Showing posts with label digi craft. Show all posts

Monday, 6 October 2014

A catch up Mash up

Hi all

I thought I would drop by today with a bit of a catch up of bits and pieces since my last visit ... hence the title 'mash up' I have been doing so well being organised with my blog posts ... even shocked myself :D but life and work got the better of me the last couple of weeks and I missed my Cyber Monday date last week so here's a little of what I have been up to ;)

At the end of September I had a day in the studio at Create and Craft with ....


The Serif 2015 calendar collection, Cottage Arts (beautiful) Masks and Art backgrounds and the Daisy Trail 2014 collection (and of course Craft Artist 2 Professional) A perfect combination for creating Christmas pressies this year whether you use photos or not, and if you're doing Christmas craft fairs .... say no more :D (Calendars and DT collection unlimited angel policy as long as you create your designs yourself and cottage arts is 200 of one design ... fill your boots I say LOL)

I managed some Me time in my studio


and even if I say so myself I LOVE my flowerpots! One of those things that I look at and am really proud of! A bit of mixed media going on here with watercolour pencils and pastels (thanks to Cat Bennett for reminding me to mix it up in Greece!)

I then created a couple of projects that I really enjoyed doing for the Scrap365 blog


Hop on over (after you finish here :)) and check out the step by steps on the blog and let your imagination go and create some of your own Mexicana .... go on the sequins are calling!! And while you're there look at the right hand side at the top and grab yourself the FREE copy of our new digital magazine .... AMAZING!!!

Then it was more show prep time! Most of the time I work in my craft studio (yes I know I'm lucky to have my own room!) But sometimes I like to sit on the sofa and watch telly while I'm creating (the beauty of digi crafting!)


Sometimes though the woofs get bored :D step 1 ... the paws on the mat and the stare


Step 2 the half body on the mat and the stare under the eyebrows


Step 3 the 'you will pay attention to me' stare


Step 4 'ok I am going to sleep on your hand so you can't move it' LOL Ollie did get his own way eventually and I took them for a walk after getting Stan out of his bed where he had retired having abandoned all hope LOL

And what was I prepping for? The amazing craftscape collection which launched on Create and Craft on 2nd October


This is a page I made live on air with Dean Wilson as my guide :D (the text is using the font Galeforce as lots of you have asked!)


And this is one of my favourites from Twilight forest .... I will share more images and a project tutorial or two soon ;) I just love the kits ,I think they are genius and I can't wait to see what you all do with them!

And finally after the very busy launch I went to Seaton Carew with the boys for a walk on the beach the next day to clear the cobwebs


and beautiful it was too! Although rain was around it was a beautiful Autumn afternoon and the beach and sky just seemed to go on forever! These moments in time are so precious aren't they?

And that's it, all caught up so far, as I said I will be preparing some project tutorials soon and I have some frequently asked questions to answer! Thanks for popping by, I hope you are well and happy and as ever, until soon,
Happy Crafting
Love
MJM x

Sunday, 28 September 2014

Hold Fast to Dreams - A Craft Artist 2 home decor project tutorial

Hi all

I've created another tutorial for you using digi kits from the Victoria Nelson collection using Craft Artist 2 professional. Remember you don't have to use the content I have or follow the design to the letter make it your own .... unleash your creativity.

This is the piece of home décor I am going to create


I created it on a 12 x 12 page set up and the finished piece is about 10 x 10. I have used the Victoria Nelson Bird Garden digi kit .... so pretty!


I added some material to my page and resized it almost to the edges, I then aligned it centrally with the vertical and horizontal buttons in the align tab bottom right, this meant that every layer would sit in exactly the right place as I aligned each one the same as I built up the design, even the circle punch that I dragged on a resized was aligned centrally every time. (If you hold the CTRL or control key down as you resize the punch it will stay perfectly circular for you!)


Before I punched the circle I added a decorative edge to the punch by going to the third tool bar while the punch was selected and from the scissor type drop down menu selected the bump edge and then increased the wavelength and amplitude values (play around with these to get the pattern you want, I always call it the smoothness and bumpiness :D) When I was happy I clicked punch on the bottom right corner and deleted the waste area.


I added two more layers of material in the same way, aligning them to the centre and adding shadows to bring the design to life.


I then started adding the pretty embellishments to build my design ....


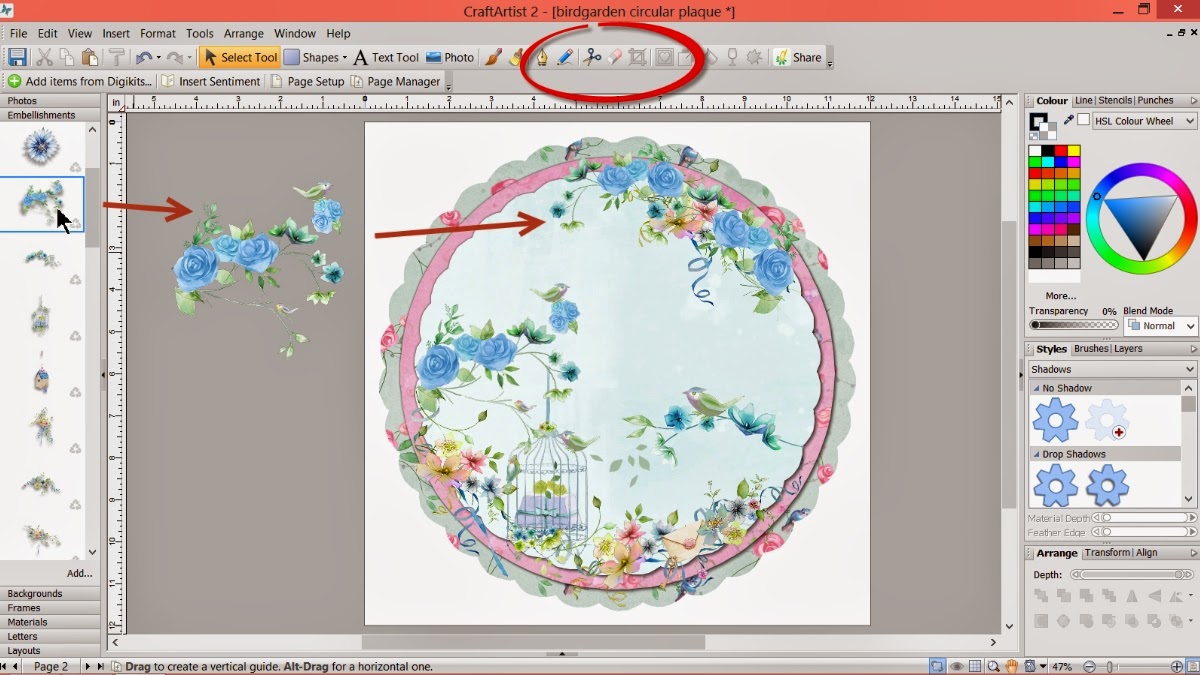
.... twisting things with the ball tool and flipping them if necessary with the tools in the arrange tab. I also erased away bits of the images if they didn't look right or over hung my design by selecting the embellishment and picking up the erase tool on the 2nd tool bar.


I added further detail with the envelope and keys embellishments after erasing away the bits I didn't want and re sizing them accordingly then adding them in place arranging them backwards via the arrange tab.


I continued to add detail to the top right of my design to balance it, again twisting etc as needed and erasing bits I didn't want ....


.... like the birds on the blue roses.


And lastly I added my quote using the text tool. Click on the A text tool button, click on your work space, choose a font and size and type then click edit points on the bottom right and push against the wrap text nodule to put the text in a line, clicking the centre button under the text tool button aligns the words accordingly. I also recoloured the lettering with the colour palette.


And that's it a pretty piece of home décor. You could just print it out and hang it on the wall, you could add it to a wooden plaque, you could print off the separate layers and hybrid it or add it into another design the choice is yours!

I hope you have enjoyed this tutorial and I thank you for popping by. I'll see you soon but maybe a little while longer than normal as I have some shows to prep for so bare with me ;) but until then, as always

Happy Crafting
Love
MJM x

Monday, 9 June 2014

A small addition, a huge upheaval .... My crafty Space!

Hi all

A couple of months ago I treated myself to this little beauty

I had a Craft Robo but have been coveting the Silhouette for a while ... got to move with the times right? Well that was my justification :D The only thing was I couldn't get it on my table to leave out and plugged in all the time (the only sure way it gets used ... you know what I mean!) so I had to have a re arrange in the studio which resulted in this

Total carnage of my front room

and dining room .... well basically the whole house! Good job hubs was away!

What seemed like such a small job seemed to take forever but with no where to sit I had to complete it once I'd started!

And suddenly the new look studio took shape!

And I seem to gain so much more space!

I love my room now, it feels so nice to work in it .... and I've even managed to keep it tidy (ish) since
though I do have a pile of 'stuff' to go in the storage room upstairs squirreled away at the moment until I know the pesky mouse visitor has vacated the area so I can get round to that job (I actually think the mouse family has left but it's a good excuse not to do more sorting and tidying .... shhhh don't tell anyone ;))

And there is the little beauty that caused all the trouble sitting on the table in technology corner! I haven't had a huge amount of time to play with it but I love it and it is the perfect partner to go alongside my Serif digi crafting ... and yes for all you serifers I will get round to posting a quick tutorial on my version of how I use them together, and it is super easy .... well it has to be, it's me :D

So that's my room and a little slice in a day in my life! Thanks for popping by, I hope you're well and happy. I will be back soon but until then, as ever
Happy Crafting
Love
MJM x

Saturday, 31 May 2014

MJM's FAQ - Importing PDFs into CraftArtist 2 Professional

Hi All

I'm back with part two of the importing files into your CraftArtist 2 Professional tutorial (from now on known as CAP) This time we will look at PDFs (Click here if you missed part one)

There are 3 types of files that can be converted, all easy!

1. An ordinary PDF generated say for a magazine page or a scan that’s been turned into a PDF or sometimes free instruction sheets that are found on the internet can be pulled apart very easily.

 From the start up wizard click open at the bottom of the middle column

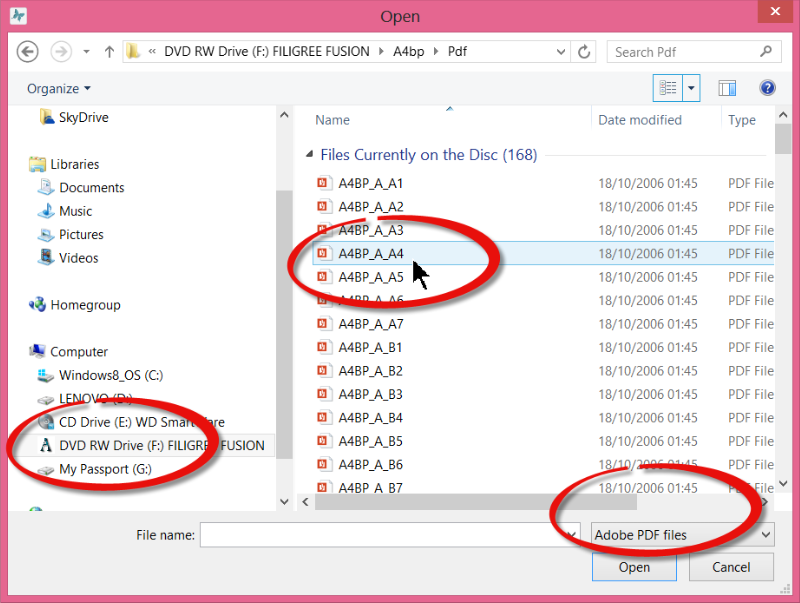
When the pop out box appears go to the drop down menu on the bottom right and select PDF files (this box defaults to search for Craft Artist projects) Now you will be able to search your computer files and folders for all the PDF files you have. Select the file you want and click open

this will now import the file into a new work space.

You will now be able to select the different elements of the document and literally pull it apart.

And save elements to your own digi kit (subject to copyright of the material of course!)
 
To create your own digi kit use the digikit creator found in the tools drop down menu, further instructions for this can be found in part one of this post (click here)
 
2. A PDF from a craft CD. These behave slightly differently

As in the first example From the start up wizard click open at the bottom of the middle column, when the pop out box appears go to the drop down menu on the bottom right and select PDF files (this box defaults to search for Craft Artist projects)

Now search your computer for the craft CD location which will be in your DVD drive and should have its name showing. Click to open and then search for the folder(s) that hold the images. (These folders can be called different things and also can be sub folders in other folders all CDs vary so search around for them) Open these when you have found them and then click on the PDF you want to add to your workspace.
Select the file you want and click open, this will now import the file into a new project.

A lot of craft PDF pages have multiple images on them and we want to get to the individual images so we need to do a little extra work.
When the ‘page’ is added to your work space we want to be able to cut out the images so for this we use the cut out studio while the whole page is selected.

If the images are on a white background you can work with a large brush size and 100% grow tolerance and simply drag the brush into the page and you will see a dotted line appear around the images, the background is now cut away. If the images are on a patterned background you may find a smaller brush size easier and the reduction of the grow tolerance – I liken this to fingers that reach out and grab like for like colours to cut away so a smaller grow tolerance means a smaller grab and also click drag and release the brush a little at a time so it doesn’t grab too much at one time, play around with the settings for each individual project and you’ll get the hang of it in no time ;) Once you are happy with the cut out click ok and the images return to your workspace

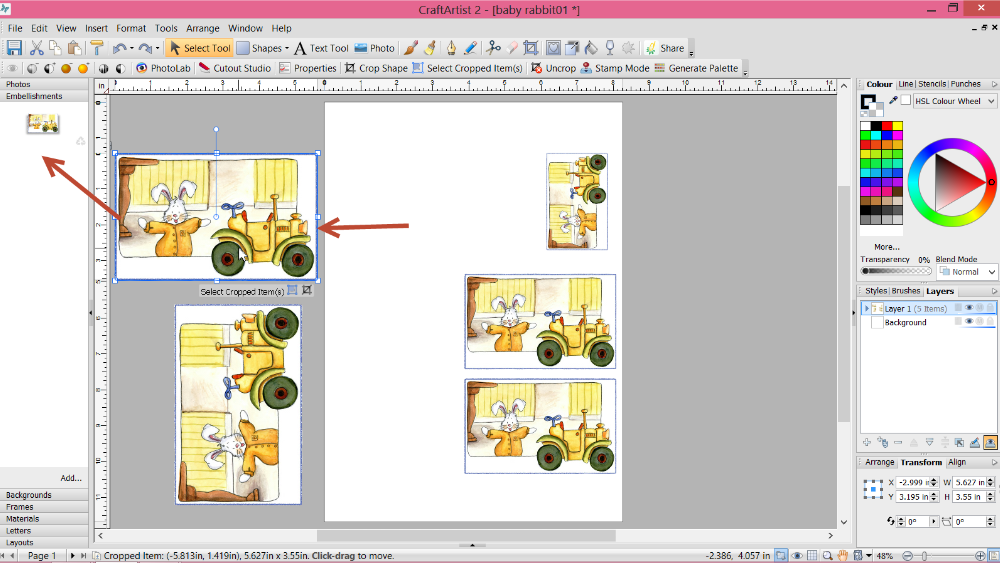
You will find that the images are still joined. This is simply solved by making sure the images are selected with the blue box around them and then go to the scissor tool

Drag this a little way into the blue box on an empty space (avoiding cutting into images) Unlike usual when you have to cut from outside an object to outside an object to cut it you only need to make a small ‘snip’ in this instance
Click select to de activate the scissors then click on the grey area around the work space to de select the image and now when you click on one of the images you should find that they are all separated. These again can then be saved in the relevant sections of your kit and saved using the digikit creator (again see part one of this tutorial by clicking here)

3. The final PDF type is again from a craft CD and it just involves an extra step!

Import your PDF as above (start up wizard then open then select PDF files etc)


When you run your cursor over the images you will see that it is shredded into bands.


Draw an imaginary box around one of the images to select it and click group at the bottom right corner


then go to Tools on the very top tool bar and from the drop down menu select convert to picture

Accept the default settings in the pop out box and your image will be converted into a picture file on the work space and you will now see the cut out studio button on the tool bar is available which was not there before.

Now proceed as above (cut out image then click ok)

 
and now you have a complete image to use and save as you wish!
 
I hope all that makes sense and de mystifies importing PDFs into your CAP to work with! (part one involving CD images is here if you missed it)
 
At this point I have to say please use your common sense and adhere to any copyright and angel policies linked to the images you intend to use. They all still stand as stated by each company even though CAP enables you to use them in different ways, it is just a tool and content remains the property of each individual designer but I know you all know that anyway ;)
 
Well that's all from me for this tutorial, I will put some more together soon ;) Thanks for popping by I hope you are well and happy and as ever, until soon
Happy Crafting
Love
MJM x

Thursday, 29 May 2014

MJM's FAQ - Importing CD images into CraftArtist2 Professional

Hi All

From doing the shows on Create and Craft TV I get asked a lot of questions about CraftArtist2 Professional and some pop up quite frequently so I thought it was about time I did some posts with answers to those questions in the form of some picture tutorials :)

So first up is how to import images from Craft CDs and image CDs into CraftArtist2 Professional. This tutorial will be in two parts, this first one addressing the importing of image files and the 2nd will address importing PDFs. I will also refer to CraftArtist2 Professional as CAP from now on it's just quicker ;)

Importing any file images (jpeg, png, bitmap etc) from a craft CD or an image CD is super easy with CAP. Some craft CD’s that hold images have a user interface that opens when the CD is loaded, we don’t need this as we just want to access the image files so close down the interface once it has loaded.


Next from CAP we go to the photo tab on the left and at the bottom of this section click add, this takes you to all the files and folders on your computer and where you would normally add your own photos and scans but this time we need to search for the CD location

It will be in your DVD drive and should have its name showing.
 
Click to open and then search for the folder(s) that hold the images. (These folders can be called different things and also can be sub folders in other folders all CDs vary so search around for them) In this instance its not in the images file but found in a file I wouldn't expect!
 
Open these when you have found them and make it easier on yourself by changing the view of the files to large icons!
 
and then click on the images you want to add to your workspace (holding the Ctrl key down while selecting allows you to add multiple images at once)

Now you can work with the images in CAP as you wish and even build your own digi kits by dragging and dropping them into the relevant tabs
 
and then saving your digi kit at the end of your work time. Go to Tools then digikit creator
 
Open the relevant section to check your images are in place then click save digikit
 
This will probably take you to your My Digikit folder in Documents. Name your kit and click Save.
 
So that’s importing just basic image files. Some CD’s, however, have multiple images on a page and we want to get to the individual images so we need to do a little extra work.

 
When the ‘page’ is added to your work space we want to be able to cut out the images so for this we use the cut out studio

If the images are on a white background you can work with a large brush size and 100% grow tolerance.

Simply drag the brush into the page

and you will see a dotted line appear around the images, the background is now cut away. If the images are on a patterned background you may find a smaller brush size easier and the reduction of the grow tolerance – I liken this to fingers that reach out and grab like for like colours to cut away so a smaller grow tolerance means a smaller grab and also click drag and release the brush a little at a time so it doesn’t grab too much at once, play around with the settings for each individual project and you’ll get the hang of it in no time ;)

Once you are happy with the cut out click ok and the images return to your workspace but you will find they are still joined.

This is simply solved by making sure the images are selected with the blue box around them and then go to the scissor tool

drag this a little way into the blue box on an empty space (avoiding cutting into images) Unlike usual when you have to cut from outside an object to outside an object to cut it you only need to make a small ‘snip’ in this instance

Click select to de activate the scissors and then click outside the blue box of the images to de select them all and now when you click back on an individual image you will find that it has been separated from all the others!

Again dragging them into the relevant tab e.g. embellishments allows you to save all your hard work in your own digi kit!

 
As before go to Tools then Digikit Creator. Open the relevant sections to check your images are there and click save digikit. (You must make sure that the digikit you want to save into is added into your workspace already so I have already got my crafty CD kit loaded in when I go to save this part of the kit)
 
This time instead of naming a new kit click on the name of the existing kit that we just made (crafty CD kit)
 
Click yes when this box pops up and it will overwrite the existing kit adding the new bits (NB: this is providing this kit is loaded into your workspace!)
 
When its all saved click done
 
And if you look in your Digikit browser you will find your newly created kit!
 
I hope all that makes sense and de mystifies importing CD images into your CAP to work with!
 
At this point I have to say please use your common sense and adhere to any copyright and angel policies linked to the images you intend to use. They all still stand as stated by each company even though CAP enables you to use them in different ways, it is just a tool and content remains the property of each individual designer but I know you all know that anyway ;)
 
Well I will toddle off now and leave you in peace, I will post part 2 of this tutorial talking about importing PDFs in a day or so. I hope you are well and happy, thanks for popping by and as ever, until soon
Happy Crafting
Love
MJM x