Showing posts with label purple cows 2 in 1 combo trimmer. Show all posts

Thursday, 9 December 2010

Purple festivities

Hi all

I hope you're all keeping warm and safe! This weather is bonkers isn't it? Luckily I haven't had the snow but I know family and friends who are so over the white stuff .... thinking of you all!

I thought I'd share some colourful festive pieces with you tobrighten yur day with the main colour being purple of course ... purple for Purple cows and today I have some projects to share over there ...


.... as always I got very carried away with my freestyle mouse and 2 in 1 combo trimmer LOL and don't forget you can downlaod the PDF instructions for FREE from Sadie so why not mosey on over and have a look :)and don't tell Sadie I told you as I'm sworn to secrecy but there are some amazing new products coming out next year .... I can't wait for you to see them!

Right I'm off to light the fire, put on a few more layers of clothing and write some Christmas cards, thanks for hopping by, stay safe and warm and as ever until soon happy crafting!
Love
M x

Saturday, 4 September 2010

A Christmassy colour focus

Hi all,
Well it's colour focus time again over at the Lilly pad with Banana Frog, I can't believe that means another month has gone ... this year is going fast isn't it .... or is it just me? Anyhoo hop on over to the Lillypad to see a pic of our colour focus inspiration and check out the other talented froglets interpretation of it then hop back here and I'll share more step by step piccies of my project ... see you in a mo :)

..... Oh good your back, Some lovely stuff there isn't there! Ok so as promised here's my project in a little more detail ...


I'm really loving all the new Christmassy Frog stamp sets and feel I maybe having a seasonal month with my Lilly pad lesson coming up and my Project of the day later in the month .... well tis only 3 months away eek! So let's get started on those Christmas cards!


The ingredients for the reindeer card are the Banana Frog it's Christmas deer stamp set, Big and Juicy waterfall ink pad, a speedball brayer (my new toy :)) some silk art card, black card, white stayz on, perfect medium clear ink, blonde moments black embossing powder, some rbbon and a bit of bling.


1st up I taped a piece of silk art card to some scrap paper (I taped it to a 5'' square size) and then cut a mask from a post it note to add as a moon.


I took my brayer to my ink pad and picked ink up from the dark blue side towards the middle. The big tip when making a graded effect is to take the hard edge off the inside edge of the brayer by spinning it on some scrap paper to take the ink off the end of the roller. I went across the square at a diagonal ...


...then spun the card round to repeat the same thing on the other corner until the ink met in the middle.


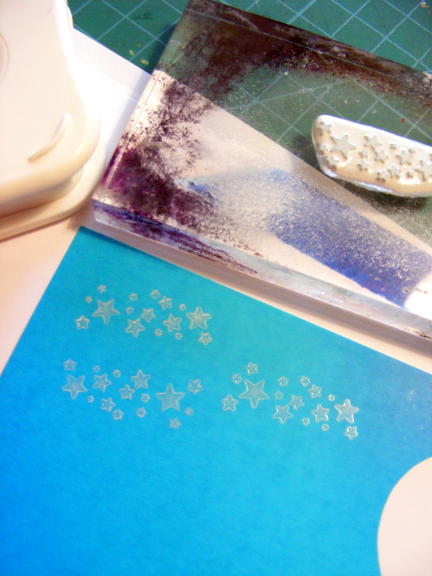
I trimmed the silk art card down to it's 5'' square and then removed the moon mask and added some of the oh so cute tiny stars from the stamp set using white stayz on.


I stamped the deer image with some clear perfect medium and embossed it in black to create a strong focal point. I also made sure the antler overlapped the moon to create a bit of drama to the scene and tie the image together.


Using a bit of offcut from the silk art card that had been coloured when I was brayering, I stamped a sentiment from the stamp set with the prefect medium and embossed this. I cut it down and mounted it onto some white card with a decorative edge courtesy of my Purple cows trimmer.


I made a large white mat with a decorative edge, added a ribbon to the blue square and built up the pieces on foam pads for dimension. The finishing touch was a little bit of bling .... well it is Christmas :)

Moving onto the yellow and red I picked out from the colour focus inspiration..


This time the ingredients are the same as above but this time I used the Banana Frog Christmas Elegance stamp set and Big and Juicy mountain meadow ink pad.


This time I picked up ink from the yellow end of the ink pad towards the centre (again spinning off the hard edge of the yellow ink at the end of the brayer) And I made a vertical coating of ink.


Again I flipped the card round and repeated the process to colour the other half of the card.


I ripped down the edges of the card (towards me) to reveal the white core and then stamped a line of the baubles from the stamp set down it. I love the Merry Christmas sentiment in the set, simple and stylish! I then added some of the small snowflakes into the gaps using black archival ink.


I brayered a smaller square of silk art card with the yellow and red colours again the same way I did the blue square above. I then stamped the other bauble from the stamp set with perfect medium and embossed it in black.


Cutting the embossed bauble out I added it to the centre of the strip on a foam pad to create a focal point for my card.

And that's it! some Froggy Christmassy fun. I love the simple graphic look of Banana Frog stamps and I like the fact that they allow me to create simple, contemporary, stylish cards.....among other things like my Christmas table lights and the goodies I'm cooking up for 2 more Frog blog posts this month .... watch this space :)

Thanks for popping by, I hope you feel inspired to create and I'll see you soon. Until then Happy crafting!

Love
M x

Friday, 3 September 2010

Sharing some purpleness

Hi all

Just dropping by to share some of my recent Purple Cows creations using the fabulous 2 in 1 combo trimmer, the Freestyle mouse and the Hot and cold laminator! Both of these projects .... and in fact ALL the projects the cowgirls design can be seen over at the pasture and from there you can download the projects for FREE!!! So if you're looking for some creative inspiration pop on over and download those projects till your hearts content!!

Today I'd like to share this project with you


Birthday decorations (as seen on tv ... LOL)


The cake, cake stand is made from Bazzill cardstock and Cosmo Cricket DeLovely crafting kit using the 2 in 1 combo trimmer.


The bunting is made from Bazzill cardstock and Anna Griffin papers using the 2 in 1 combo trimmer and the Hot/cold laminator (and some flowers from my garden :))


and finally the laminated light holders are made from tissue paper, clear snaps glitter aswell as petaloo flowers using the hot/cold laminator like these here.

and my next project is my shakey page


Lots of alcohol ink and the Hot/cold laminator for this one aswell as the freestyle mouse kit.

The shakey bits inside and the seaweed and fish embellies are cut from the laminated alcohol ink sheets.

And that's it for today, a little bit of purpleness on this lovely sunny Friday. If you want to see more or are wondering where to get the tools I'll be on Create and Craft TV on Thursday the 9th of September at 8am (if that's too early check the schedule for the repeat shows :))

Thanks for stopping by, I hope you're all well and happy and until soon Happy Crafting!

Love
M x

Friday, 6 August 2010

Designer Friday at the Ranch!

Hi all! I'm here to share some purple goodness with you on this lovely day as it's my turn on Designer Friday over at Purple Cows

As some of you may know I've recently been proud and honoured to have been presenting Purple Cows tools on create and craft TV. I've been busy beavering away making samples for these shows and one of my fave raves at the moment are these..


Laminated bags! Oh they are so super easy with the Purple Cows Hot/Cold laminator and my trusty Purple Cows 2 in 1 trimmer!


Of course the beauty of the Purple Cows Hot pockets that go alongside the laminator is that they come in all the crafting sizes and the 12 x 12 Hot pockets are perfect for using your scrapbook papers in a different way! These DeLovely Cosmo Cricket papers are just that and I think they deserve to be shown off, what better way than as a bag! The pockets on the front are made from the 6'' x 4'' Kool pockets, super strong (held on there with Helmars glue!) and the perfect size for my bag (they also enabled me to get more of that paper on display :))

The front and back are 12 x 12 hot pockets, filled with the paper and the side and base are 3 3''x 12'' strips of paper put into 2 12 x 12 hot pockets and then trimmed into strips with the fabulous Purple cows guillotine. The whole thing is then put together with eyelets (I used a crop-a-dile), a bit of ribbon attached for the handles and then you're good to go! The lamination with the Purple Cows laminator and Hot pockets is super strong and believe me these bags are sturdy!

So then I was playing with some digi scrapping ....


How cool! a completely unique beach bag with my own photo on it!!


and then go small with the 8 x 8 Hot pockets and an 8'' x 8'' digi scrap page. Don't you think these would make great gift bags??

So why not see what you can create with your Purple Cows laminator and Hot pockets, think outside the box, get those papers out of the album and create some purple gorgeousness of your very own :)

Thanks for stopping by , pop back often to the pasture to be inspired by the oh so talented cow girls and don't forget that all the projects generated by the girls are available as FREE PDF downloads, just follow the links to scribd. If you're stuck for inspiration let us help you out!!

I'll see you soon, until then Happy Crafting!
Love
M x