How lovely are your suprises!
Hi folks
Well it's been a busy few days with life and putting together one of my DIY projects so you can create this ....
A Christmas tree surprise ..... what's the surprise?
it opens up to reveal a decorated Christmas tree complete with fairy lights and space to add your own special Christmas memories.
The project is available on line in my website shop at www.mjm-thearttart.com
But what is a DIY project I hear you cry. I created the idea of DIY projects a few years ago as a way of sharing a kind of workshop with you, I provide all the templates you need and full step by step instructions with oodles of photographs on the way and you use your own stash, that way you make the project in the colours and patterns you want without me inflicting my choices on you, after all we all have different tastes and what a dull world it would be if we didn't! And this DIY project goes a step further as I have added a new digi craft set of instructions for those of you that would like to create the project digitally with Serif Craft Artist 2 professional like this one
and again this set of instructions has a full step by step tutorial with lots of screen shots of me working on the programme.
Then you complete the project with the relevant steps from the paper craft instructions.
So fancy having a go and creating a very unique Christmas decoration full of memories that will take pride of place and return year after year? It would make a great Christmas present especially for a first Christmas for a baby or even a newly married couple, the beauty is you can make it however you want for whoever you want and as you have the templates you can make it again and again (and for those of you wondering if you can sell what you make then yes you can ;))
The project will be emailed to you in a zipped file so no postage, it will contain 3 PDF's a set of templates, a set of paper craft instructions (21 pages of instruction and full colour photo step by steps) and a set of digi craft instructions (42 pages of instruction and full colour screen shot photo step by steps) and it costs just £5.00. Whether you're a new crafter or a seasoned crafter you will love this project, it's easy and it's unique! Find it in my shop www.mjm-thearttart.com
Right folks I have to dash, hubs is home for a couple of days from panto and is waiting for a Sunday roast!!! I will be back soon, I hope you're well and happy.
as ever Happy Crafting
Love
MJM x
Showing posts with label christmas. Show all posts
Sunday, 1 December 2013
Sunday, 4 December 2011
A Black & wite Froggy Christmas
Hi all
Time to deliver a project of the day over at the Lily pad again. Some super simple but stylish black and white Christmas cards

As ever a more detailed post can be found on the Banana Frog blog.
Well it’s time for this froglet to hop off the lily pad I’m afraid. After much soul searching and juggling of time I have decided with great sadness after 2 ad 1/2 years it is time for me to step down from the Banana Frog DT and have said my fond farewells over at the Lilypad today.
Thanks for stopping by and hopping over to the Lily pad, I hope you're well and happy and until soon Happy Crafting
Love
M x
Time to deliver a project of the day over at the Lily pad again. Some super simple but stylish black and white Christmas cards
As ever a more detailed post can be found on the Banana Frog blog.
Well it’s time for this froglet to hop off the lily pad I’m afraid. After much soul searching and juggling of time I have decided with great sadness after 2 ad 1/2 years it is time for me to step down from the Banana Frog DT and have said my fond farewells over at the Lilypad today.
Thanks for stopping by and hopping over to the Lily pad, I hope you're well and happy and until soon Happy Crafting
Love
M x
Labels:
Banana frog,
card making,
cards,
christmas,
stamp techniques,
stamping,
stamps,
stickles
Monday, 20 December 2010
Festive Glitzy fun
Hi all, with the festive season upon us I thought I would share some fun and festive glitziness with you;

Happy Christmas
I love creating collages and paper dolls, my Christmas card last year was a print from a paper doll collage I made so I thought I’d do the same again this year, especially with all the gorgeous Glitz colours to play with. These collage projects are great for using up all the scraps we all keep and I have used a veritable feast of Glitzyness in this project so with a deep breath here is my shopping list;
Glitz Designs Love Nest papers; stripe, floral, polka and sky
Glitz Designs Scarlett papers; polka and stripe
Glitz Designs Hoopla papers; floral and polka
Glitz Designs Hoopla GlitzersGlitz Designs Hoopla cardstock stickers; titles
Glitz Designs frosting; pink/clear
Glitz Designs Glitzers; circles
Glitz Designs Teeny Alphas; Red block

Phew! I have scrapped this page in A4 UK size (which is about 8 ¼’’ x 11 ¾’’) I sketched out my scene and then pieced my papers together to create a background on the Love Nest stripe base. Using a decorative cutter on different green papers I cut strips for my tree layers and used the bunting from the hoopla cardstock titles in the top corner, I cut the strip to allow me to ‘curve’ the bunting on the page.

I then decorated the tree with the circle glitzers (I love Glitzer stickers, with a clear base you can see through and bling encapsulated in them they are so easy to use!) I also added some pink frosting for extra sparkle.

I made some parcels, stacking them up and adding contrasting ribbons, inking all the edges to add definition.

I then made my paperdolls using white card and coloured them in with pencils and making clothes from my selection of Glitz papers, inking edges to create shape. I printed head shots of me and my husband to go on the dolls.

After dressing the dolls I added them to my page on foam pads for extra dimension.

I added further decoration to my scene with Glitz frosting gems on the shoes and the hats, a star for the tree and the balloons from the Hoopla Glitzers.

Of course a family scene wouldn’t be complete without Stan and Ollie so I printed out a small photo of the dogs, cut them out and made antlers for them. I added my title using the teeny alphas and sat the boys on top of the letters.

With a bit of extra bling here and there and final touches my fun festive scene was complete, well it makes me smile!

I will scan my page and create prints for the front of my card blanks and send out some festive Glitzy fun to my family and friends for Christmas. What will you create today that will put a Glitzy smile on your face? Whatever it is I would like to take this opportunity to wish you all a very happy and safe Christmas and may all your festive wishes come true. I’ll see you soon and until then, as ever, Happy Crafting
Love
M x
Happy Christmas
I love creating collages and paper dolls, my Christmas card last year was a print from a paper doll collage I made so I thought I’d do the same again this year, especially with all the gorgeous Glitz colours to play with. These collage projects are great for using up all the scraps we all keep and I have used a veritable feast of Glitzyness in this project so with a deep breath here is my shopping list;
Glitz Designs Love Nest papers; stripe, floral, polka and sky
Glitz Designs Scarlett papers; polka and stripe
Glitz Designs Hoopla papers; floral and polka
Glitz Designs Hoopla GlitzersGlitz Designs Hoopla cardstock stickers; titles
Glitz Designs frosting; pink/clear
Glitz Designs Glitzers; circles
Glitz Designs Teeny Alphas; Red block
Phew! I have scrapped this page in A4 UK size (which is about 8 ¼’’ x 11 ¾’’) I sketched out my scene and then pieced my papers together to create a background on the Love Nest stripe base. Using a decorative cutter on different green papers I cut strips for my tree layers and used the bunting from the hoopla cardstock titles in the top corner, I cut the strip to allow me to ‘curve’ the bunting on the page.
I then decorated the tree with the circle glitzers (I love Glitzer stickers, with a clear base you can see through and bling encapsulated in them they are so easy to use!) I also added some pink frosting for extra sparkle.
I made some parcels, stacking them up and adding contrasting ribbons, inking all the edges to add definition.
I then made my paperdolls using white card and coloured them in with pencils and making clothes from my selection of Glitz papers, inking edges to create shape. I printed head shots of me and my husband to go on the dolls.
After dressing the dolls I added them to my page on foam pads for extra dimension.
I added further decoration to my scene with Glitz frosting gems on the shoes and the hats, a star for the tree and the balloons from the Hoopla Glitzers.
Of course a family scene wouldn’t be complete without Stan and Ollie so I printed out a small photo of the dogs, cut them out and made antlers for them. I added my title using the teeny alphas and sat the boys on top of the letters.
With a bit of extra bling here and there and final touches my fun festive scene was complete, well it makes me smile!
I will scan my page and create prints for the front of my card blanks and send out some festive Glitzy fun to my family and friends for Christmas. What will you create today that will put a Glitzy smile on your face? Whatever it is I would like to take this opportunity to wish you all a very happy and safe Christmas and may all your festive wishes come true. I’ll see you soon and until then, as ever, Happy Crafting
Love
M x
Labels:
christmas,
christmas craft,
collage,
Glitz designs,
hoopla,
love nest,
paper dolls,
paper piecing,
scarlett,
scrapbook,
scrapbooking
Thursday, 9 December 2010
Purple festivities
Hi all
I hope you're all keeping warm and safe! This weather is bonkers isn't it? Luckily I haven't had the snow but I know family and friends who are so over the white stuff .... thinking of you all!
I thought I'd share some colourful festive pieces with you tobrighten yur day with the main colour being purple of course ... purple for Purple cows and today I have some projects to share over there ...

.... as always I got very carried away with my freestyle mouse and 2 in 1 combo trimmer LOL and don't forget you can downlaod the PDF instructions for FREE from Sadie so why not mosey on over and have a look :)and don't tell Sadie I told you as I'm sworn to secrecy but there are some amazing new products coming out next year .... I can't wait for you to see them!
Right I'm off to light the fire, put on a few more layers of clothing and write some Christmas cards, thanks for hopping by, stay safe and warm and as ever until soon happy crafting!
Love
M x
I hope you're all keeping warm and safe! This weather is bonkers isn't it? Luckily I haven't had the snow but I know family and friends who are so over the white stuff .... thinking of you all!
I thought I'd share some colourful festive pieces with you tobrighten yur day with the main colour being purple of course ... purple for Purple cows and today I have some projects to share over there ...
.... as always I got very carried away with my freestyle mouse and 2 in 1 combo trimmer LOL and don't forget you can downlaod the PDF instructions for FREE from Sadie so why not mosey on over and have a look :)and don't tell Sadie I told you as I'm sworn to secrecy but there are some amazing new products coming out next year .... I can't wait for you to see them!
Right I'm off to light the fire, put on a few more layers of clothing and write some Christmas cards, thanks for hopping by, stay safe and warm and as ever until soon happy crafting!
Love
M x
Thursday, 25 November 2010
Project on the Lily pad
Hi all
Here's the second installment of my Banana Frog triple, today it is my turn to share a project of the day

I have expanded on my trick or treat bag from last month and gone all festive with some fab Christmas stamps (Retro baubles on sale now for just over £3, and loads of other goodies at crazy prices, it would be rude not to shop!) As ever hop on over to the Lily pad for the full blown step by step instructions to create some festive treat bags for yourself!
Ok I am hopping off myself to get my lesson at the Lilypad ready for tomorrow, class starts at 9am ... don't be late :)
As always I hope you're well and happy and until tomorrow Happy Crafting!
Love
M x
Here's the second installment of my Banana Frog triple, today it is my turn to share a project of the day
I have expanded on my trick or treat bag from last month and gone all festive with some fab Christmas stamps (Retro baubles on sale now for just over £3, and loads of other goodies at crazy prices, it would be rude not to shop!) As ever hop on over to the Lily pad for the full blown step by step instructions to create some festive treat bags for yourself!
Ok I am hopping off myself to get my lesson at the Lilypad ready for tomorrow, class starts at 9am ... don't be late :)
As always I hope you're well and happy and until tomorrow Happy Crafting!
Love
M x
Labels:
Banana frog,
christmas,
christmas craft,
gift bags,
stamping,
stamps
Saturday, 16 October 2010
Do not open until December 25th
Hi all
It's my turn to share over at It's a Creative World today and I thought I would bring out an oldie but goodie, well it only gets out once a year LOL
Here it is


An interactive memory advent calender that will fit in with your Christmas decs and if you'd like to know more, like how I did the text transfer or stretched the paper to paint, pop on over to IACW and read my far more detailed post over there as well as getting Christmas inspired by some of the other creative girls on your visit .... well it would be rude not to :)
Now while I'm here I want to ask ... how are you? It has been an age since I sat and wrote a real life blog, it was way back at the end of July so I must rectify this soon, if for no other reason than to share some pics of my woofs, they are well and bonkers as normal!! Life just seems to be going so quickly doesn't it! I know the battle cry as we get older is time goes fast but oh boy! this year them upstairs certainly have ther fingers pressed on that super fast forward button don't they!
And while I find myself chatting can I just say a huge thankyou for all the lovely messages I've had in various cyber places I frequent about the Serif POW shows on Create and craft, I do really appreciate you all taking the time out to find me and leave me some love :)
Ok rambling now, I'll save up the rest for a real life post ... very soon I promise!
I hope you're all well and happy, until soon Happy Crafting!
Love
M x
PS do you remember I mentioned retreats a couple of days ago? Well I've just been officially announced for the Scrap-A-Mia retreat in May, check out the side bar for details .... I am so honoured to be with such an AMAZING line up of teachers (if not a little nervous LOL)
It's my turn to share over at It's a Creative World today and I thought I would bring out an oldie but goodie, well it only gets out once a year LOL
Here it is
An interactive memory advent calender that will fit in with your Christmas decs and if you'd like to know more, like how I did the text transfer or stretched the paper to paint, pop on over to IACW and read my far more detailed post over there as well as getting Christmas inspired by some of the other creative girls on your visit .... well it would be rude not to :)
Now while I'm here I want to ask ... how are you? It has been an age since I sat and wrote a real life blog, it was way back at the end of July so I must rectify this soon, if for no other reason than to share some pics of my woofs, they are well and bonkers as normal!! Life just seems to be going so quickly doesn't it! I know the battle cry as we get older is time goes fast but oh boy! this year them upstairs certainly have ther fingers pressed on that super fast forward button don't they!
And while I find myself chatting can I just say a huge thankyou for all the lovely messages I've had in various cyber places I frequent about the Serif POW shows on Create and craft, I do really appreciate you all taking the time out to find me and leave me some love :)
Ok rambling now, I'll save up the rest for a real life post ... very soon I promise!
I hope you're all well and happy, until soon Happy Crafting!
Love
M x
PS do you remember I mentioned retreats a couple of days ago? Well I've just been officially announced for the Scrap-A-Mia retreat in May, check out the side bar for details .... I am so honoured to be with such an AMAZING line up of teachers (if not a little nervous LOL)
Monday, 13 September 2010
Lilypad lesson
Hi all
Today I have a rather festive, edible, stamping treat posted on the Banana Frog blog for my Lilypad lesson ... want to see? ... ok here it is...

A quite spectacular Christmas cake fit to grace any festive table!
I know it's only September but Christmas has a way of sneaking up doesn't it? so I feel it's never to early to start those seasonal plans and with the new Christmas Banana Frog stamp releases I couldn't resist getting into the festive spirit! In fact it's been somewhat a festive month for my posts at the Lilypad and I have another to share on the 25th to complete it!

I have used one of my favourite stamping techniques for the decorations ... triple embossing

and if you'd like to see the full step by step project hop on over to the lilypad and check out my post :)
Thanks for stopping by, I hope you're all well and happy andI'll be back soon, until then Happy Crafting
Love
M x
Today I have a rather festive, edible, stamping treat posted on the Banana Frog blog for my Lilypad lesson ... want to see? ... ok here it is...
A quite spectacular Christmas cake fit to grace any festive table!
I know it's only September but Christmas has a way of sneaking up doesn't it? so I feel it's never to early to start those seasonal plans and with the new Christmas Banana Frog stamp releases I couldn't resist getting into the festive spirit! In fact it's been somewhat a festive month for my posts at the Lilypad and I have another to share on the 25th to complete it!
I have used one of my favourite stamping techniques for the decorations ... triple embossing
and if you'd like to see the full step by step project hop on over to the lilypad and check out my post :)
Thanks for stopping by, I hope you're all well and happy andI'll be back soon, until then Happy Crafting
Love
M x
Saturday, 4 September 2010
A Christmassy colour focus
Hi all,
Well it's colour focus time again over at the Lilly pad with Banana Frog, I can't believe that means another month has gone ... this year is going fast isn't it .... or is it just me? Anyhoo hop on over to the Lillypad to see a pic of our colour focus inspiration and check out the other talented froglets interpretation of it then hop back here and I'll share more step by step piccies of my project ... see you in a mo :)
..... Oh good your back, Some lovely stuff there isn't there! Ok so as promised here's my project in a little more detail ...

I'm really loving all the new Christmassy Frog stamp sets and feel I maybe having a seasonal month with my Lilly pad lesson coming up and my Project of the day later in the month .... well tis only 3 months away eek! So let's get started on those Christmas cards!

The ingredients for the reindeer card are the Banana Frog it's Christmas deer stamp set, Big and Juicy waterfall ink pad, a speedball brayer (my new toy :)) some silk art card, black card, white stayz on, perfect medium clear ink, blonde moments black embossing powder, some rbbon and a bit of bling.

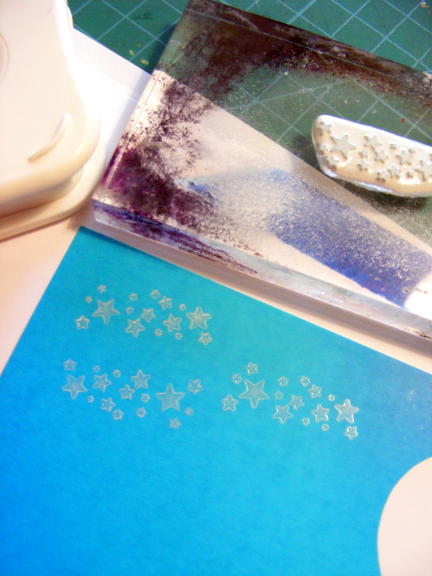
1st up I taped a piece of silk art card to some scrap paper (I taped it to a 5'' square size) and then cut a mask from a post it note to add as a moon.

I took my brayer to my ink pad and picked ink up from the dark blue side towards the middle. The big tip when making a graded effect is to take the hard edge off the inside edge of the brayer by spinning it on some scrap paper to take the ink off the end of the roller. I went across the square at a diagonal ...

...then spun the card round to repeat the same thing on the other corner until the ink met in the middle.

I trimmed the silk art card down to it's 5'' square and then removed the moon mask and added some of the oh so cute tiny stars from the stamp set using white stayz on.

I stamped the deer image with some clear perfect medium and embossed it in black to create a strong focal point. I also made sure the antler overlapped the moon to create a bit of drama to the scene and tie the image together.

Using a bit of offcut from the silk art card that had been coloured when I was brayering, I stamped a sentiment from the stamp set with the prefect medium and embossed this. I cut it down and mounted it onto some white card with a decorative edge courtesy of my Purple cows trimmer.

I made a large white mat with a decorative edge, added a ribbon to the blue square and built up the pieces on foam pads for dimension. The finishing touch was a little bit of bling .... well it is Christmas :)
Moving onto the yellow and red I picked out from the colour focus inspiration..

This time the ingredients are the same as above but this time I used the Banana Frog Christmas Elegance stamp set and Big and Juicy mountain meadow ink pad.

This time I picked up ink from the yellow end of the ink pad towards the centre (again spinning off the hard edge of the yellow ink at the end of the brayer) And I made a vertical coating of ink.

Again I flipped the card round and repeated the process to colour the other half of the card.

I ripped down the edges of the card (towards me) to reveal the white core and then stamped a line of the baubles from the stamp set down it. I love the Merry Christmas sentiment in the set, simple and stylish! I then added some of the small snowflakes into the gaps using black archival ink.

I brayered a smaller square of silk art card with the yellow and red colours again the same way I did the blue square above. I then stamped the other bauble from the stamp set with perfect medium and embossed it in black.

Cutting the embossed bauble out I added it to the centre of the strip on a foam pad to create a focal point for my card.
And that's it! some Froggy Christmassy fun. I love the simple graphic look of Banana Frog stamps and I like the fact that they allow me to create simple, contemporary, stylish cards.....among other things like my Christmas table lights and the goodies I'm cooking up for 2 more Frog blog posts this month .... watch this space :)
Thanks for popping by, I hope you feel inspired to create and I'll see you soon. Until then Happy crafting!
Love
M x
Well it's colour focus time again over at the Lilly pad with Banana Frog, I can't believe that means another month has gone ... this year is going fast isn't it .... or is it just me? Anyhoo hop on over to the Lillypad to see a pic of our colour focus inspiration and check out the other talented froglets interpretation of it then hop back here and I'll share more step by step piccies of my project ... see you in a mo :)
..... Oh good your back, Some lovely stuff there isn't there! Ok so as promised here's my project in a little more detail ...
I'm really loving all the new Christmassy Frog stamp sets and feel I maybe having a seasonal month with my Lilly pad lesson coming up and my Project of the day later in the month .... well tis only 3 months away eek! So let's get started on those Christmas cards!
The ingredients for the reindeer card are the Banana Frog it's Christmas deer stamp set, Big and Juicy waterfall ink pad, a speedball brayer (my new toy :)) some silk art card, black card, white stayz on, perfect medium clear ink, blonde moments black embossing powder, some rbbon and a bit of bling.
1st up I taped a piece of silk art card to some scrap paper (I taped it to a 5'' square size) and then cut a mask from a post it note to add as a moon.
I took my brayer to my ink pad and picked ink up from the dark blue side towards the middle. The big tip when making a graded effect is to take the hard edge off the inside edge of the brayer by spinning it on some scrap paper to take the ink off the end of the roller. I went across the square at a diagonal ...
...then spun the card round to repeat the same thing on the other corner until the ink met in the middle.
I trimmed the silk art card down to it's 5'' square and then removed the moon mask and added some of the oh so cute tiny stars from the stamp set using white stayz on.
I stamped the deer image with some clear perfect medium and embossed it in black to create a strong focal point. I also made sure the antler overlapped the moon to create a bit of drama to the scene and tie the image together.
Using a bit of offcut from the silk art card that had been coloured when I was brayering, I stamped a sentiment from the stamp set with the prefect medium and embossed this. I cut it down and mounted it onto some white card with a decorative edge courtesy of my Purple cows trimmer.
I made a large white mat with a decorative edge, added a ribbon to the blue square and built up the pieces on foam pads for dimension. The finishing touch was a little bit of bling .... well it is Christmas :)
Moving onto the yellow and red I picked out from the colour focus inspiration..
This time the ingredients are the same as above but this time I used the Banana Frog Christmas Elegance stamp set and Big and Juicy mountain meadow ink pad.
This time I picked up ink from the yellow end of the ink pad towards the centre (again spinning off the hard edge of the yellow ink at the end of the brayer) And I made a vertical coating of ink.
Again I flipped the card round and repeated the process to colour the other half of the card.
I ripped down the edges of the card (towards me) to reveal the white core and then stamped a line of the baubles from the stamp set down it. I love the Merry Christmas sentiment in the set, simple and stylish! I then added some of the small snowflakes into the gaps using black archival ink.
I brayered a smaller square of silk art card with the yellow and red colours again the same way I did the blue square above. I then stamped the other bauble from the stamp set with perfect medium and embossed it in black.
Cutting the embossed bauble out I added it to the centre of the strip on a foam pad to create a focal point for my card.
And that's it! some Froggy Christmassy fun. I love the simple graphic look of Banana Frog stamps and I like the fact that they allow me to create simple, contemporary, stylish cards.....among other things like my Christmas table lights and the goodies I'm cooking up for 2 more Frog blog posts this month .... watch this space :)
Thanks for popping by, I hope you feel inspired to create and I'll see you soon. Until then Happy crafting!
Love
M x
Subscribe to:
Posts (Atom)