Showing posts with label ink. Show all posts

Wednesday, 24 November 2010

A Froggy Autumn

Hi all,

It's the second installment of the Banana Frog sketch focus for this month and this is my offering


Hop on over to the Lilly pad and check out how the other froglets interpreted it but before you go I'd like to share a quick step by step of the layout I made.


I used some small leaves from 3 different stamp sets; totally tropical, tropical taste and build a daisy and arranged them in a pattern on a stamp block to create the pattern on the paper strip across the layout.


I tore a strip of cream card and using a clear embossing ink stamped a pattern of the leaves and then embossed them in gold.


Using a spice big and juicy ink pad and some cut and dry foam I coloured the strip of stamped card with all the lovely spicey colours in the pad


Next I customised my 12x12 brown Kraft cardstock by distressing and inking the edges, coloring a block in the middle with some more ink from the big and juicy ink pad and stamping the cherry blossom stamp from the Banana Frog Kawaii Kokeshi stamp set in the top corner and then embossing it in gold


I stamped out my title using the rosecube alpha stamp set and mixing up the colours from the big and juicy ink pad, cutting them into letter tiles


And lastly my journalling block came from the totally tropical stamp set, cut out and distressed again with the spice ink


I assembled it all with some more torn cardstock in dark brown, some vintage lace and small photos mounted onto distressed mats of brown cardstock.


I love the autumny colours of the big and juicy ink pad and the gold embossing of the simple stamped images.

And that's it for today, what will you create with your Banana frog stamps and autumn colours? There's still time to hold onto autumn before the winter really sets in!

I hope you're well and happy, This is the start of a Banana Frog triple for me so I'll see you tomorrow with my project of the day, until then Happy Crafting
Love
M x

Tuesday, 31 August 2010

Scrapping then and now with Glitzy goodness

Hi all!
Today I want to share with you a couple of my Glitz layouts aswell as tell you a little story! Are you sitting comfortably? OK! let's begin ....


1951

I'm asked one crafty question quite a lot 'how long have you been scrapping' and I always say, as most crafters do, since I was little. This page is inspired by my first memory of a scrapbook aswell as the fabulous Glitz designs Vintage love collection. When I was a little girl I remember spending hours looking through a scrapbook my mum made when she was a little girl. I was fascinated by all the old photos and the bits of victorian scraps and pictures she included. Today as a grown up scrapper myself I still find the book a constant source of fascination and now have it scanned page by page on my hard drive!


This is the scanned page that the photo I have used in my layout comes from and I love it even more that my Nanny's hand writing is on it, that's why I like to use hand writing on my pages, I think it is as much of a memory as the photo for me.

So what Glitzy goodness did I use? From the Vintage love collection I used love letters, velvet, damask (reverse side) and polka patterned papers. I also used the numbers from Save the Date clear stamp set (Glitz stamps are just fabulous!) A Vintage Love What Not and a Vintage paper layer.


I built up the layers by ripping, tearing, distressing and inking my pp's and stamped the date. I then used a water brush to pull in the ink to fill the outlined numbers.


To make my elements I made a polka dot mat for my photo, inked a piece of doiley, distressed the WhatNot and roughly tore the butterflies from the paper layer. I like the shabby chic look of these torn butterflies and also that you can see the text from the paper layer.


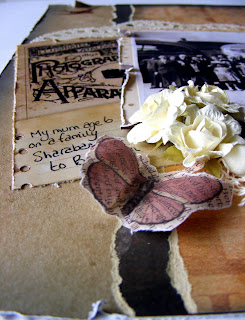
Assembling the layout I curled the wings of the butterfly and added them on silicon for dimension along with some paper flowers...


...and some vintage lace and ribbon. I love the fact that I am now able to scrap my mums scrapbook thanks to modern technology and fabulous Glitz products.

And so moving on to the here and now!


All the fun of the Fair

Last week my sister and 2 beautiful nieces came to stay and I took them for a dayout to a theme park. We had so much fun I wanted to record the memory straight away and what better paper collection than Glitz Maya!

I used Maya navy (reverse side), stripe, polka and patchwork. I also added into the mix some Glitz pink frosting, some Detour cardstock alphas and some Plum crazy Alphas aswell as my favourite teeny alphas in pink block and black round.


As I'm sure you can imagine I had lots of photos of the day so decided to include lots of small ones in my layout while using the bright colourful ferris wheel photo as a base. The Maya patchwork paper is great for adding little touches of all the colours in the collection when it's cut up and I used the patterned rectangles as small corner mats for my photos.


These small mounted photos I added to the right side of the layout on foam pads for added dimension, aswell as adding my journalling to the top right corner and a line of the yummy pink frosting, which is super easy to use as all the gems are attached on a sticky strip!


Then I added my title using a mix of Glitz Alphas. I love how all the different styles and colours work together and are linked by the super fab teeny alphas! A bit of rainbow ribbon which fits perefctly with Glitz Maya, I think, and some bobbles finished off my colourful fairground layout.

Looking at these 2 layouts side by side I love that they mark a passage of time recording two very different days out and that I was able to reflect that artistically using two very different Glitz designs collections.

I hope you enjoyed my litle trip through scrapping then and now with Glitz designs. Thanks for stopping by and until soon Happy 'Glitzy' Crafting

Love
M x

Wednesday, 4 August 2010

A froggy sketch

Hi all
It's sketch day, part one, over at the lilly pad. Every month the froglets either have a sketch to work with or a colour inspiration, this month is a sketch and this is my offering


Pop on over to the lilly pad to see how the other froglets have interpreted it, that's the great thing with sketches everyone works with them differently!

My layout is a photo of hubby in Xcaret ecological park in our beloved Mexico and quite aptly I have used The totally tropical stamp set and the tropical taste tadpole set alongside the oh so cute DeLouisville tadpole set.


I created my own paper with a piece of 12 x 12 and a big and juicy stamp pad in vibrant primaries.


I then stamped a thin strip of this with flowers from the tropical taste tadpole set and the top of a big strip with flowers from the totally tropical set.


I then layered up contarsting Rose Moka papers and positioned some of the stamps to work out their positions. This is a great trick with acrylic stamps so you can get an idea of how things are going to look.


I then stamped an embellishment of the large flower corner in totally tropical on to some white card using the big and juicy vibrant primary ink pad to tie the layout together, cut it outand added it on foam pads for dimension as well as stamping out the title block with the same ink pad and using the DeLouisville alphas for the title, don't they fit perfectly?!


and lastly I stamped a journalling block from the tropical stamp sets to record my memory of the day.

And that's it my version of this months sketch over at Banana Frog, I love making my own papers with my ink pads, why don't you have a play too?

Thanks for stopping by and I'll see you soon (at the moment I am somewhere up the Baltics having a fabulous time, I hope, bobbing about on a cruise ship) Until then Happy Crafting!
Love M x

Friday, 30 April 2010

Froggity Blog hop!!

Hi all, thanks for Hopping by on the Banana Frog blog hop! If you happened here by chance never fear you can catch up with the hop here and it will be worth it! All the froglets are soooo talented!!

So without further ado here is my hop offering for this months hop and the theme is Spring


Over the Garden Gate

I took some pictures of the garden as it at last started to blossom following this recent winter and love this picture over the garden gate. I like looking through things and being intrigued by what's behind doors and gates. For this project I have re visited one of my favourite techniques 'poor mans crackle' and I have used one of my favourite Banana Frog stamp sets Round in Circles. It's so useful for lots of things.


I cut some cardboard from an old box (always looking to 'up cycle' LOL) and cut it into a garden gate shape, ripping out a rectangle for the photo frame.


Now to get messy :) I smeared the shape with a layer of PVA glue, using fingers keeps it a smooth application.


Then while the PVA is slightly tacky I painted over the top of it with white acrylic paint. The paint needs to be thinned ever so slightly so it goes on easier and don't over paint or the glue will lift. Painting in one direction gives a uniform crackle but changing brush direction gives more texture.


If you're patient you can let it dry naturally, if you're like me however you can speed up the process with a heat gun, but don't overheat or hold the gun too close as the paint will blister. It's so exciting to see it crackle!! Leave the piece aside and get stamping your embellies!


There are loads of lovely flower stamps available from Banana Frog, take a peek in the shop but I decided to make flowers with the circles from the round in circles stamp set. I like the simple look of them and you can create all different sizes by layering the circles within each other. I used distress inks in bright spring colours and mixed two colours on the stamps before stamping the image to create shading.


Going back to my gate I stamped around the frame with some stamps from the Swirls stamp set using green ink to create abstract grass and stalks. I cut some gate hinges from card and added them and I then mounted the 6x4photo onto some white card and attached it behind the frame.


Finally I added my flowers on foam pads for extra dimension.


And that's it a piece of Spring home decor that sits on my shelf and makes me smile especially when the weather outside turns a bit dull!

You can see some other projects I did using the poor mans crackle technique on the BF blog here


Diamonds and pearls

and here


How does your garden grow

Thanks for hopping by my blog and I hope you feel inspired by this post and all the froglet posts along the way, talking of which your next stop is with the lovely Kirsty Wiseman here and don't forget to leave a comment wherever you go, who knows there may be froggy treats to be had :) AND don't forget it's Happy 4th Birthday at froggie HQ tomorrow, with a few surprises so don't forget to go and check out the party tomorrow and hop back on over here as I have something to contribute to the party!!

I hope you are all well and happy and until tomorrow Happy Crafting
Love
M x