Showing posts with label distress ink. Show all posts

Tuesday, 15 May 2012

One little post before I go!

Hi all
Well tomorrow is M day ...... moving day! As you can imagine I am buried under boxes and all those last minute 'what do I do with that' things and packing the studio ..... well don't get me started LOL But all being well, with a good wind behind us we'll be off tomorrow to start a brand new adventure! I hope the sun shines!!!

So I thought I'd post a few bits before I go, thanks for all the lovely messages, some of you have been asking to see some of the samples I've had on tv .... so here's a couple (a lot of my 'stuff' has been packed so only been able to photograph a couple of bits :))

These were created for the Serif Craft Artist Steam Punk 4 day deal on create and craft TV back at the end of March .....

A hope chest ......


I made the chest out of chipboard and then designed my own decorative papers to cover it.The blend mode in the programme is fab for mixing the backgrounds to make my own papers and the photo real embellishments look great gathered together and shadowed to give that realistic touch

I printed some of the imges off multiple times to create some 3D embellishments and mixed them with some of my own crafty embellishments.

Then I created some scenes on paper to cover the inside of my chest.

This one is a reverse canvas filled with a photo of my niece

And some embellishments layered to make them 3D, with some imagery printed onto acetate to hang within the frame to create more depth

So that's a taster of some of my hybrid projects.

Just before I packed my studio up I completed a commission for scrap365, here's a sneak

to appear in the Sepember issue, I took great joy in getting messy with fibre paste and ink.... well until my new studio is settled I guess it will be a while before I can get messy in my craft room :)

And finally ....

The boys took a last spin in the fields

They don't know it yet but not only will they have fields to play in soon but loads of cliff walks and miles and miles of beach too ..... did I tell you I was a little bit excited??!!!

Ok so I'll sign off for now I will be back as soon as possible and hopefully writing to you from the comfort of my brand new studio! Until then ,as ever, I hope you are well, thanks for stopping by, I'll *see you* soon and of course.....
Happy Crafting
Love
M x

Monday, 14 May 2012

Sketchy goings on!

Hi all

Well as the title suggests there are sketchy goings on today over at the sketchbook365 blog wanna play? Then why not pop on over to the blog and see the sketch from the lovely Wendy McKee and also see what the other members of the Scrap365 DT have come up with ..... there's loads of inspiration to be had and the best bit? You can add your designs too and be in for the chance to win a prize!

Here's my take on the sketch .....

Lots of Happy doodling as I'm in a happy mood, as the title says We're on the move, come Wednesday we will be all packed up (I hope if the packing fairies answer there invitations LOL) and on our way up to the North East .... I'm going home to my neck of the woods after 25 years of being away and I am soooo excited!

In close up I have layers of scrap paper, distressed of course :) and some doodled borders punched with a crop a dile and a doodled rainbow coloured with pencils (I love my colouring pencils and feel they've been somewhat neglected recently!)

The arrow embellishments are doodled

and the signpost is cut out from a photo of the sign at the crossroads at the end of our village ..... I'm hoping the next sketch will work as the second half to this layout so I can add a destination page to create a complete double layout :)

Why not hop on over to the Sketchbook365 blog, be inspired and play along with us, we'd love to see what YOU come up with and rememeber it can be anything inspired by the sketch, paper, digital and hybrid ..... everything is welcome ..... see you there :)

Thanks for stopping by, I hope you're well and happy and I'll *see you* soon until then as ever
Happy Crafting
Love
M x


Monday, 30 May 2011

{happy birthday} froggity blog hop

Hi all
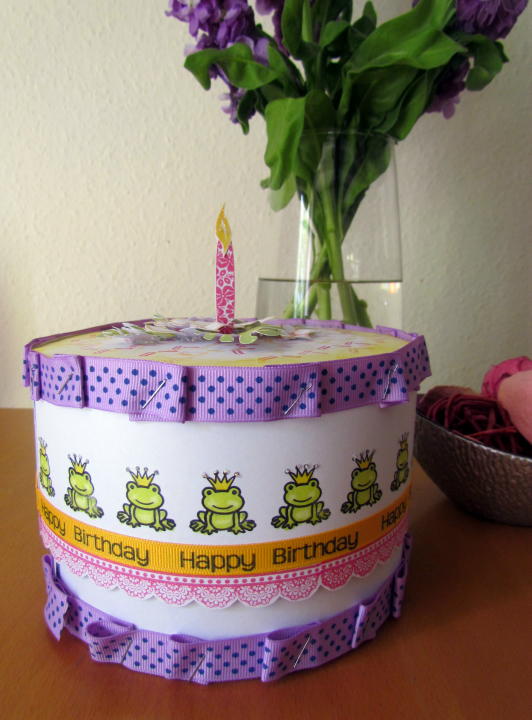
Well that's another month gone and time for another Banana Frog blog hop, can you believe we're nearly half way through the year!! Anyway this months blog hop is a special one .... it's the little green guys birthday and what's a birthday without some cake?


And better still this one is calorie free :) and doubles up as a great gift box! I have used a veritable feast of Frog stamps for this project Charming prince, Tropical garden, Build a daisy, Simple greetings, That takes the cake and It's all about elegance (psssst all these stamps are on sale, go on treat yourself ;))


1st up I cut a strip of white card for the lid and stamped along the bottom edge with the lace trim from It's all about elegance and trimmed to the pattern. Then added the greeting from simple greetings along some ribbon with permanent ink sticking it along the strip above the stamped lace trim.


Next thing was, what else but, the cute little frog from Charming prince, again stamped with permanent ink so I could colour them in with my pro markers.


I cut a wider strip of white card for the base of the box and added a purple trim to the bottom of it and along the top of the top strip of card using a stapler to pleat it as I went to give a look of piped icing.


I then added some bling to the crowns with glitter glue.


Cutting a circle with dragons teeth for the top and bottom of the box I added pretty sprinkles to the top from the stamp in that takes the cake and inked the edges.


Using the totally tropical stamp set I stamped some leaves and flowers mixing the ink on the stamps to create shaded colouring. I used one of the petals from build a daisy to create the candle and one of the leaves stamped in yellow for the flame.


To make the candle stand up on the cake I cut it with some tabs on the bottom of the petal that were stuck to the underside of the top when it was in position.


The flowers and leaves were added with silicon glue and curled before sticking in place to add dimension.


And that's it a unique froggy birthday gift box :)

Thanks for hopping by today, your next stop on the hop is the fabulous Francine (I love her style) and don't forget to comment as you go there may be birthday prizes!! Enjoy the rest of the hop and I'll see you soon. Until then Happy Crafting
Love
M x

Friday, 4 March 2011

Springing into Spring

Hi all,
Today I am springing into Spring with my project of the day over at Banana Frog with this layout ....


Hop on over to the Lilypad for the step by step instructions AND to bag a bargain ... there's a sale on!!!

I hope you're all well and happy, I have been a crafting fool with deadlines, trade shows, magazine submissions and TV and I'm now prepping for my workshops at Olympia for the Stitch and Craft show however I will endeavour to get back soon to fill you in on my life in general, crafty goings on and of course those boys :)

Stay safe and until soon Happy Crafting!
Love
M x

Saturday, 25 December 2010

A froggy Happy Christmas

Hi all!
MERRY CHRISTMAS!!! I hope you're all having a lovely day with family and friends and over indulging to the max ... hopefully I'm doing the same :)

However the world of crafting doesn't stop for anyone ... well why should it? and today I have a project over at the Lily pad


A festive indulgence for your New year party table .... as ever step by steps are on the Banana Frog blog, enjoy!

As I don't know if I'll make it back before the 31st I'll post a quick Happy New Year to you all here. Thanks for all your support and cyber friendship in 2010 and here's to a very happy, peaceful, prosperous and healthy 2011 to us all!

If I don't *see you* before I'll see you next year and as ever Happy Crafting
Much seasonal love
M x

Thursday, 28 October 2010

A Glitzy Spooktacular

Hi all, well here I am again to share some more Glitzy goodness with you in the form of 2 spooktacular layouts with yummy Glitz Designs
As the Halloween season approaches I thought I would do a layout to record my Halloween celebration. The celebration stretches right back to pagan roots and is a time to celebrate the end of one year and the beginning of the next, in effect it is the new year celebration as well as a time to celebrate our ancestors and of course the rich harvest to see us through the dark winter months and it is known as


Samhain (pronounced sow-ein)

I love the mix of Purple and black for Halloween so what better line to use than Glitz Designs Plum Crazy, one of my all time favourites ... to date! Purple is such a hard colour to get right with papers and I think Glitz designs just hit the mark with this collection. Ok enough waffling this is my list of ingredients for my layout;
Glitz Designs Plum Crazy paper; Diamonds, chair, polka and stripe
Glitz Designs Plum Crazy journaling cardstock stickers
Glitz Designs Plum Crazy cardstock alphas
Glitz Designs Paisley flourish rub ons
Glitz Designs black damask rub on
Glitz Designs Distressing stamps; set two
Glitz Designs teeny alphas; round black.


I ripped the piece of chair paper in half roughly along the diagonal and distressed it all ... liberally! Using the text side of the paper it went across the base of the diamonds paper (also distressed of course!)


Before I adhered the lilac text paper to the base I worked on it. I used the alpha stickers to create my title but didn’t want them the strong plum colour that they are so I took some of the sticky off the back (by repeatedly sticking each letter to my jumper) and used the alphas as a stencil. As I had run out of some of the letters I cut around their outline on the sticker sheet so I could use the negative, I quite like the ethereal quality I got from mixing up the positive and negative alphas. I then used one of the distressing stamps and some black ink to stamp over my title and built up a ‘black mist’. Tip; to avoid getting a straight edge from the stamp I only applied ink to the centre, avoiding adding ink to the stamp edge. Once I was happy with the build up of black I removed the alpha stickers (remember Glitz Design stickers are really super sticky so really work at covering them in fluff before using this method!)


I then added a piece of the Damask rub on, this I ripped to avoid harsh edges, a little paisley flourish and then cut out the centre of two of the journaling card stock stickers to add later.


My photos are of my Halloween hearth, candles, crystals and offerings of food and wine, these I layered onto some distressed pieces of the polka paper


Lastly I added some ribbon, a strip of the stripe paper as a detail, some staples, the tiny alphas and my journaling which is a little bit of Samhain Lore.

And now I’d like to take you from the past to the present with all the colours of the autumn season.


Little Pumpkin

I love this photo of my cousins little boy over in the states last Halloween on his Pumpkin search. I’ve mixed it up a little with my supplies for this layout and here’s the list;
Glitz Designs Vintage Love papers; love letters and polka
Glitz Designs Kismet papers; brown and stripes
Glitz Designs Kismet journaling cardstock stickers
Glitz Designs Maya papers; damask and stripe
Glitz Designs Maya rub ons
Glitz Designs teeny alphas; brown round


I decided to use the 11’’ x 8.5’’ format for this layout for a change as I really wanted to focus the design around the photo. I layered up a strip of vintage love letters onto some kismet brown then these two onto the vintage love polka. All pieces were distressed and inked, that part of my design didn’t change!


I then added a torn strip of Kismet stripes paper, some ribbon for texture and then cut out the round journaling block from the Kismet stickers so I could keep the very fine line of the outer circle to use as well, so creating 3 circles from the one sticker.


Next I set to with my scissors and the coloured sides of the Maya damask and stripe paper and cut out some autumn leaves. I then inked the edges to define the shape and curled them with my fingers. (You could of course use punches or dies if you have them!)


I layered up the photos and the leaves, using silicon glue to give my leaves movement and added more ribbon for texture.


I added some leaves to the top corner of the photo for balance, added the teeny alphas and finally the Maya rub on birdie ....as it just seemed right :)

And that’s it my Spooktacular Glitzy offering for this month. Thanks for stopping by and whatever you get up to this Halloween may I wish you the warmest of Seasons greetings and Happy Crafting
Love
MJM x

Monday, 25 October 2010

Stamping up a treat ....

.... and no tricks :)

Hi all, it's my turn to share a project of the day over at the Lily pad ... this is what I've made ...


Oh so simple and cute for all your Halloween treats, want to know more about it? Hop on over to the Banana Frog blog for full step by step instructions :)

Thanks for stopping by, I'm sorry this is short and sweet I'll be back soon to chat more, I hope you're well and happy and until soon as ever Happy Crafting.

Love
MJM x

Thursday, 14 October 2010

Scrapping outside the album with Glitz Designs

Hi all

Today I’d like to share a piece of home decor with you using the yummy Distressed Couture collection from Glitz Designs. There are so many gorgeous Glitz papers and products I feel it is a shame to hide them away in albums. I love the new trend to display scrappy creations around the home and with the trend to upcycle things combined this is an ideal project.


The ingredients I have used; Glitz Designs Distressed Couture paper collection, Distressed Couture dress form stamp, Glitz Designs paper layers, Glitz designs Whatnot, Glitz Designs frame rub ons and Glitz Designs clear frosting

I quite simply used strips and rectangles of papers from the Distressed Couture collection, distressed the edges liberally, (this works brilliantly with the double sided paper so you get to see both sides) added aged mahogany distress ink and got out the sewing machine to stitch my layers together while adding some texture detail.


The layers of paper were then adhered to the base of the piece which is a stripped piece of corrugated cardboard box (this is where the upcycling comes in! I love stripping cardboard boxes and using them for my crafting)


The focal piece of my scrappy creation is a double Distressed Couture paper heart, distressed of course! Matted on to a stripped corrugated cardboard heart, which is layered onto a Glitz frame rub on (Glitz rub ons are second to no other rub on out there in my opinion!) and all this rests on a slightly distressed Glitz paper layer.


The addition of some lace and velvet ribbon stapled on adds to the shabby chic feel and the Glitz Dream Whatnot lends that oh so trendy Alice in Wonderland look to the piece. The finishing touches come from some Glitz frosting twisted to a flourish, the distressed couture dress form stamp embossed in black, a bit of bling and a kilt pin with charms from my craft box.

A super simple but stylish project that looks great on a small artists easel displayed for all to see. I recently taught this class at a retreat using the Glitz Plum Crazy range and that looked great too so why not have a play with your Glitz supplies and see what home decor you can create with all the yummy products, talking of which there is a whole host of new Glitz goodies about to hit the shops and they really are to die for delicious, so keep your eyes peeled, even here in the UK as I happen to know of certain places that have their orders placed and I will let you know as soon as it arrives on these shores!

Thanks for stopping by, I hope you’re all well and happy and until soon Happy Crafting!
Love
M x

Monday, 4 October 2010

Froggy colour focus

Hi all

It's part one of the October colour focus over on the Lilly pad today and here's my offering


Lillian Kathleen

I got so carried away in the moment of creating this layout that this month I don't have step by steps for you but I'll try and break it down so you can see what I did!

The layout is of my nanny as a little girl, her name was Lillian Kathleen and my niece was named after her Lilly Kirsty. I have used the Mastryoshka dolls stamp set, the rosecube alphas stamp set and the it's all about elegance stamp set. The papers are 7 gypsies and I've used distress inks in old paper, antique lace, tea dye and walnut stain.


I cut the swirl from some 7 gypsies paper and then stamped the Mastryoshka dolls onto some of the remaining patterned paper. It gives them an interesting look and adds a bit more interest than stamping onto plain paper.


Once I had all my main elements ready I worked out an area on the background to stamp a random pattern, using different colour inks, using the medallion stamp from the mastryoshka set to add some more interest to the background of the layout. Before adding the photo I used the border stamp from the same set to stamp onto the photo to tie everything together. Once all the main elements were in place I added my journalling which was a mix of making memories tiny alphas, Rose moka tiny alphas and handwriting. The number is stamped from the rosecube stamp set and then I stamped the frame from It's all about elegance for my title block.


I, of course, distressed edges as I went and inked things generously :) The last addition was some prima flowers in the colour pallette I've used for the rest of the layout.

Maybe you'll be inspired to tell a story today using your Banana Frog stamps. whatever you do, thanks for stopping by, enjoy the inspiration from the rest of the froglets in the colour focus post and as ever until soon Happy Crafting!

Love
M x

Tuesday, 31 August 2010

Scrapping then and now with Glitzy goodness

Hi all!
Today I want to share with you a couple of my Glitz layouts aswell as tell you a little story! Are you sitting comfortably? OK! let's begin ....


1951

I'm asked one crafty question quite a lot 'how long have you been scrapping' and I always say, as most crafters do, since I was little. This page is inspired by my first memory of a scrapbook aswell as the fabulous Glitz designs Vintage love collection. When I was a little girl I remember spending hours looking through a scrapbook my mum made when she was a little girl. I was fascinated by all the old photos and the bits of victorian scraps and pictures she included. Today as a grown up scrapper myself I still find the book a constant source of fascination and now have it scanned page by page on my hard drive!


This is the scanned page that the photo I have used in my layout comes from and I love it even more that my Nanny's hand writing is on it, that's why I like to use hand writing on my pages, I think it is as much of a memory as the photo for me.

So what Glitzy goodness did I use? From the Vintage love collection I used love letters, velvet, damask (reverse side) and polka patterned papers. I also used the numbers from Save the Date clear stamp set (Glitz stamps are just fabulous!) A Vintage Love What Not and a Vintage paper layer.


I built up the layers by ripping, tearing, distressing and inking my pp's and stamped the date. I then used a water brush to pull in the ink to fill the outlined numbers.


To make my elements I made a polka dot mat for my photo, inked a piece of doiley, distressed the WhatNot and roughly tore the butterflies from the paper layer. I like the shabby chic look of these torn butterflies and also that you can see the text from the paper layer.


Assembling the layout I curled the wings of the butterfly and added them on silicon for dimension along with some paper flowers...


...and some vintage lace and ribbon. I love the fact that I am now able to scrap my mums scrapbook thanks to modern technology and fabulous Glitz products.

And so moving on to the here and now!


All the fun of the Fair

Last week my sister and 2 beautiful nieces came to stay and I took them for a dayout to a theme park. We had so much fun I wanted to record the memory straight away and what better paper collection than Glitz Maya!

I used Maya navy (reverse side), stripe, polka and patchwork. I also added into the mix some Glitz pink frosting, some Detour cardstock alphas and some Plum crazy Alphas aswell as my favourite teeny alphas in pink block and black round.


As I'm sure you can imagine I had lots of photos of the day so decided to include lots of small ones in my layout while using the bright colourful ferris wheel photo as a base. The Maya patchwork paper is great for adding little touches of all the colours in the collection when it's cut up and I used the patterned rectangles as small corner mats for my photos.


These small mounted photos I added to the right side of the layout on foam pads for added dimension, aswell as adding my journalling to the top right corner and a line of the yummy pink frosting, which is super easy to use as all the gems are attached on a sticky strip!


Then I added my title using a mix of Glitz Alphas. I love how all the different styles and colours work together and are linked by the super fab teeny alphas! A bit of rainbow ribbon which fits perefctly with Glitz Maya, I think, and some bobbles finished off my colourful fairground layout.

Looking at these 2 layouts side by side I love that they mark a passage of time recording two very different days out and that I was able to reflect that artistically using two very different Glitz designs collections.

I hope you enjoyed my litle trip through scrapping then and now with Glitz designs. Thanks for stopping by and until soon Happy 'Glitzy' Crafting

Love
M x