Showing posts with label Love Games. Show all posts

Friday, 5 August 2011

Getting on my Glitz in a different size

Hi all
It's my turn to share a couple of projects with you using lovely Glitz Designs products and this month I thought I would change it up a bit and scrap in a different size. I decided to use A4 (uk paper size) and found it an interesting challenge and really enjoyed the different discipline. Here's what I created


Nothing is Black and White


And here's the twist on the title, my hidden photo and journalling!

For this project I have used:
Glitz Designs Love Games Papers; Floral and Damask
Glitz Designs Afternoon Muse paper; Floral
Glitz Designs Love Games Paper layers
Glitz Designs Afternoon Muse Journal stickers
Glitz Designs Teeny Alphas; cream and ivory block
Glitz Designs frosting; red and black
Glitz Designs Giant Rhinestones; pink, black, green collection.

The photos are from a cruise we went on, it was a formal night and we went to have some proper photos taken, all started out well but after a nice bottle of red with dinner the giggles set in and the formality of the photo shoot was blown! I printed off the 'proper' photo in black and white and then one from the end of the shoot, when it all started going south, in colour. The black and white of Love Games works perfectly with my black and white idea and the zing of Afternoon Muse works great for the shot of hidden colour.


I ripped away an aperture slightly larger than my colour photo from the Love Games floral paper and then cut away the centre of the crossword paper layer to create a frame.


I adhered a mat of the yellow paper to the back of the photo and cut a journal sticker to a rounded shape, added this to my photo and recorded my hidden bit of the story.


After matting the black and white photo onto some of the papers, making it big enough to cover the hidden section and distressing the edges, I created a hinge by cutting two of the little damask patterns from the paper and folding the strip in half, adhering it to the photo and the base of the layout so the black and white photo became a little 'door'


Cutting some of the black ad white poppies from the floral paper and scrunching them into shape I created some bespoke flower embellishments.


Adding rhinestones, lace, ribbon and the gorgeous teeny alphas for my title finished off my layout.

As I had done one of my pages landscape I thought the next one should be portrait


A Volcano and a camel ride

For this project I have used;
Glitz Designs Laced with Grace papers; Floral, Plaid, Rose and Polka
Glitz Designs Love Games paper; score card
Glitz Designs Laced with Grace Journal and Title stickers
Glitz Designs Afternoon Muse Title stickers
Glitz Designs Teeny Alphas; Burnt Orange

I love the orange colours in the Laced with Grace colection and the richness of them has always reminded me of the many volcanos I have been lucky enough to visit, so, the other day when I came across these photos of our camel ride through the Timanfaya volcano range in Lanzorote I knew just the papers to use to scrap my memory of an unforgettable day (for many reasons LOL)


When I get to work with such great paper colletions I really like to be able to mix the different papers up and let them do the work. I cut several layers in different colours and distressed the edges.


When I adhered the paper layers I made sure I left the top edges loose so I could slip my little photos under them in position. I created a distressed matt for my larger photo and added that on foam pads for added dimension.


I then set to and started chopping up some of my lovely stickers, they are heavy duty stickers and can take the punishment! It's really interseting to see how the stickers can be transformed into something completely different and I will keep all the bits not used as I know somewhere along the line they will be perfect for a project.


After adding the stickers, journalling and creating my title with the teeny alphas my layout was finished and even though it is mainly papers and stickers it still has a lot of dimension and I love the colour of it!

So why not try a different size to scrap your next page in? It'll make you look at things in a different way! Thanks for stopping by and I'll see you soon, until then Happy Crafting!
Love
M x

Tuesday, 19 July 2011

Happy July with Glitz Designs

Hi all,
Well it’s that time again to share some Glitzy goodness with you with some Glitz Designs loveliness.

July is one of my favourite months, it holds so many memories for me as it’s the month that the long school holidays start and it’s my birthday month so I wanted my projects to sum up those feelings ....


40 years on

I hardly recognise this little person, but it is one of my favourite pictures of me and makes me smile, I realised it is now 40 years since it was taken, oh my life!! And I thought it would be interesting to see what I would say to that younger me knowing what I know now so created this layout with some hidden journaling to hold my message.

I have mixed up the collections for this one and this is what I used
Glitz Designs Love Games papers; score card and polka
Glitz Designs Laced with Grace papers; polka, floral and stripe
Glitz Designs Afternoon Muse paper; polka
Glitz Designs Teeny alphas; apple green block, pink block, yellow block and burnt orange
Glitz Designs Laced with Grace Whatnots
Glitz Designs Laced with Grace paper layers
Glitz Designs Afternoon Muse peek-a-boo
Glitz Designs Love Games clear stamp set
Glitz Designs Afternoon Muse clear stamp set
Glitz Designs Save the Date clear stamp set


I started by laying down a rough block of colour in the centre of the score card paper with some distress ink to create a base to lift my design...


...Then built up a collage of distressed circles to reflect the circle of the date stamp and to introduce all the happy colours from the papers. I also put my photos through a cartoon effect and printed them onto some mat paper, a fun effect that lends to the retro story I am telling.


I added some foam tape around three edges of my ‘now’ photo to adhere it to the page, leaving the right side open to slip in my hidden journaling.


I love the sentiment on the Laced with Grace paper layer but it was too big for my layout in its entirety so I cut some word strips from it ....


.... then added in the missing words with the teeny alphas. I love mixing up typesets and these teeny alphas are not only one of my favourite Glitz products but quite possibly one of my most favourite products ever! I love the colours.


Finally I stamped the Hello stamp at the top of a strip of card and fold it concertina style to slip in behind my ‘now’ photo. This is where my hidden message to the younger me lives.


This layout will live on an easel on my side for a while, I love its happiness with all the colours and I love the message it speaks to me.

So with the summer holidays round the corner over here in the UK and all my memories of long days playing in the back garden with the paddling pool and trips to the seaside I really smiled when I saw this photo of my cousins two little ones sitting in their sandpit in the sun, I love the candied shot.


Happy Life

I used;
Glitz Designs Laced with Grace papers; stripe, polka and plaid
Glitz Designs Afternoon Muse papers; block, stripe and banner
Glitz Designs Afternoon Muse paper layers
Glitz Designs Afternoon Muse cardstock stickers; titles
Glitz Designs Afternoon Muse Whatnots
Glitz Designs Afternoon Muse Glitzers
Glitz Designs Laced with Grace cardstock stickers; titles


I took some bright yellow paint and splattered the middle of my base paper, adding ‘sunshine’...


....And started building up layers of paper as a base for my photo. I created a paper ribbon with some of the Afternoon Muse block paper by folding a strip backwards and forwards along its length and when adhering allowing sections of it to stand free.


The clown from the what not was perfect as an accent at the corner of my collage so I cut him free and adhered him to the end of the follow your bliss title sticker.

The Glitzers were perfect for finishing off my layout as was one of the banners cut from the banner paper, while the ferris wheel cut from the paper layer finished of the happy fun fair feel of my page.

I hope July is a happy month for you too, thanks for stopping by and until soon Happy Crafting
Love
M x

Tuesday, 7 June 2011

A Glitzy Beach hut and a Glitzy dad!!

Hi all, for my Glitz offering this month I decided to swap one of my layouts for something a little different ....


Oh I do love to be beside the seaside!! And the fabulous Afternoon muse papers with a few other Glitzy bits from the other lines were perfect to create my little piece of summery home decor ... here's the ingredients;
Glitz Designs Afternoon Muse papers; Stripe, Polka, Floral, Block and Carte Postal
Glitz Designs Laced with Grace paper; plaid
Glitz Designs Afternoon Muse Glitzers
Glitz Designs Love Games Paper layers
Glitz Designs Love Games cardstock stickers - titles
Glitz Designs clear distressing stamps set 3


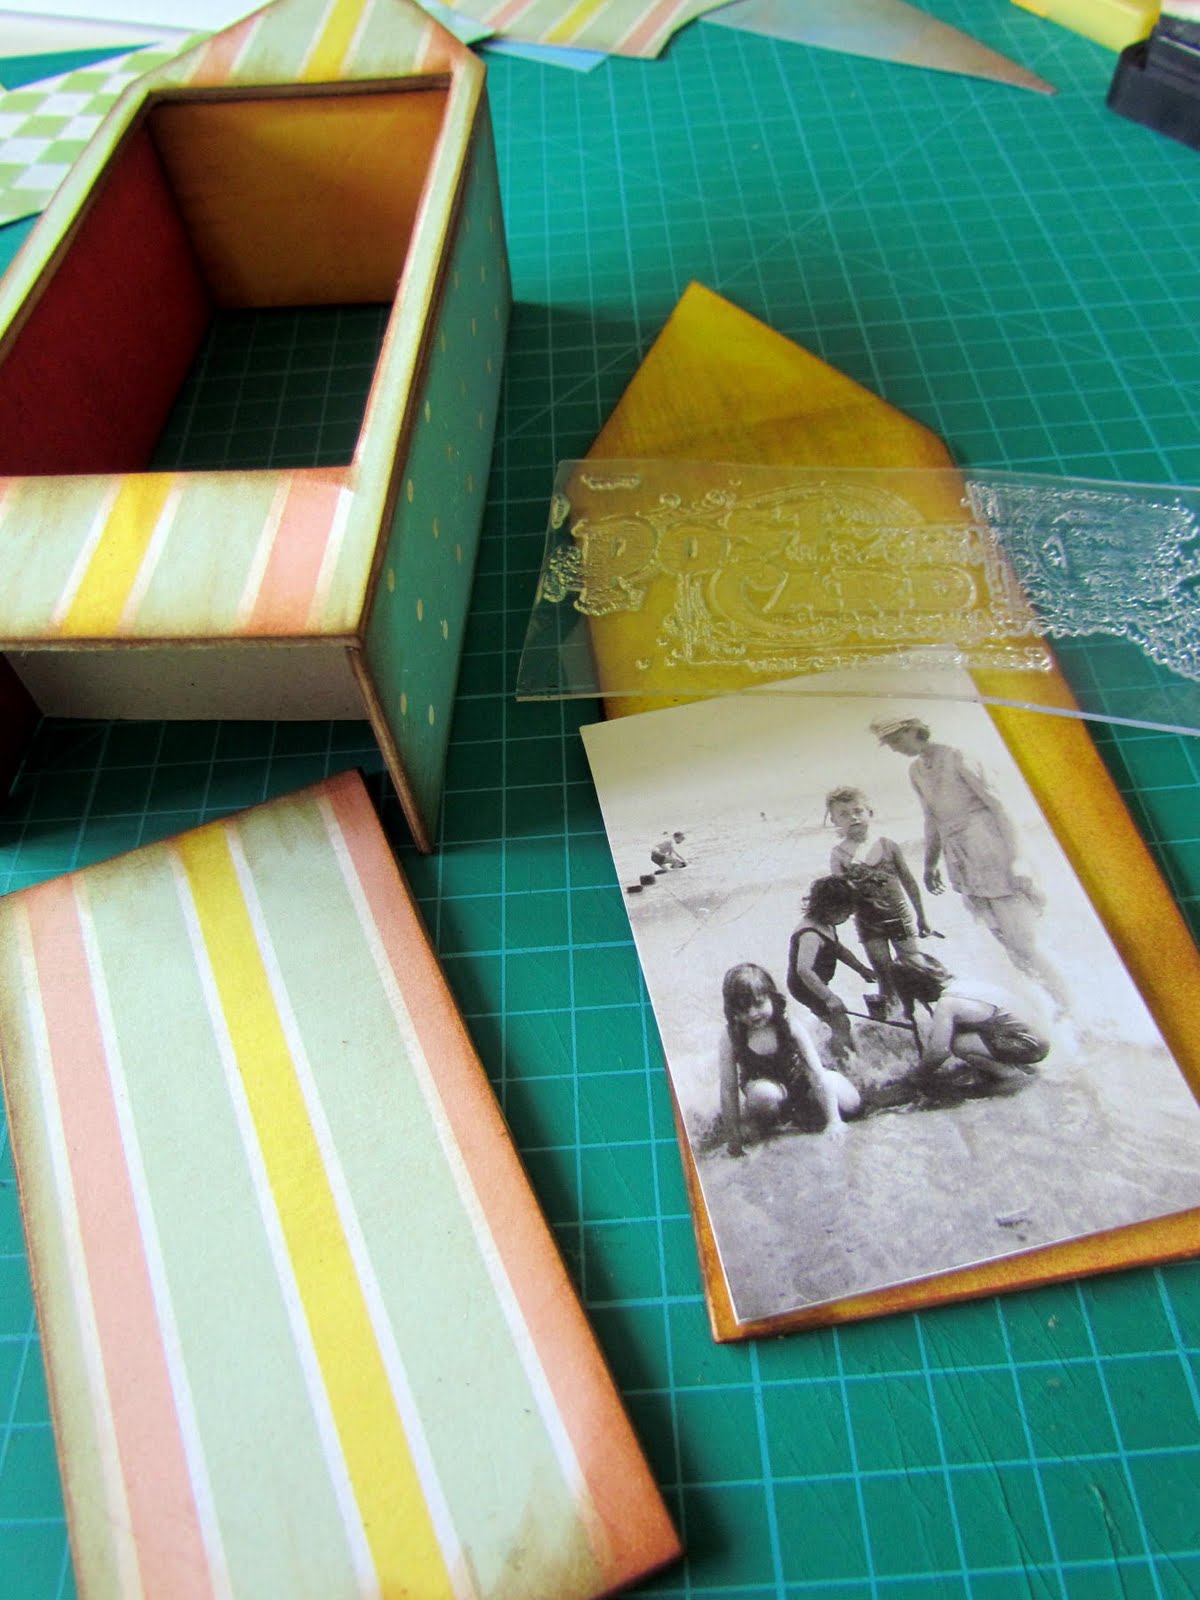
I cut out my pieces for construction from some chipboard...


...then covered them with the yummy papers on both sides and started to construct. Before I attached the back of the hut I decorated the inside of the back panel with a Glitz stamp, my family photo and some material for texture.


After attaching the back of the hut I decorated the door and added a hinge down the left side made from a strip of patterned paper folded in half.


For the roof tiles I cut the green diamonds from the reverse side of the Carte postal paper, cut them in half and layered them up on the roof, adding the bunting cut from the paper layer to the front.


I added some little trinkets inside the hut and added a small step to the front finishing it all off with the cardstock sticker on the inside of the door. I hope you've enjoyed my little trip to the seaside. Next I'd like to introduce you to a very special man in my life ...


...My Dad! As it's fathers day this month we are celebrating the special fellas in our lives over at Glitz and the Love Games line fits perfectly with this rare photo of my dad not making a cheesy grin at the camera! Here's what I used;
Glitz Designs Love Games papers; polka, stripe, damask, floral
Glitz Designs Love Games cardstock stickers; titles and journalling
Glitz Designs Love Games paper layers
Glitz Designs Afternoon Muse glitzers
Glitz Designs Love Games whatnots
Glitz Designs teeny alphas; Burnt orange and cream
Glitz Designs Run on fancy frames


I started with a bit of distressing, well I would wouldn't I! and decided to go with the lovely black side of the Love Games floral paper as my base, adding in a little red insert with the polka paper to match the mount I created for the photo.


I built up layers of paper, paper pleats, rub ons and some hessian for texture.


My top tip when using the fabulous Glitz whatnots and stickers, if you only want to have a bit peaking out, cut them so you get the rest to use on another project.


Adding the teeny alphas (LOVE these!) for my title...


... I finished off the layout by circling the relevant words on the paper layer for my journalling. I think this layout will go on an easel on the side in my house, the Love games papes are so stylish and I want everyone to know how much I love my dad!

Thanks for letting me share my Glitzy projects with you and thanks for stopping by. I'll see you soon,until then Happy Crafting
Love
M x

Thursday, 12 May 2011

Glitzy ladies

Hi all
This month on the Glitz blog we are celebrating the special ladies in our lives. I am lucky enough to have many special ladies in my life, past, present and future but no one is more special to me than my mum, everything that I am is because of this lady and although I may not always have been the perfect daughter we have a great relationship and I'm thankful she's my mum!


I love this candid photo of us at my wedding and the colours of the Glitz papers are perfect for showing off a very happy moment. Here's what I used;
Glitz Designs Laced with Grace papers; stripe, plaid, polka and floral
Glitz Designs Afternoon Muse papers; cart postal and polka
Glitz Designs Laced with Grace clear stamps
Glitz Designs Afternoon Muse clear stamps
Glitz Designs Laced with Grace Journaling Cardstock stickers
Glitz Designs Laced with Grace paper layers
Glitz Designs Love Games Glitzers
Glitz Designs Love Games Whatnots
Glitz Designs Love Games Titles Cardstock stickers
Glitz Designs Teeny Alphas; Olive green and Aqua block
Gitz Designs lear frosting

I've always loved the fact that you can mix and match across all the Glitz Designs collections and love that they use colours that really sing together.


The stamps are fab and here I have stamped directly over my small photo


And look at the detail in the fairy whisper stamp which looks great stamped onto some of the Laced with Grace paper


The teeny alphas are just perfect in all their different colours and styles


And even the 'plain' papers in the collections are full of tones and interest.

For my other layout I decided to celebrate a lady that is special to me in my creative life, someone who is a source of inspiration to me. I have just re organised my studio and I wanted to create some wall art so I made this layout as a tribute to Frida Kahlo


The papers in the new collections have always made me think of Mexico with the hands that appear regularly in Fridas art, the butterflies and the colours of orange, green, turquoise and yellow so I thought it would be fun to mix them up for this layout. I have used;
Glitz Designs Afternoon Muse papers; Floral, Carte Postal and Block
Glitz Designs Laced with Grace papers; Floral and Butterflies
Glitz Designs Love Games paper; Polka
Glitz Designs Laced with Grace paper layers
Glitz Designs Laced with Grace Whatnots
Glitz Designs Laced with Grace Glitzers
Glitz Designs Laced with Grace Peek-a-boo
Glitz Designs Love Games Peek-a-boo
Glitz Designs Love Games title cardstock stickers
Glitz Designs Afternoon Muse peek-a-boo
Glitz Designs Giant Rhinestones


I created a frame from the floral paper and ripped out the centre, ripping back into the frame and rolling the paper back to reveal the bright yellow on the double sided paper.


The peek-a-boos create great layers and all the colours in the paper lines mix so well. The butterflies cut out from the laced with grace paper make great embellishments.


Dimension and layers are built up with more peek-a-boos, paper layers and stickers. I love the bright happy colours in this layout and it will make a great addition to my studio wall to inspire me when creating.

Thanks for letting me share my creations with you, what special ladies will you celebrate with your Glitzy stash? Don't forget to play along with the Get your Glitz on challenge either .... there's goodies to be had!

I hope you're well and happy and until soon Happy Crafting!
Love
MJM x

PS Fancy a Crafty Retreat? Check out my post below NOW!!!!

Saturday, 7 May 2011

Get your Glitz on challenge #2

Hey all

HAPPY NATIONAL SCRAPBOOK DAY!!!! Hope you've all had a little creative time! I also just wanted to drop in and let you know that the Get your Glitz on challenge #2 will go live today on the Glitz blog .... it's time for YOU to get your Glitz on and show us what you can do with yummy Glitz product, there are prizes and you will be featured on the Glitz Blog so go for it!

This months theme is clustering all the details can be found on the Glitz Designs blog ....I had a play and came up with this for my Dad's birthday card ...


.... it also goes to prove that even though Glitz product is oh so pretty it can be used for a masculine twist!

Thanks for stopping by and I look forward t seeing what you all come up with for the challenge!

I hope you're well and happy and until soon Happy Crafting!
Love
M x

PS I have used Glitz Designs;
Love games papers; damask and stripes,
Love Games peek-a-boo
Love Games Glitzer
Love Games paper layer
Love Games cardstock stickers titles
Laced with grace clear stamps
Afternoon Muse glitzers
Teeny alphas in cream
Black frosting