Showing posts with label craft project. Show all posts

Tuesday, 27 May 2014

'I am Youth, I am Joy...'

Hi all

Just popped in to drop off some sneaks of my latest offering for the latest issue of Scrap365 which is on the shelves NOW!! (craft shops and WHSmith) Do you have yours?

I have mine and I was really tickled to see that this issue I am the centrefold LOL and before that conjures up images best not thought about the picture is of my birds nest project!

 
This is one of those projects that I was REALLY, REALLY pleased with. It lived in my head for months before finally tumbling out and was all inspired by a 50p bridesmaid posy holder!

 
This issue of Scrap365 is all about upcycling, re purposing and using up what we have squirreled away in our craft rooms proving that we don't need to spend a fortune to indulge our addiction .... oops I mean hobby :D

I have to give a big shout out to the photography department for the magazine, I love the way they have set up the photos (with the help of our fab editor!) and executed them superbly not just for my project of course but for the whole magazine, it's a visual delight!

To accompany my project I have posted a Step by step on the Scrap365 blog so please do hop on over to see how I did it and see how to transform some tin foil, tissue paper, polystyrene shapes, music paper and of course that posy holder into (what I think) is a beautiful piece of home décor.

 
I hope you enjoy and I hope you get to grab a copy of the magazine to be inspired by all the other glorious projects held within ..... A sunny afternoon, a quiet hour by yourself, maybe a cheeky glass of cold white wine and a superb magazine packed with crafty delights .... what could be better? In fact that's me doing that right now once I have signed off ;)

CHEERS :D

Thanks for popping by I am lining up some posts for you, a few tutorials, frequently asked questions answered, a project revisited and a bit of general life so until I *see you* soon, as ever,
Happy Crafting
Love
MJM x

Tuesday, 7 June 2011

A Glitzy Beach hut and a Glitzy dad!!

Hi all, for my Glitz offering this month I decided to swap one of my layouts for something a little different ....


Oh I do love to be beside the seaside!! And the fabulous Afternoon muse papers with a few other Glitzy bits from the other lines were perfect to create my little piece of summery home decor ... here's the ingredients;
Glitz Designs Afternoon Muse papers; Stripe, Polka, Floral, Block and Carte Postal
Glitz Designs Laced with Grace paper; plaid
Glitz Designs Afternoon Muse Glitzers
Glitz Designs Love Games Paper layers
Glitz Designs Love Games cardstock stickers - titles
Glitz Designs clear distressing stamps set 3


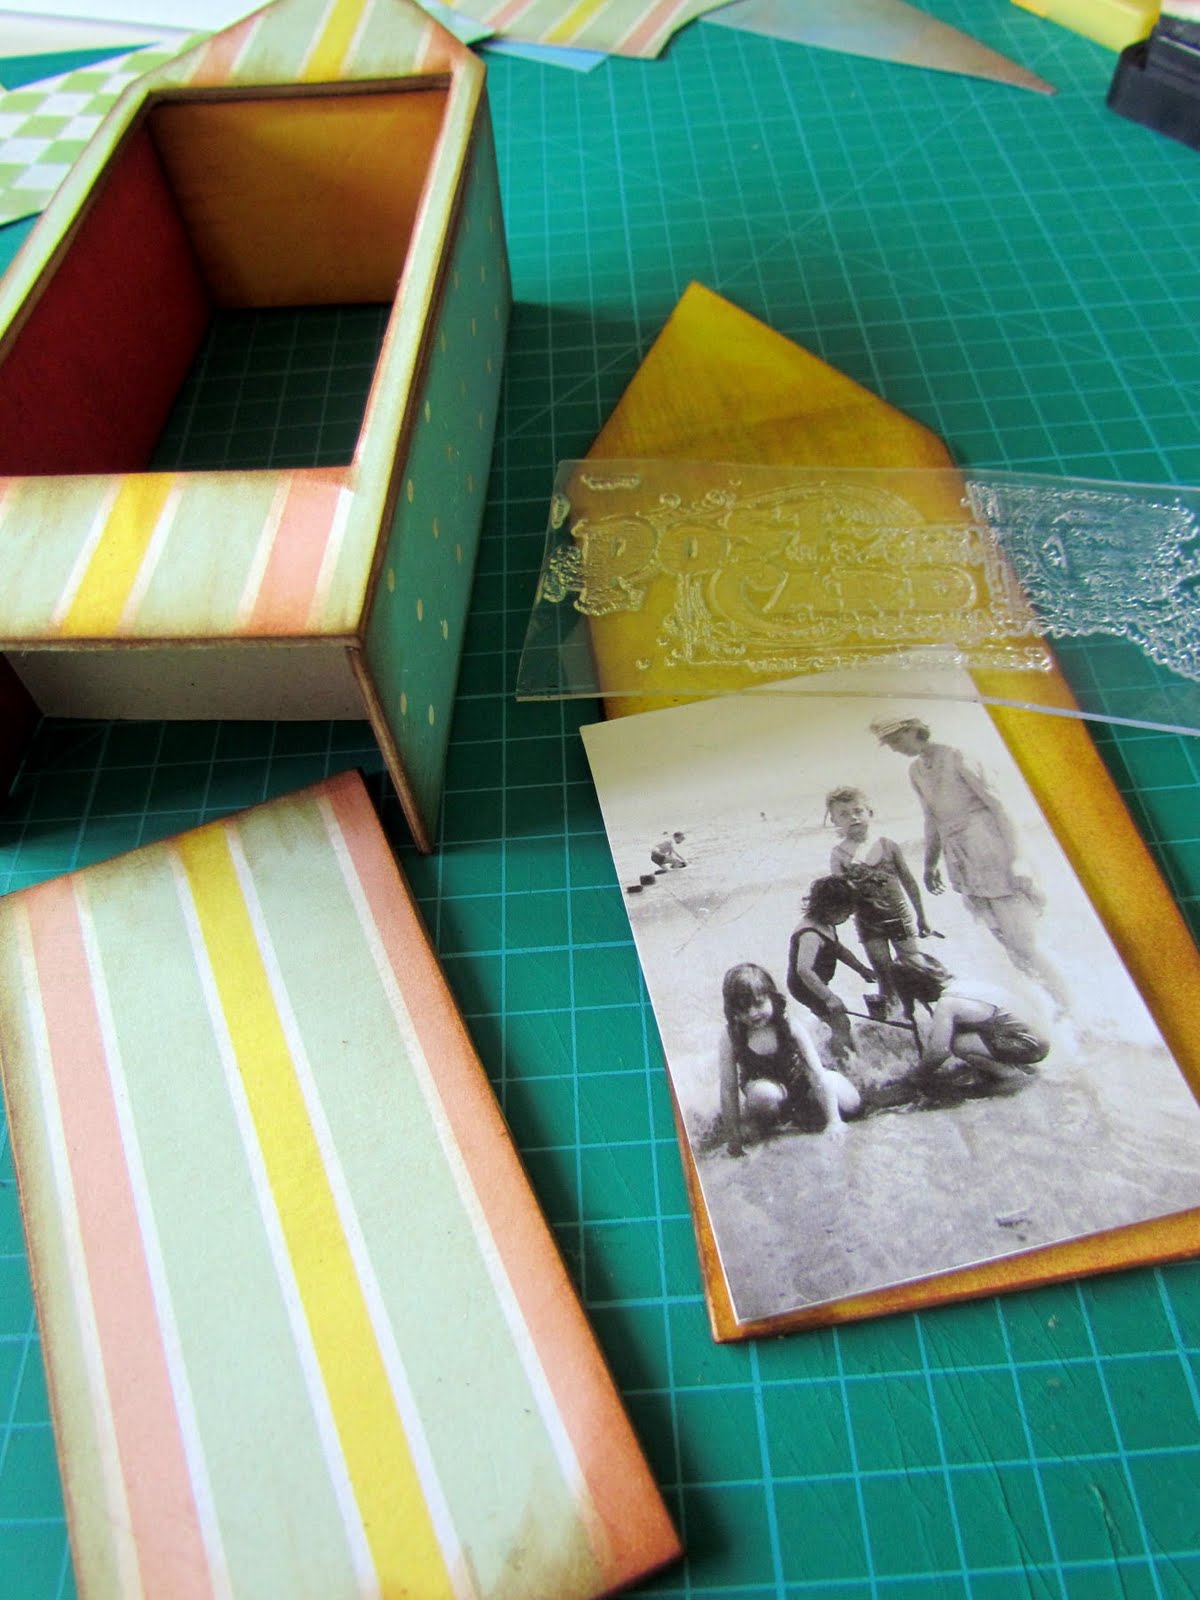
I cut out my pieces for construction from some chipboard...


...then covered them with the yummy papers on both sides and started to construct. Before I attached the back of the hut I decorated the inside of the back panel with a Glitz stamp, my family photo and some material for texture.


After attaching the back of the hut I decorated the door and added a hinge down the left side made from a strip of patterned paper folded in half.


For the roof tiles I cut the green diamonds from the reverse side of the Carte postal paper, cut them in half and layered them up on the roof, adding the bunting cut from the paper layer to the front.


I added some little trinkets inside the hut and added a small step to the front finishing it all off with the cardstock sticker on the inside of the door. I hope you've enjoyed my little trip to the seaside. Next I'd like to introduce you to a very special man in my life ...


...My Dad! As it's fathers day this month we are celebrating the special fellas in our lives over at Glitz and the Love Games line fits perfectly with this rare photo of my dad not making a cheesy grin at the camera! Here's what I used;
Glitz Designs Love Games papers; polka, stripe, damask, floral
Glitz Designs Love Games cardstock stickers; titles and journalling
Glitz Designs Love Games paper layers
Glitz Designs Afternoon Muse glitzers
Glitz Designs Love Games whatnots
Glitz Designs teeny alphas; Burnt orange and cream
Glitz Designs Run on fancy frames


I started with a bit of distressing, well I would wouldn't I! and decided to go with the lovely black side of the Love Games floral paper as my base, adding in a little red insert with the polka paper to match the mount I created for the photo.


I built up layers of paper, paper pleats, rub ons and some hessian for texture.


My top tip when using the fabulous Glitz whatnots and stickers, if you only want to have a bit peaking out, cut them so you get the rest to use on another project.


Adding the teeny alphas (LOVE these!) for my title...


... I finished off the layout by circling the relevant words on the paper layer for my journalling. I think this layout will go on an easel on the side in my house, the Love games papes are so stylish and I want everyone to know how much I love my dad!

Thanks for letting me share my Glitzy projects with you and thanks for stopping by. I'll see you soon,until then Happy Crafting
Love
M x

Monday, 30 May 2011

{happy birthday} froggity blog hop

Hi all
Well that's another month gone and time for another Banana Frog blog hop, can you believe we're nearly half way through the year!! Anyway this months blog hop is a special one .... it's the little green guys birthday and what's a birthday without some cake?


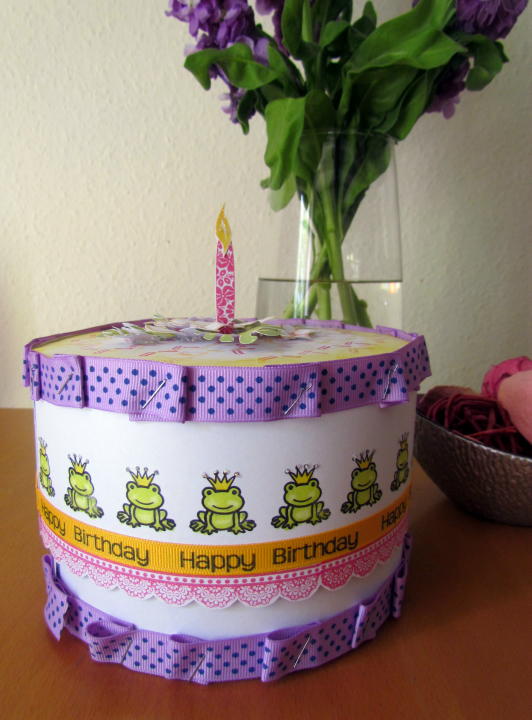
And better still this one is calorie free :) and doubles up as a great gift box! I have used a veritable feast of Frog stamps for this project Charming prince, Tropical garden, Build a daisy, Simple greetings, That takes the cake and It's all about elegance (psssst all these stamps are on sale, go on treat yourself ;))


1st up I cut a strip of white card for the lid and stamped along the bottom edge with the lace trim from It's all about elegance and trimmed to the pattern. Then added the greeting from simple greetings along some ribbon with permanent ink sticking it along the strip above the stamped lace trim.


Next thing was, what else but, the cute little frog from Charming prince, again stamped with permanent ink so I could colour them in with my pro markers.


I cut a wider strip of white card for the base of the box and added a purple trim to the bottom of it and along the top of the top strip of card using a stapler to pleat it as I went to give a look of piped icing.


I then added some bling to the crowns with glitter glue.


Cutting a circle with dragons teeth for the top and bottom of the box I added pretty sprinkles to the top from the stamp in that takes the cake and inked the edges.


Using the totally tropical stamp set I stamped some leaves and flowers mixing the ink on the stamps to create shaded colouring. I used one of the petals from build a daisy to create the candle and one of the leaves stamped in yellow for the flame.


To make the candle stand up on the cake I cut it with some tabs on the bottom of the petal that were stuck to the underside of the top when it was in position.


The flowers and leaves were added with silicon glue and curled before sticking in place to add dimension.


And that's it a unique froggy birthday gift box :)

Thanks for hopping by today, your next stop on the hop is the fabulous Francine (I love her style) and don't forget to comment as you go there may be birthday prizes!! Enjoy the rest of the hop and I'll see you soon. Until then Happy Crafting
Love
M x

Monday, 18 April 2011

Glitzy Springtime and Bunnies

Hi all,
Spring is here and with it arrived a box of new goodies from Glitz Designs on my doorstep. It's contents made me smile as much as the blue skies, the flowers in the garden and the lambs in the field, the new lines are yumsville and I know you're going to LOVE the new stamp sets. So what better thing to scrap first than some Spring photos!


This layout is inspired by the beautiful Spring day today and the 'song' I have journalled. It is from one of my all time favourite films Willy Wonka and the chocolate factory (the original Gene Wilder version, love you Mr Depp but Gene rules this one!) and I sing it a lot at this time of year, but originally it came from As you like it by Willam Shakespeare and even then he was quoting from a celtic ballad 'it was a lover and his lass' ... hmmm best stop waffling and let you know what I used!

Glitz Designs Afternoon Muse papers; Banner, Stripe, Block, Floral, Carte Postal, Polka
Glitz Designs Laced with Grace paper; Butterflies
Glitz Designs Afternoon Muse and Love Games Clear Stamps
Glitz Designs Afternoon Muse Glitzers
Glitz Designs Afternoon Muse Paper Layers
Glitz Designs Teent Alphas; Burnt Orange, Cream, Bubble gum pink, aqua block, yellow block, apple green block
Glitz Designs Maya cardstock stickers


I cut out all the shapes I needed for the fields, rainbow and clouds etc distressing edges as I went. When doing a collage like this I use a plain 12 x 12 piece of cardstock to build it on so I don't waste too much of my precious paper (this also means it's a great way to use up scraps!) The colours and patterns of the afternoon muse papers are great for my happy spring collage, love that polka paper!


The hot air balloon and sun rays are made using the new stamps. So useful and so much fun not to mention brilliant stamps that give a great image every time.


I took some photos of the lambs in the field next to our house and cut them out to fit into my collage and cut out the photo of my nieces (a great way to lose a dodgy background)


With scissors still in hand I cut out lots of flowers from the floral paper even ones that were missing petals (as they are tucked under flowers in the design) and those around the edges as they still work when I layer everything up.


Once I'd layered all the flowers around my photo and tucked some behind the 'hills' I cut out some of the butterflies from the laced with grace paper, curled the wings and added them all over the collage.


Finally I set to with the teeny alphas. My favourite all time alphas ever and I LOVE the new additions to the line with their mixed up style of letters, the colours make my heart sing! I added some doodled journalling inbetween and doodled in places on my collage


and that was it done, a happy spring time layout with one of my favourite photos of my nieces. My second layout stays with my beautiful nieces and something else that happens at spring time ... Easter.


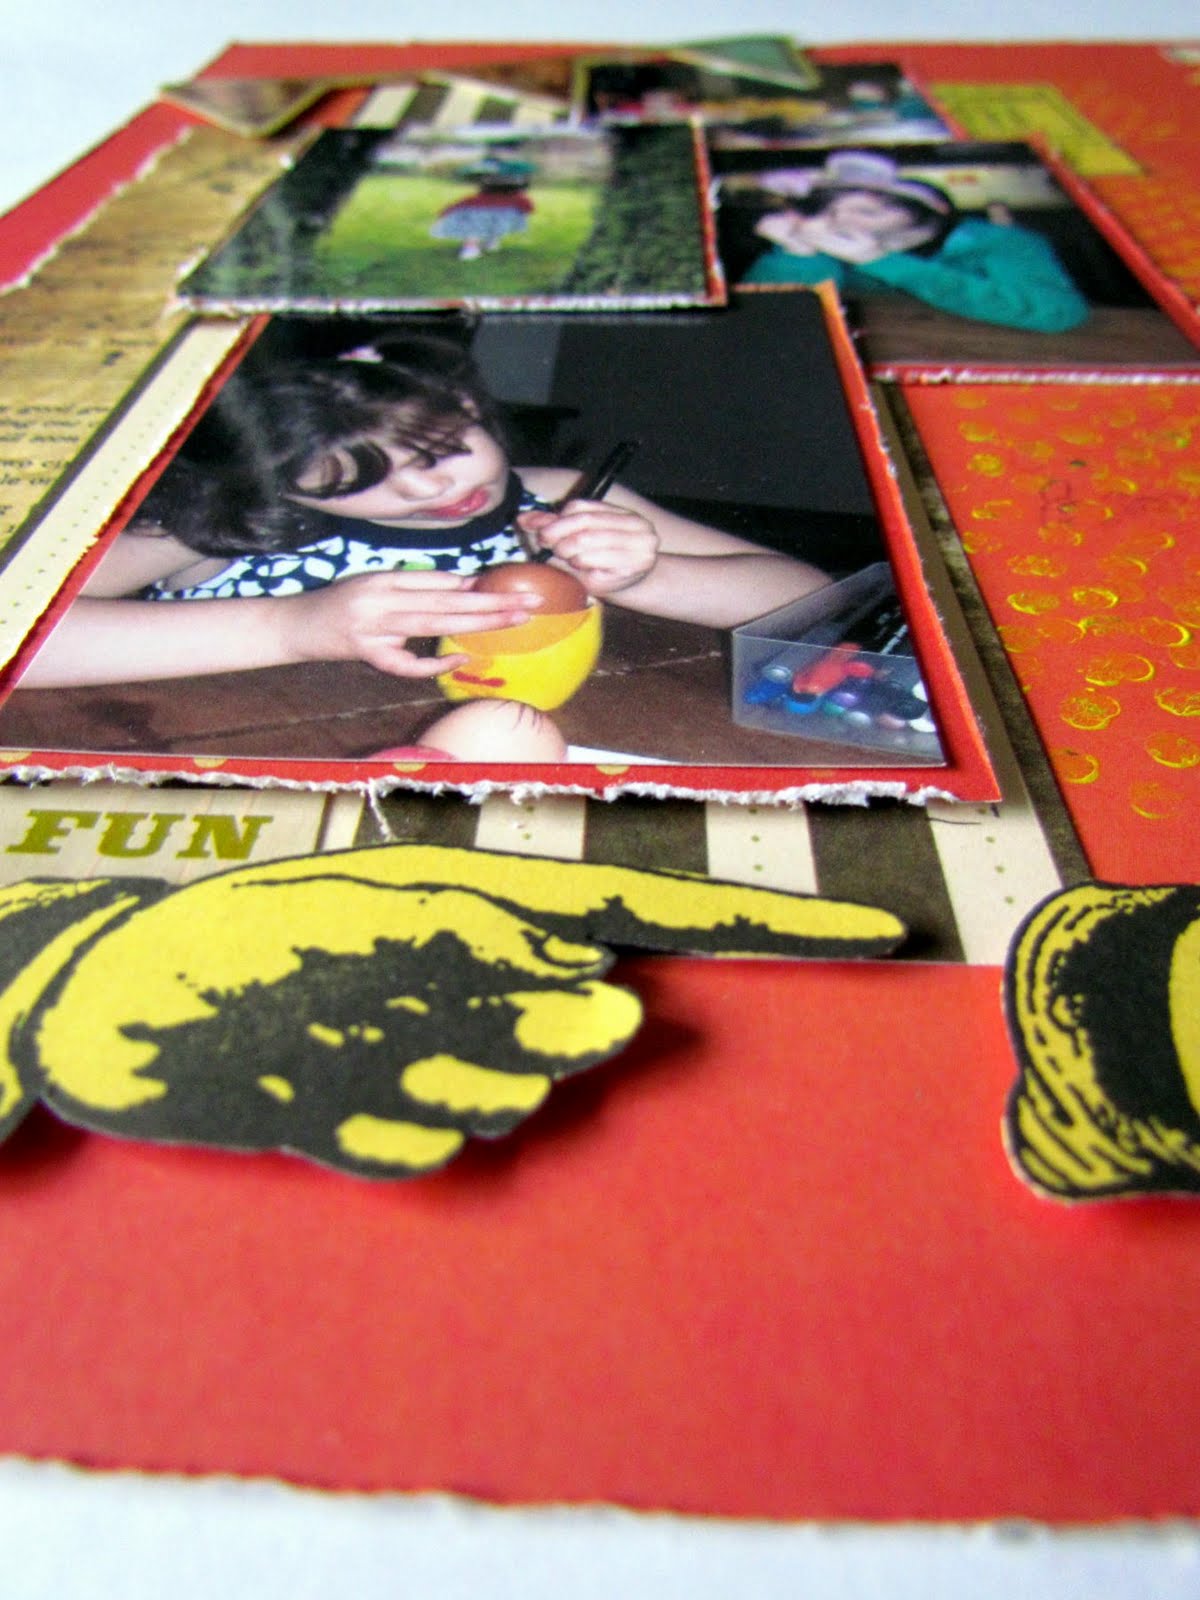
This is a record of a really fun Easter weekend spent with them and my sister. Decorating eggs, eating roast dinner and driving the girls crazy with a fiendishly clever Aunty Michelle treasure hunt LOL. Here are my ingredients;

Glitz Designs Laced with Grace papers; Rose, Stripe, Polka
Glitz Designs Afternoon Muse paper; Floral
Glitz Designs Laced with Grace Peek-a-boo
Glitz Designs Laced with Grace Clear Stamps
Glitz Designs Afternoon Muse Peek-a-boo
Glitz Designs Afternoon Muse Cardstock Stickers-titles
Glitz Designs Afternoon Muse Paper Layers
Glitz Designs Clear stamps Distressing set 2
Glitz Designs Teeny Alphas; cream


The orange tones with the playground imagery from Laced with Grace mixed with the Afternoon Muse yellow were perfect to tell my story. I broke up the orange 12 x 12 by stamping, using a distress stamp with yellow paint, around the area my photos would sit to tie everything all together.


I stamped images on to the yellow paper and also adhered one of the Afternoon Muse peek-a-boos onto it to pop it off the page.


I lifted my photos by matting them onto some of the polka paper and cut out the photo of my bunny eared niece to create a photo embellishment of my own.


I framed my cut out niece with a peek-a-boo from Laced with Grace and as it has a cut out centre I could pop her out of it on foam pads for dimension. I added an orange butterfly from the paper as an extra embellishment.


The cut out stamped images, cardstock stickers, a paper layer and those gorgeous teeny alphas finished off my layout. Another happy layout that makes me smile

So what new Glitzyness will you use to make you smile? .... warning! You will be spoilt for choice .... whatever it is please share it with us and now there is the perfect opportunity to show off your Glitz with the new Monthly challenge, see details here and get Glitzy and creative!

Thanks for stopping by and letting me share my projects with you. I hope you're all well and happy and enjoying Spring, until soon Happy Crafting
Love M x

Monday, 4 April 2011

Old Techniques and favourite stamps!

Hi all
It's my turn to share a project over at the Lily pad. A revisit to an old chalky technique and some of my favourite Banana Frog stamps


As ever the step by step instructions are over on the frog blog so why not hop on over and check it out, and while you're there snag a bargain, there's an AMAZING sale on stamps in the shop!!!

I hope you're well and happy, I'll *see you* soon, until then Happy Crafting
Love
M x

Friday, 1 April 2011

NEW and absolutely FREE craft stamper e-zine

Hi all

Have you heard about the new kid on the block?? We all know and love the Craft Stamper magazine right? Full of inspirational projects covering all crafts with a twist of something different thrown in for good measure!....

..... Well today see's the launch of the craft stamper e-zine FREE to download NOW


and packed full of projects, 12 complete step by step projects to be exact, all projects chosen from the best of 2010 by the readers so what are you waiting for? ....

.... oooh! wait! there's more! add this....


...Blog button to your side bar (adding this link http://www.craftstamper.com/ezine/ to it) and then go to the Craft stamper website and leave a comment, there is blog candy available so really it's a win, win situation for all of us .. a free e-zine and the pleasure of spreading the word about it with blog candy thrown in for your efforts woo hoo!

So go download and spread the crafty word to one and all wherever you can shout about it, from face book to the roof tops and anywhere in between .... you know it makes crafty sense!

I hope you're all well and happy, enjoy your craft stamper e-zine and I'll see you soon .... Happy Crafting!
Love
M x

Friday, 25 March 2011

The Art Tart DIY CD collections

Hi all

How are you? I hope the sun is shining with you today, doesn't life seem so much better when the sun shines?? I seem to have been so busy these past few months, chasing myself coming back that it's been difficult to think straight but with the sun shining and spirits lifted I think it's about time for a shake up on many levels ;)

I feel I have neglected my little corner of blogdom of late and my poor website is in desperate need of some TLC so there will be spring cleaning and re vamping going on over the next few weeks!

I also feel I have neglected the crafter within me of late but never fear the craftiness inside is waking up and I am cooking up lots of very 'Michelle' things that will become the focus of my attention going forward .. isn't it all too easy to get bogged down with things sometimes? But no more! I am flinging my arms wide and embracing new challenges with a spring in my step!

I had a great time at the Olympia stitch and craft show last weekend and I think that was also a big 'wake up and take stock moment' for me as I had a gallery of my work out,things I had forgotten about and things that I miss! I had great workshops and met some lovely people .... all the lovely comments did me a power of good so thankyou to all the great people who crossed my path! I will share workshop photos soon but first the other thing I want to share from the show are the 2 DIY project CD collections I produced for the show.

Each CD contains 4 of my full step by step DIY projects with templates and 11 bonus projects of workshops I have done over the past year oh and also 290 photos of my gallery for you to peruse, scrap lift and hopefully be inspired by. Many people have asked me for a book of my stuff and at the moment this is the best way for me to share :) They were made as a limited edition for the show so there is only limited stock so please pop on over to the shop on my website www.mjm-thearttart.com and grab a bargain. Each CD is £10.00 that's 15 projects (A single DIY project has been on sale for £5.00 - £7.50) for a bargain price (and no P&P when posting within the UK) Here's the pics of the covers so you get an idea of what's on offer ...


The back cover is the same on CD 2 just blue LOL

There are more DIY projects being cooked up at the moment and lots more exciting things, watch this space, that crafter within is taking over LOL.

And Finally just before I go the other thing I have neglected is sharing photos of the terrible twosome Stan and Ollie, they are as adorable and funny as ever and I will share lots more of their antics soon, in the meantime here are my boys ...


Thanks for letting me waffle on :) and thanks for popping by, don't forget to pop on over to the website to snag a CD bargain .... the website will be going off line in a week or so for it's overhaul and spring clean so grab em while you can!

I'll be back soon, I hope you're all well and happy and as ever Happy Crafting!
Love
M x