Showing posts with label blog hop. Show all posts

Saturday, 11 January 2014

Scrap365 Blog Hop

Hi all

At Scrap365 we are getting your scrapping New Year off to a flying start!!!
This month we are teaming up with Finnabair and her amazing DT from Mixed Media Place :D

http://mixedmediaplace.com/index.php?route=common/home
 
One of the things that we are very conscious of at Scrap365 HQ is that if you are new to scrapping it can be really overwhelming with the choice of products to use and the host of styles to emulate….the same could be said if you’re experienced!!

So we have decided that 2014 is the year to get BACK to BASICS!! It doesn’t matter if you have been scrapping for ten years or ten days...you will be sure to learn something new along the way!

Finn has very kindly donated a marvellous prize to either add to your stash or to get you started.


All you need to do to be in with a shot of the prize is follow the Scrap365 and Mixed Media Place blogs. Like both on Facebook and leave a message on the Scrap365 blog telling us which layout principle you are going to try! We would love to see your take on the Principles so be sure to upload them to our Facebook page :)

Our January Blog Hop is all about layout principles. This fabulous prompt was found on Pinterest, courtesy of SuzyQ Scraps. It really sums up the beginnings of every layout.

 
So continue your blog hop journey with us and see how this turns into some glorious pieces of art :)
 
And here is my little offering
 
 
I chose to work with the 6th principle on the sketch ... Texture. I love making my work 'touchy feely' and I like people to have not only a visual experience but also a tactile experience when I share my work.
 
Texture can be added to your work in so many different ways. It can be done with embellishments, material, paint and even the paper itself. I'm going to break down my layout for you to give you a few ideas on how you could add texture to your layouts and hopefully prompt you to explore other ways for yourself. 
 
There are so many gorgeous papers on the market now that already look textured and they are a great place to start from as with my base 12 x 12 from 7 dots studios, I then set to work with some distressing....
 
 
I do this by holding my scissor blade at a 90 degree angle to the edge of my paper and scratching it backwards and forwards. Start gently and add more and more pressure as you get the feel of the paper to create as much or as little distressing as you desire.
 
 
Ripping the edges also gives a different paper texture, rip towards you to reveal the core of the paper.
 
 
I created a 'scrunched' frame for my small photo which added a different paper texture and even more dimension to my layout. Distress the edges of a mat which is cut a bit larger than the photo and then curl up the edges, ripping into the frame as you go.
 
 
Once all my paper and photos were distressed I moved onto some fabric texture with ribbons and lace. All sorts of fabrics make for great textural additions to your work from net to hessian, ric rac braid to felt, velvet to denim.


I like to attach my lace and ribbon with staples by pleating them roughly as I go to add some movement to the strips I use. Also the metal of the staple plays really nicely against the texture of the lace.


And then I raided my embellishment boxes and added even more texture with metal, wood, resin, cork and wire. Pick textures that not only feel different next to each other but also textures that the eyes can see which creates a visually textural feast even if the viewer can't touch your work physically.


The last thing to add was my journaling (which is a quote from Bruce Lee) You can add texture with your alphas too, some are 'touchy feely' with so many great choices on the market and I also find by mixing up the styles of alphas I use I can create visual texture too.

 
The following close ups show the mix of textures I have used in a little more detail.
 
 
Layering up the elements creates texture in itself by adding dimension.


and doodling some of the title adds my own personal texture to my work
 
 
I hope this will inspire you to add some extra texture to your work and have a play about with different materials and embellishments.
 
That's it from me for this little installment of our blog hop, I hope you've enjoyed your visit and will pop back soon to *see me* Now it's time to hop off to the next lovely in our list, the uber talented Pascale and one of the lovely Mixed Media Place girls, you're in for a treat ... enjoy! (just click on her name to get there)
 
Don't forget to leave your comments on the Scrap365 Blog when you get back to the beginning and follow the instructions to be in for a chance to win that gorgeous prize! And maybe you could leave some blog love on the DT blogs along the way ;)
 
Thanks for your visit and until soon, as ever,
Happy Crafting
Love
MJM x
 
Materials used; Paper = 7 dots studio - Messy Head & Glitz designs - Wild and Free Arrows, Drip. Embellishments = Prima decorative wooden embellishments, Tim Holtz idea-ology cogs, Metal charms from PaperArts, Websters pages - Alison Kreft recorded stickers, Freckled Fawn cork arrows,
Alphas = American Crafts Thickers - Sentiment foil letter stickers, Cosmo Cricket tiny type

 

Wednesday, 13 November 2013

Has it been so long???

Hi all

Sneaking in to remove the dust covers, open the curtains and let some air in to my little corner of blogdom!

http://www-graphics.stanford.edu/courses/cs348b-competition/cs348b-05/abandoned/images/abandoned.jpg

I really cannot believe it has been so long! I had to giggle to myself when I read the last post and made a comment about it not being May like weather but more like November .... prophetic? Or am I just rubbish LOL

I guess I need to find some love for blogging again, I know I posted ages ago about this very subject. I used to love blogging and leaving little bits of my life here in cyber space but think I got a little jaded with it all, being on so many design teams at one point when blogging was not an option as I posted my regular DT projects every month. As life got busier in other ways I had to part company with a lot of those lovely companies and suddenly I was free to choose when I blogged. I intended to take a little time off but it's like going on a holiday, it takes me a little while to resume normal life and I guess my blog has suffered the most. Anyway no excuses and no apologies that's the way it is, however I am going to try and get back into the groove and hopefully will make it back here a little more often ..... but no promises right??!!

I am stacking up some posts now, basically having a blogging day ;) There will be catch up bits, up to date bits and hopefully lots of crafty bits :)

But to end this post the first thing I am going to drop off is this link to the Scrap365 blog

http://scrap365.blogspot.co.uk/


.... there is a blog hop and you still have time to join in for the chance to win the new American Crafts Autumn Crisp collection. There is loads of lovely inspiration on the blogs of some of my fellow DT members on the mag so go on why not indulge and be inspired and remember to read the rules, post along the way and you could win all those goodies! Why am I not in the blog hop? Too busy this month but I will be playing along with the next one ;)

Right my crafty lovelies and anyone who has stumbled along here by chance I will get this posted and keep writing some more posts and who knows maybe it will be worth popping back really soon!

Until then, as ever, Happy Crafting!
Love
MJM x

Thursday, 22 September 2011

Scrap 365 .... the cat's out of the bag at last!

Hi all

Welcome to my little slice of the Scrap 365 blog hop, I hope you're having fun :) If you are here under your own steam why not start at the beginning on the Scrap 365 blog? I don't want you to miss out on any of it!

So finally the cat is out of the bag and we can shout about Scrap 365, the brand new UK scrap magazine coming very soon. I have been lucky enough to have worked with Katy Fox (the editor of Craft Stamper and this new title) as a freelance consultant on Scrap 365 and all I can say is this is going to be a great magazine with a super talented design team bringing articles covering all aspects of scrapping today.

For those that don't know me let me introduce myself. My name is Michelle Jackson-Mogford aka MJM. I’m a onetime theatre designer/stage manager who decided to give it all up to get back to my arty roots and I’m loving it! I’m married to a comedian (that’s a whole other story!) and I live in the beautiful British country side with him and our 2 little dogs Stanley Dervish and Oliver Pickles

I discovered scrapbooking at the beginning of 2007, I love creating art with meaning as well as being really into collage so scrapping is perfect for me. I also enjoy using my model making skills to create 3D scrap art and interactive pages.

I was proud to be a Best of British Scrapbooking winner 2008. I am a regular contributor to the Craft Stamper magazine and have been featured in other craft magazines in the UK. I design for Banana Frog stamps here in the UK as well as Purple Cows Inc and Glitz Designs in the States. I also work with Serif (Digital Craft Artist) and I have been demo-ing their product on Create and Craft/ Ideal world TV as well as Purple Cows tools for the last year and a half and love being part of an amazing TV family!

The rest of 2011 going into 2012 is shaping up to be very exciting with many big crafty projects on the go and a 6 week Amazon cruise on which I will be teaching craft classes ... lucky, lucky me :)

As part of the hop we've been asked to share one of our favourite projects of 2011 with you and I think mine has to be a class I designed for the Scrap-A-Mia retreat back in the Spring ...


A scrapped birdcage....


...A unique piece of home decor...


...That looks good all ways round...


...Containing pictures of our Granddaughter...


...and our Grandson (I know what you're all saying, I don't look old enough LOL, it's my step son's children ;))


I also converted it to a double layout


For anyone a little nervous to tackle the construction


and I have to say I like the layout just as much :)

I best stop waffling now and let you carry on with the hop. Before you go don't forget to leave a comment. REMEMBER! leave a comment on EVERY DT blog and on the Scrap 365 blog for a chance to win a years subscription to Craft Stamper (our big sister magazine) PLUS over £20 worth of stamps .... now that's worth leaving a few words for isn't it :) Oh and if you're lucky enough to be at Ally Pally for the Big Stamp and Scrapbooking show this weekend don't forget to pop along to the Traplet stand for a sneak peek of the new mag and a fabulous subscription offer! (Can't make Ally Pally but still want the fab subs deal? If you live in the UK you can still get it by calling 01684 588599that'll get you the first 3 issues for just £1 whoop whoop! And click the button on the post earlier today on the Scrap 365 blog to be entered into the prize draw so you don't miss out on a thing!)

So you're next stop is with the oh so talented Wendy McKee Enjoy!!

Thanks for stopping by. I am absolutely thrilled to be part of the Scrap365 Design team..... It’s going to be a grand adventure!

*see you* soon, until then HAPPY CRAFTING!
Love
M x

Saturday, 30 July 2011

Froggity blog hop!

Hi all

It's that time of the month when the froglets leap from their Lilypads and share some work with you on the Banana Frog blog hop. You can start at the beginning from the frog blog if you have just happened to visit, if you're here on the hop I hope you're having fun :)

This months theme is Summer so I made some summery cards to share with you ...


I like the clear fresh look of the acetate and love adding a splash of colour to acetate stamping with some alcohol inks.


Happy Days card


This is super simple. Using the Totally Tropical stamp set, add some different coloured stayzon to the large corner stamp and stamp twice onto your acetate. I really like mixing inks on my stamp to get a shaded, multi coloured image. Top tip, when stamping onto acetate get right over the top of your work and stamp straight down positively but not too heavy handed as the stamp will slide!


Stamp two title blocks from the Tropical Taste tadpole stamp set, again mixing the colours and then stamp the greeting from the Sentimental Style stamp set on to one of them. I have stamped two sentiment blocks so the one with the greeting will be for the front and the other one attaches to the inside behind it to cover up the glue marks, obviously it shows just plain white on the inside as the stamped side goes against the front block, but, as I have used gel glue to attach the sentiment for dimension it is quite nice to see the double stamped image. Hmmm I keep re reading this last bit .. does it make sense?? LOL


You are my sunshine card


Again another simple card but I think it has added impact with the alcohol ink. Using the Scribble Flowers stamp set, I stamped a pattern using black stayzon down one side of the card front.


Flipping the card over I then dropped on some alcohol inks in different colours and let it do it's own thing! While it dried (it doesn't take long!) I stamped the little sentiment block from the Build a Daisy stamp set, again I did this twice attaching one to the front and the other behind it


Flowers in Nature


And finally, a card that mixes a bit of all of them! I stamped the flowers from the Super Dreamy stamp set using several stayzon colours, Stamped the sentiment from Build a Daisy and finally added some butterflies from the Swirls and Butterflies stamp set. I then added some alcohol ink to the back of the sentiment area, letting it do it's own thing again and that was it, a striking card made simply :)

I hope you've enjoyed your visit with me on the blog hop and feel inspired to do some simply clear summer stamping, I feel inspired to take this to a larger project and am cooking up a layout for my Project of the Day on the 4th August so please check back then!

A lot of the froglets are very busy at the moment with summer holidays etc so this month is just a short hop, I will direct you back to the Lilypad to catch up on those you've missed or to peruse for added inspiration and don't forget to check the shop link to grab a sale bargain while you're there! thanks for stopping by and I'll see you soon, until then Happy Crafting
Love
M x

Monday, 30 May 2011

{happy birthday} froggity blog hop

Hi all
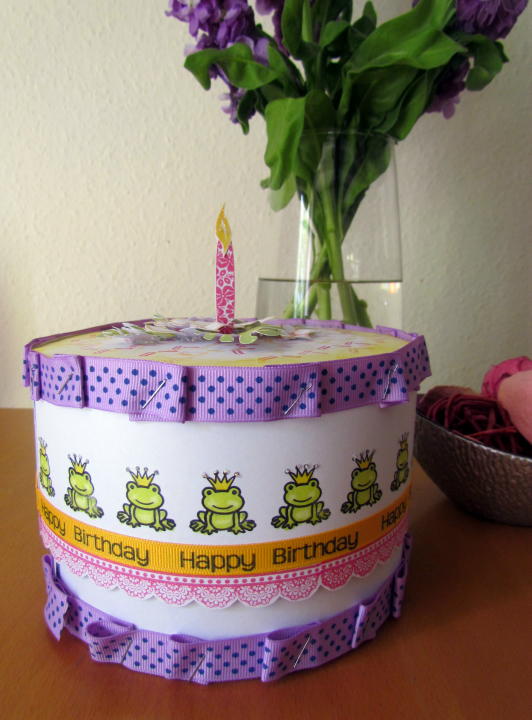
Well that's another month gone and time for another Banana Frog blog hop, can you believe we're nearly half way through the year!! Anyway this months blog hop is a special one .... it's the little green guys birthday and what's a birthday without some cake?


And better still this one is calorie free :) and doubles up as a great gift box! I have used a veritable feast of Frog stamps for this project Charming prince, Tropical garden, Build a daisy, Simple greetings, That takes the cake and It's all about elegance (psssst all these stamps are on sale, go on treat yourself ;))


1st up I cut a strip of white card for the lid and stamped along the bottom edge with the lace trim from It's all about elegance and trimmed to the pattern. Then added the greeting from simple greetings along some ribbon with permanent ink sticking it along the strip above the stamped lace trim.


Next thing was, what else but, the cute little frog from Charming prince, again stamped with permanent ink so I could colour them in with my pro markers.


I cut a wider strip of white card for the base of the box and added a purple trim to the bottom of it and along the top of the top strip of card using a stapler to pleat it as I went to give a look of piped icing.


I then added some bling to the crowns with glitter glue.


Cutting a circle with dragons teeth for the top and bottom of the box I added pretty sprinkles to the top from the stamp in that takes the cake and inked the edges.


Using the totally tropical stamp set I stamped some leaves and flowers mixing the ink on the stamps to create shaded colouring. I used one of the petals from build a daisy to create the candle and one of the leaves stamped in yellow for the flame.


To make the candle stand up on the cake I cut it with some tabs on the bottom of the petal that were stuck to the underside of the top when it was in position.


The flowers and leaves were added with silicon glue and curled before sticking in place to add dimension.


And that's it a unique froggy birthday gift box :)

Thanks for hopping by today, your next stop on the hop is the fabulous Francine (I love her style) and don't forget to comment as you go there may be birthday prizes!! Enjoy the rest of the hop and I'll see you soon. Until then Happy Crafting
Love
M x

Sunday, 30 January 2011

Froggity Blog hop

Hi all
And welcome if you are here via the Banana Frog blog hop, but you're also welcome, ofcourse, if you have just arrived here in passing! If you'd like to join in the hop it's not too late just hop on over to the Lilypad and start at the top of the list I know you will find loads of inspiration along the way from the oh so talented froglets!

At this point I am adding in that this post is late (sorry) as I have holiday brain and have gained a day somehow .... hmm margueritas?? I am also now saying a HUGE sorry as now this post is publishred all my photos seemed to have disappeared from my post!!! I'll post the lovely photos (such a shame I love this project!)when I get home next week as I don't have them with me :( I also prepared this post before I flew off from blighty and before the winter theme for the hop was decided ...oops! Going well so far LOL ok enough extra waffle let's move on :)

So here's my project for today, with valentines on the way I thought I would share some Lurve!


Love Tokens


The ingredients
This project uses the aptly named It's all about love stamp set and the DeLouisville tadpole set. I have also used some Bubblegum Canford card, white card, colorbox archival ink in Firebird, red devil and dark cherry, Embossing ink, cosmic shimmer ruby blush blaze embossing powder and a pink doodle pen.


Stamp the large heart from the set on to some white card and draw a line around it larger than the image, cutting it out to create a template for the top and bottom of the box.


Draw around the template onto the pink card and once again draw around the image creating a margin to snip so that it can be folded over and create the anchor for the sides of the box.


Fold up the snipped sections and adhere a strip of card around the hearts. Before adhering the strip around the top of the box, stamp it with the small dangling hearts fronm the samp set. NB you need to make the top heart the merest fraction bigger than the bottom so the lid fits on the box snuggly


Stamp the large heart onto some white card and cut out following the scallops, then stamp the large heart again on to some pink card this time cutting just inside the line of the inside heart to create a mat for the box top.


Emboss the smaller heart onto some white card and cut it out to create an embellishment for the centre of the box top.


The box could contain any treasure for your loved one to enjoy but I think these love tokens are fun, personal and in expensive as they can carry such promises as breakfast in bed and a day of sport on the telly! Stamp the large heart onto some white card and cut out following the scallops. Use the Tadpole set of DeLouisville to write the word and doodle around the heart with a pink pen. The 'claim' for the token can be written on the back.


Add some tissue paper in the bottom of the box, maybe some chocoates and a few love tokens and enjoy that specal squidgy feeling when you give it to your loved one and they admire the effort you've made to say 'I love you'

I hope you feel inspired, and talking of inspiration your next stop is the talented
Lory and I know she will be better organised than me :)
Enjoy the rest of the hop and thanks for stopping by my little section of the Lilypad :)
I hope you're well and happy and until soon Happy Crafting
Love
M x