... and I'm over it LOL! Hi all! since I was last here I had a birthday ...
Hubby took me to Stratford for a picnic and shopping and then cooked yummy crispy duck in the evening, a lovely day all round. Wierd that last year was a big build up to the big four 0 and this year it kind of just happened :) Thankyou to all my lovely friends and family for all the birthday wishes too I was over whelmed by all the messages that popped up across my various hide aways in cyber space! Ok so moving on ...
Today is my project of the day over at the Lilly pad for Banana Frog ..
A Froggie fairytale
I had sooooo much fun making this simple little project and the step by steps for it can be seen on the frog blog here.
Yesterday was one of my monthly workshops with the lovely ladies at Bee Crafty. We made versions of this ...
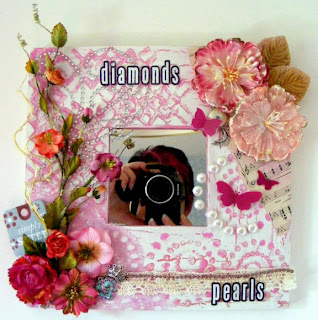
A mirror I altered for my first guest design spot over at Banana Frog over a year ago ... oh my where does the time go?? Once again the joy I find in teaching is to see how everyone makes their own unique version of a project ..
We made our own vines for this class and they turned out great (I think that will be a post to come :)) as well as making tissue paper flowers of all shapes and sizes! I had a lovely day with everyone and as ever thankyou to all the ladies.
A couple of posts ago I mentioned my work with Serif and digital scrapbook artist 2 and thought I would share some of my layouts
This was my second ever digi layout made within about 2 hours of loading the programme! It really is so super easy to use and so much fun, infact it should come with a health warning it is so addictive! I have printed this one off on an A3 printer and mounted it on some 12 x12 cardstock, you don't need an A3 printer just put it on a usb stick/cd and take it to the stationers to print or print in 8 x8, A4 or anyother size you like!
This A4 layout is completely digi. I love the blend modes on the software, literally one touch blending to create that designer look paper by adding your own photos to your backgrounds
and taking that idea a step further, creating my own background paper with a photo in it, printing that off and making a hybrid page with the heart journalling embellishment created in the programme.
I'm finding it fascinating to create a completely digi layout
and then copying that in hybrid form. The letters on these layouts use the stencil facility in the programme and are filled with photos of Stratford. I am really loving playing with this digi scrapping, a surprise to me really as I am a paper and glue girl but it's giving me a wider feild to play in and experiment and I love that I can create my own papers and embellishments in the programme! If you haven't got yours but are intrigued I'll be back on Create and Craft with Serif for 2 shows on the 17th August and again on the 23rd ... see you there :)
And Finally...
My handsome boys with their new haircuts!
Helping me unwrap my birthday presents, not a very clear photo but it makes me smile :)
On the way for the picnic in Stratford, Stan is so protective of his little bruv!
And then the boys had to get in on the act of the pink champagne, the cork was a great source of amusement for Oliie
and a 'won' prize for Stan!!
And relax LOL .....here endeth the waffle! I will be scheduling some posts over the next couple of weeks as I am off up the baltics, as it were!! On a cruise ship with hubby, think russian ballet, the hermitage and cocktails on deck ... I can't wait :) The boys are off to visit with sister Ruby in Yorkshire, oh dear what am I landing on mum and dads doorstep!!!!
Thanks for visiting and I'll be reporting back soon ... ish :) until then Happy Crafting.
Love
M x
Sunday, 25 July 2010
Saturday, 17 July 2010
Simple things
Hi all
This is an even quicker post than yesterdays :) and is one of those magical scheduled ones as I will be at Bee Crafty today preparing for next weekends workshop.
I wanted to remind you all of the year long Simple things project over at It's a creative world, this months word is 'achievement' and here is my offering
accompanied by my 'better late than never' entry for last months word 'graciousness'
(I had to gracefully admit time got the better of me!) Pop on over and see my full whittering in the post and also to be inspired by the other creative girls!
I'll see you all soon ... no really I will, lots to share :) so until then as ever Happy Crafting!
Love
M x
Labels:
bee crafty,
craft workshops,
IACW,
it's a creative world
Friday, 16 July 2010
Love those meeces to pieces!
Hi all!
Still alive here :) just busy, busy!!!
Just wanted to pop in and drop this off
Todays project from Moi over at It's a creative world and full destructions can be seen in my post over there. A really fun, quick easy little sewing project ... I know me sewing but I had the urge LOL (and I use the term sewing loosely!! They're 'shabby chic' LOL)
This past few weeks has seen a few new things for me to play with, not least the Serif Digital scrapbook artist 2 which I LOVE and took on Create and Craft TV for the pick of the week at the beginning of the month even though it only survived 44 hours and 42 minutes before selling out :) It really is awesome and I will post a few of my creations and more info very soon when I have a little more time!
At the moment I am prepping for a Purple Cows show (that I will probably have done by the time you read this!) on Create and Craft today and I have to leave here at 4am for an 8am show ouch!! Can't wait for you to see the birthday cake I have made with the trimmer though ... I love it even if I say so myself LOL
Since I was here last I also saw my husband for a whole 6 days and actually took some time off for a picnic and dinner out shock horror, oh and the boys have had hair cuts ... Oliver has dramatically shrunk LOL but more of all that and pics in the next real life post I do ... soon... honest! and it will be full of pretty pictures and sneaks of the oh so yummy new Glitz lines (you can see them here if you can't wait! ... swoon!!!)
Sorry to type and dash but I must! I hope you're all well and happy and until very soon Happy Crafting!!
Love
M x
Tuesday, 6 July 2010
Pretty Distressing
Hi all
For my Glitz post this month I thought I'd share with you 2 classes I taught recently at the Scrapping Angels retreat. The idea behind these two projects is to show distressing can be pretty, especially with yummy Glitz products!
Love to Play
This layout uses the Maya range of papers specifically floral, stripe, damask and navy. I've also used the vintage winged rub ons and a stamp from the distressing stamp set. I've also added some hessian, stickles, acetate and faded jeans distress ink.
The picture frame is ripped out of a strip of the damask paper and ripped and torn back, behind the hole I have added another piece of the damask paper to create an illusion of the photo popping out of the paper.
The green side of the damask was a bit too clean for my layout so I used one of the oh so useful distress stamps and some faded jeans distress inks to break down the colour. The vintage winged rub on owl sat perfectly at the end of the strip and as in my last post I applied some of the butterflies to some acetate to create embellishments, however this time as it was a strong acetate I folded it in half to make the butterflies look like they were flying.
After copious amounts of distressing edges and folding them up my layout was completed with the super easy paper flowers made from scraps of the maya paper. They are simply irregular circles cut out and scrunched up, and I mean scrunched! The more you screw up the paper and break the fibres (especially as the Glitz papers are so thick) the more you can manipulate the circles into the flower shapes. A little button was added to the centre of each to finish them off. Lastly some stickles picked out little bits of the owl rub on and created a flourish at the top of the page.
My other class was a piece of home decor
Glitzy heart
A great way to recycle those pizza boxes we all seem to collect LOL. I used the Distressed couture range for this project, I love how chic it is! The papers are Floral, stripes, blocks, vines and polka. I also used one of the fun Vintage love whatnots, some clear frosting, a rub on frame, a paper layer and the chic little dress form stamp.
The papers were torn and ditressed into strips, layered up and sewn together on my machine. I then stuck them to a piece of stripped corrugated card. The base of the heart is some more stripped corrugated card and some distressed paper hearts added on top, made in a similar way to the flowers in my love to play layout.
The dress form I stamped onto some of the paper and embossed it with a black enamel. I layered up the paper layer, the rub on and the hearts adding the whatnot and some ribbon and lace under the heart before adhering.
The finishing couture look was to add a kilt pin and some charms, along with some frosting for blingy good measure!
I love how the Glitz products work just aswell for home decor as they do for scrapping and card making ... what will you create with your Glitzy goodness?
Thanks for stopping by and until soon Happy Crafting
Love
M x
Monday, 5 July 2010
A colour focus
Hi all
The first part of this months colour focus over at Banana Frog has gone live today and my offering is included so I thought I would share a quick step by step and some more photos with you, but be sure to check out how all the oter froglets interpreted the colours this month .. I know you'll be inspired!!
So here is my offering
No not the fizz but the glasses LOL remember my boring garden table transformation for the blog hop on the 30th June? Well these are the accessories I spoke of!
I have just used some cheap wine glasses, the totally tropical stamp set and the ever so cute tadpole set tropical taste along with the summery coloured stayz on that match the poster we were given as the inspiration.
Hold the stapm in your hand for this project, as they are acrylic you can mould them around most shapes. Again I have mixed ink colours on my stamps.
I found it easier to have the glass upside down to work on and started with the tadpole flower flourish around the base.
I then built up the design the same way I did on my table using the larger flower in the tadpole set
then the smaller flower
and then as a finishing touch I used the largest single flower from the full size stamp set to add a detail to the base of the glass.
And that's it super simple and super quick but I think they look quite 'chic' especially as the glasses only cost 79p for all 4 LOL. What can you jazz up with your Banana Frog stamps?
I hope you're all well and happy, thanks for stopping by and until soon
Happy Crafting :)
Love
M x
Subscribe to:
Posts (Atom)