Saturday 25 December 2010

A froggy Happy Christmas

Hi all!
MERRY CHRISTMAS!!! I hope you're all having a lovely day with family and friends and over indulging to the max ... hopefully I'm doing the same :)

However the world of crafting doesn't stop for anyone ... well why should it? and today I have a project over at the Lily pad


A festive indulgence for your New year party table .... as ever step by steps are on the Banana Frog blog, enjoy!

As I don't know if I'll make it back before the 31st I'll post a quick Happy New Year to you all here. Thanks for all your support and cyber friendship in 2010 and here's to a very happy, peaceful, prosperous and healthy 2011 to us all!

If I don't *see you* before I'll see you next year and as ever Happy Crafting
Much seasonal love
M x

Monday 20 December 2010

Festive Glitzy fun

Hi all, with the festive season upon us I thought I would share some fun and festive glitziness with you;


Happy Christmas
I love creating collages and paper dolls, my Christmas card last year was a print from a paper doll collage I made so I thought I’d do the same again this year, especially with all the gorgeous Glitz colours to play with. These collage projects are great for using up all the scraps we all keep and I have used a veritable feast of Glitzyness in this project so with a deep breath here is my shopping list;

Glitz Designs Love Nest papers; stripe, floral, polka and sky
Glitz Designs Scarlett papers; polka and stripe
Glitz Designs Hoopla papers; floral and polka
Glitz Designs Hoopla GlitzersGlitz Designs Hoopla cardstock stickers; titles
Glitz Designs frosting; pink/clear
Glitz Designs Glitzers; circles
Glitz Designs Teeny Alphas; Red block


Phew! I have scrapped this page in A4 UK size (which is about 8 ¼’’ x 11 ¾’’) I sketched out my scene and then pieced my papers together to create a background on the Love Nest stripe base. Using a decorative cutter on different green papers I cut strips for my tree layers and used the bunting from the hoopla cardstock titles in the top corner, I cut the strip to allow me to ‘curve’ the bunting on the page.


I then decorated the tree with the circle glitzers (I love Glitzer stickers, with a clear base you can see through and bling encapsulated in them they are so easy to use!) I also added some pink frosting for extra sparkle.


I made some parcels, stacking them up and adding contrasting ribbons, inking all the edges to add definition.


I then made my paperdolls using white card and coloured them in with pencils and making clothes from my selection of Glitz papers, inking edges to create shape. I printed head shots of me and my husband to go on the dolls.


After dressing the dolls I added them to my page on foam pads for extra dimension.


I added further decoration to my scene with Glitz frosting gems on the shoes and the hats, a star for the tree and the balloons from the Hoopla Glitzers.


Of course a family scene wouldn’t be complete without Stan and Ollie so I printed out a small photo of the dogs, cut them out and made antlers for them. I added my title using the teeny alphas and sat the boys on top of the letters.


With a bit of extra bling here and there and final touches my fun festive scene was complete, well it makes me smile!


I will scan my page and create prints for the front of my card blanks and send out some festive Glitzy fun to my family and friends for Christmas. What will you create today that will put a Glitzy smile on your face? Whatever it is I would like to take this opportunity to wish you all a very happy and safe Christmas and may all your festive wishes come true. I’ll see you soon and until then, as ever, Happy Crafting
Love
M x

Friday 10 December 2010

A Glitzy Hoopla winter

Hi all, I am so enjoying playing with all the new Glitz lines and fun products that they have brought to us. Hoopla is a really fresh and funky collection that is perfect for recording birthday and celebration memories, but also perfect for lots of other projects like this wintery offering I have for you today.


My beautiful captor

This page is a record of the 10 days I was trapped in our village in January this year due to a sudden heavy snow fall, it was very beautiful looking at the snow laden trees on the lane and Stanley my dog loved playing in the fields but it was very isolating and oh so cold! I think the colours of the hoopla collection lend themselves very well to the wintery subject and here is my Glitzy shopping list:

Glitz Designs Hoopla papers; Polka, pipework and frames
Glitz Designs Hoopla cardstock stickers; journaling
Glitz Designs Fancy frames rub ons
Glitz Designs Pom Poms; white/red/pink
Glitz Designs Tulle; Aqua
Glitz Designs giant rhinestones; green


I love the pattern of the pipework paper that I used as my base, there’s so much to look at in one piece of paper! I used a strip of the polka paper to give my photo grounding on the page and added a fancy frame rub on to further create a focal point to be built on, while also tying in the black around the edges of the patterned paper.


Next I cut off a length of the aqua tulle from the 12’’ long strip. I think this card of lovely coloured tulle is so much fun to play with and has so much potential to be used in different ways. I used some white acrylic paint to adhere my tulle to the page while also creating a snowy feel to the material. Because acrylic paint is a plastic based paint it is great to use as a decorative adhesive, just be patient waiting for the blobs of paint to start drying! Scrunching the tulle up also adds texture and intensifies the colour of it in places.


To tie in the use of the paint I also added it quite roughly to the bottom corner of the paper strip and to the top right corner of the page.


Using the lovely blue colour on the reverse of the frames paper I created a distressed mat for my photo and then had a play with the fun new pom poms. Using the white pom poms as snowballs I tied a loop in the cord that I hooked over the top corner of my photo, securing with some silicon glue and tucking a little of the cord behind. I trimmed off the excess cord to use later.


In the bottom right hand corner of the page I created a small embellishment for my journaling using one of the card stock stickers and scraps of paper to tie the page together as well as adding in some ribbon and lace that I used under the main photo and the little bit of excess cord I trimmed from my pom poms.


Using more scraps from the frames and polka paper I punched out some snowflakes and brushed them with some stickles for extra wintery sparkle ....


.... adding them in clusters around my layout, making a main feature under the corner of the photo by using 2 of the fabulous Glitz Designs giant rhinestones in the prettiest green colour alongside them.


Finally adding my jounalling to record the memory, my wintery page was complete. Glitz products come in such pretty colours and all co-ordinate beautifully and I really enjoyed working with the colours in the Hoopla line, by playing on the turquoise and aqua colours a seemingly bright and spring coloured collection can look quite wintery and I hope you have fun recording some Glitzy winter memories this year!
As ever thanks for stopping by, and if the temperature is starting to plummet with you stay wrapped up, safe and warm, see you soon with a Glitzy festive offering and until then Happy Crafting
Love
M x

Thursday 9 December 2010

Purple festivities

Hi all

I hope you're all keeping warm and safe! This weather is bonkers isn't it? Luckily I haven't had the snow but I know family and friends who are so over the white stuff .... thinking of you all!

I thought I'd share some colourful festive pieces with you tobrighten yur day with the main colour being purple of course ... purple for Purple cows and today I have some projects to share over there ...


.... as always I got very carried away with my freestyle mouse and 2 in 1 combo trimmer LOL and don't forget you can downlaod the PDF instructions for FREE from Sadie so why not mosey on over and have a look :)and don't tell Sadie I told you as I'm sworn to secrecy but there are some amazing new products coming out next year .... I can't wait for you to see them!

Right I'm off to light the fire, put on a few more layers of clothing and write some Christmas cards, thanks for hopping by, stay safe and warm and as ever until soon happy crafting!
Love
M x

Thursday 2 December 2010

Putting on the Glitz

Hi all, today I’d like to share with you some ‘Glitz and glamour’ I have been lucky enough to be on the fabulous Glitz Design team for over a year now and every time I get my Glitz box out to play I find myself in the happiest of moods, not only is the product so edible to look at but the quality is second to none. Looking back over the last year of my time with Glitz I came across this project which was one of the first things I made with my first official Glitz DT box of goodies and as this time of year is all about looking back and being thankful I thought it would be fun to share it with you today.


Putting on the Glitz
It is a super simple handbag mini book that looks glamorous on my shelf as a piece of home decor and contains special memories of a birthday cruise I went on with my husband, the photos I will share in this post will explain the story as we go! Before we start, here is my shopping list;

Glitz Designs Plum Crazy papers; floral, stripe, polka, circles, chair and diamonds
Glitz Designs Plum Crazy cardstock stickers; titles and journaling
Glitz Designs Plum Crazy alpha cardstock stickers
Glitz Designs Olivia Glitzers
Glitz Designs flourish rub ons
Glitz Designs distressing round clear stamp


The front and back of the mini book are cut into a simple handbag shape and the 2 sides are linked with a concertina of paper with mounted photos stuck into each crease so when the bag is opened all the photos kind of fan out, it’s quite impressive in its simplicity!


I kept each page a 6’’x4’’ photo mounted onto some of the fabulous double sided paper. I cut it with a thin decorative edge showing behind the photo to add interest, and was able to journal on the reverse.


As I wanted the photo to be the main focus of each page I added some simple embellishments of lace and ribbon and a small piece of flourish rub on as well as a cream flower that I sprayed with an intense, very sparkly cosmic shimmer mist to each photo.


I kept the same simple embellishment of each photo throughout the book to create continuity


I used the fabulous round distress stamp on the reverse of each photo page to create a background pattern.


I then added cardstock stickers and hand cut and distressed journaling strips throughout to tell my story.


Although the end of the story may not be quite as glamorous as it set out LOL I love my little bag of Glitz and glamour as it reminds me of such a happy time and as it says in the sticker it makes me stop and remember sometimes how really Happy I am to be me!

I hope you feel inspired to create your own little piece of Glitzy glamour, a simple idea like this would make a great Christmas gift wouldn’t it! Thanks for stopping by and sharing a little reminisce with me. I’ll see you soon, until then Happy Crafting
Love
M x

Friday 26 November 2010

Lilypad lesson

Hi all

This is the last of my Banana Frog triple for now :) My Lily pad lesson for today


Me and you, canvas on canvas

Class is in session now over at the lilypad and over there you will find step by step instructions for stamping onto canvas, image transferring onto canvas and creating a bespoke piece of home decor to create your own canvas on canvas project


I love the dimension of this piece and it takes pride of place on a little easel on my bookcase in the front room now


Another bonus is the swirl stamp set that I have used is in the Banana Frog sale at half price, so you can grab a bargain to boot when you visit the Lilypad today :)

I hope you enjoy class and I hope you feel inspired. I'm off to start creating the next project to share with you ... whatever that may be :)

Thanks for stopping by, stay safe, well and happy and until soon Happy Crafting!
Love
M x

Thursday 25 November 2010

Project on the Lily pad

Hi all

Here's the second installment of my Banana Frog triple, today it is my turn to share a project of the day


I have expanded on my trick or treat bag from last month and gone all festive with some fab Christmas stamps (Retro baubles on sale now for just over £3, and loads of other goodies at crazy prices, it would be rude not to shop!) As ever hop on over to the Lily pad for the full blown step by step instructions to create some festive treat bags for yourself!

Ok I am hopping off myself to get my lesson at the Lilypad ready for tomorrow, class starts at 9am ... don't be late :)

As always I hope you're well and happy and until tomorrow Happy Crafting!
Love
M x

Wednesday 24 November 2010

A Froggy Autumn

Hi all,

It's the second installment of the Banana Frog sketch focus for this month and this is my offering


Hop on over to the Lilly pad and check out how the other froglets interpreted it but before you go I'd like to share a quick step by step of the layout I made.


I used some small leaves from 3 different stamp sets; totally tropical, tropical taste and build a daisy and arranged them in a pattern on a stamp block to create the pattern on the paper strip across the layout.


I tore a strip of cream card and using a clear embossing ink stamped a pattern of the leaves and then embossed them in gold.


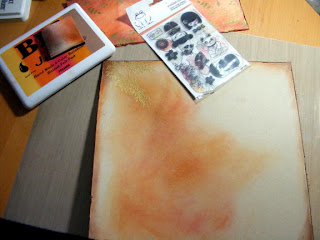
Using a spice big and juicy ink pad and some cut and dry foam I coloured the strip of stamped card with all the lovely spicey colours in the pad


Next I customised my 12x12 brown Kraft cardstock by distressing and inking the edges, coloring a block in the middle with some more ink from the big and juicy ink pad and stamping the cherry blossom stamp from the Banana Frog Kawaii Kokeshi stamp set in the top corner and then embossing it in gold


I stamped out my title using the rosecube alpha stamp set and mixing up the colours from the big and juicy ink pad, cutting them into letter tiles


And lastly my journalling block came from the totally tropical stamp set, cut out and distressed again with the spice ink


I assembled it all with some more torn cardstock in dark brown, some vintage lace and small photos mounted onto distressed mats of brown cardstock.


I love the autumny colours of the big and juicy ink pad and the gold embossing of the simple stamped images.

And that's it for today, what will you create with your Banana frog stamps and autumn colours? There's still time to hold onto autumn before the winter really sets in!

I hope you're well and happy, This is the start of a Banana Frog triple for me so I'll see you tomorrow with my project of the day, until then Happy Crafting
Love
M x

Tuesday 23 November 2010

Love abiding with Glitz Designs

Hi all,
Today I get to share some more Glitzy goodness with you ... I am so lucky to get to play with the amazing Glitz products and new lines and I am so lucky to be married to a wonderful man. 19 years ago I met my soul mate and 11 years ago this month I got to marry him. It has become a little tradition of mine over the years that I scrap a page of us then and now, this year my page was prompted by the Scarlett paper layer I’ve used.... a perfect sentiment and a perfect Glitz line!


Love Abiding

Glitz Designs Scarlett papers; Wallpaper, Polka, Bouquet
Glitz Designs Scarlett Paper Layers
Glitz Designs Scarlett Rub ons
Glitz Designs Scarlett Peek-a-boo
Glitz Designs Scarlett Glitzers

Now I have to confess I thought I would stick to the darker colours of the Scarlett line but I was drawn to the yellow side of the Bouquet paper so much I had to use it, which scared me a little as I think this is the first time ever that I have scrapped with these colours, but do you know what? I loved using a different colour palette, it was refreshing and so easy with everything co-ordinating within the line.


I cut the beautiful floral corner from the Bouquet paper, tore a strip from the green polka of the same paper and a large green rectangle from the wallpaper 12 x 12(love that green!) For my page base, distressing edges and inking.


Layering it up I tried to make things overlap in places to meld it altogether.


I printed some small ‘then’ pictures of us in sepia and distressed them with my trusty nail file.


And printed a large ‘now’ picture of us in colour, matting it onto some of the bouquet paper, distressing the edges and curling them up to add dimension.


After layering the 3 small photos down the page I added one of the new embellishments to the Glitz family, a peek-a-boo, a pack of fun designs printed onto transparent film to overlay and layer up. I used the lovely frame one to pick out a photo of us on our wedding day, attaching the top right corner with silicon glue as this would be hidden by the main photo.


To tack the opposite corner of the peek-a-boo down I used some of the pretty Scarlett Glitzers, they tie in beautifully with my floral corner and also add the perfect amount of bling (those crystals are encapsulated within the stickers, so easy to use!) while acting as a fastener.


I ripped the bottom and one side of the paper layer which started this layout and inked the edges before simply adhering it to the page to sit under my main photo which was added on foam pads to make it stand out.


Lastly, to tie in the floral bottom corner of my page and to add an interest to a bare, sharp corner of the main photo I applied a rub on to a piece of acetate and cut it out, the rub ons are so super strong and beautifully detailed they are great to create your own embellishments, adding them to acetate allows you to use them in other ways than just flat.


I added it to the top corner of my photo on foam pads, added a bit of handwritten journaling to the top left corner and voila there is this year’s then and now layout.


A complete departure on the colour front for me but I love it and I also love the fact that everything on this page is from Glitz and all from one line to boot!

I hope you’re having as much fun as me creating with the new Glitz products! Thanks for stopping by and I’d like to take this opportunity to wish all my Family and friends in America a very happy and peaceful thanksgiving. Until soon, Happy Crafting!
Love
M x