Monday, 4 July 2011

Happy Scrappy stamping!

Hi all.

I cannot believe how fast time is going again and that we are already in July! I've also been rubbish at keeping in touch with you all I know, life is super busy but very exciting though. I WILL get into a better routine and pop into my little corner of blogdom a bit more often .... honest :)

Ok, so today is my project of the day over at Banana Frog, inspired by a glorious summer morning I made a 'happy card'


As ever the step by steps are over on the Lily pad and all the stamps I have used are in the sale so why not grab yourself a bargain treat or two while you visit!

Talking of projects of the day I had a lovely email from a lovely lady from across the pond the other day. She owns a FAB website called All free Holiday crafts, there are loads of great projects over there and lots of inspiration for all manner of holidays and celebrations and all free! (I spent far too long having a happy trawl around over there!) Go and check it out, and while you're there see if you can spot this


My Project of the day that went live on the Lily pad on Xmas day last year. I was thrilled skinny (oh there's a dream way to lose weight LOL) and very flattered when she asked permission to use my project on the site, maybe some more will pop up :)

Things are good at Mogford towers, busy as I said and full of craftiness that I hope to share soon!

The boys are good too


It's been a while since they made an appearance here hasn't it, haven't they grown!

Plans are afoot to take my website off line soon to give it a much needed face lift and update and I really want to re decorate here too .... now if only my old nemesis Mr time would slow down a little maybe I'll actually get there!!!

Thanks for popping by, I hope you're all well and happy and until soon Happy Crafting

Love
M x

Tuesday, 28 June 2011

A {tweet} project

Hi all
Last month I had the pleasure of teaching at the Scrap-a-Mia retreat and loved being able to share some of the Glitz Designs papers from the Aftenoon Muse line with the delegates. This is what I created;


A scrappy piece of home decor.

When you look closely there are so many colours in the Afternoon Muse line we were able to mix things up a bit so everyone could have a colour scheme that suited them from lilac to peach!


We constructed the cage from mountboard, covering it in paint and stamps and the Glitz papers made the pop up frame in the centre which was double sided so it looks good from all angles.


With the addition of some elements sheets put together from old scraps and some handmade net flowers there was a veritable feast of birdcages to coo over.

Remember somtimes when you look at pattern paper really look at it to see what other colours are lurking and also don't always see it as a solid sheet of pattern, imagine small flashes of it within a project and you'll be surprised how different that one piece of paper can look!

Thanks for stopping by, I'll be back soon, until then Happy Crafting
Love
M x

Papers used;
Glitz Designs Afternoon Muse; Stripe, Banner and Polka

Friday, 17 June 2011

Designer Friday over at the pasture!

Hi all

It's Designer Friday over at the pasture and today is my turn to share a purple cows project using the some of the new Craft Geek tools ..... they're so cool!


I've created some bespoke designer papers using the punch its and roll it and smooch spritzers


it was so addictive once I got going and I had a happy messy afternoon creating :)


Pop on over to Sadies brand new blog for some step by step pics and come back soon to see the project I created with them ... I love it!

I hope you're well and happy, I'm busy creating some stuff I'm really rather proud of and will hopefully be able to share soon ... until then Happy Crafting!

Love M x

Sunday, 12 June 2011

July Craft stamper

Hi all

Just dropping by to let you know that the fabulous craft stamper magazine July issue is available now


It is packed with some lovely projects and loads of inspiration and oh yes a little project from me!!


It's an altered book special and is well worth getting hold of... happy reading :)

Lots of painty, doodly things going on in the art tart studio at the moment, plans are a foot and I can't wait to share them all with you, needless to say (while I keep you all in suspenders) I'm having a super, jolly, crafty time :)

I hope you're all well and happy, I'll be back soon, until then happy crafting
Love M x

Tuesday, 7 June 2011

A Glitzy Beach hut and a Glitzy dad!!

Hi all, for my Glitz offering this month I decided to swap one of my layouts for something a little different ....


Oh I do love to be beside the seaside!! And the fabulous Afternoon muse papers with a few other Glitzy bits from the other lines were perfect to create my little piece of summery home decor ... here's the ingredients;
Glitz Designs Afternoon Muse papers; Stripe, Polka, Floral, Block and Carte Postal
Glitz Designs Laced with Grace paper; plaid
Glitz Designs Afternoon Muse Glitzers
Glitz Designs Love Games Paper layers
Glitz Designs Love Games cardstock stickers - titles
Glitz Designs clear distressing stamps set 3


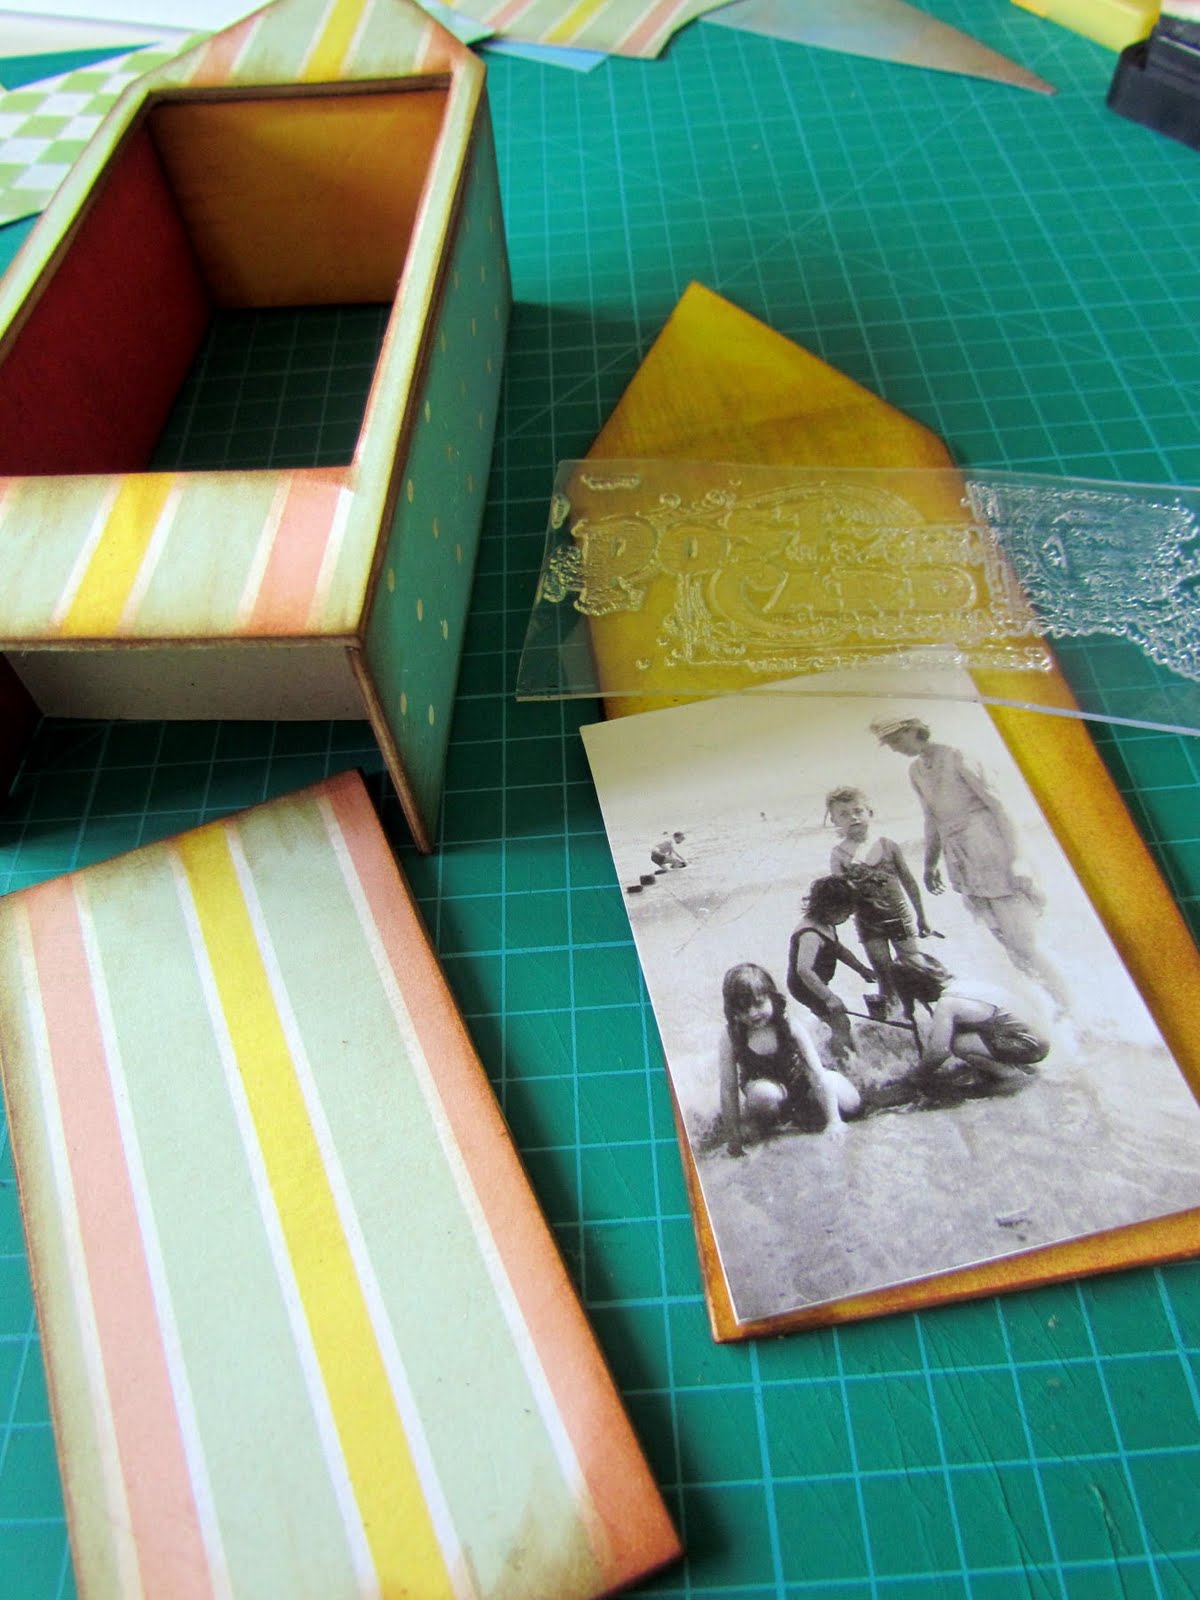
I cut out my pieces for construction from some chipboard...


...then covered them with the yummy papers on both sides and started to construct. Before I attached the back of the hut I decorated the inside of the back panel with a Glitz stamp, my family photo and some material for texture.


After attaching the back of the hut I decorated the door and added a hinge down the left side made from a strip of patterned paper folded in half.


For the roof tiles I cut the green diamonds from the reverse side of the Carte postal paper, cut them in half and layered them up on the roof, adding the bunting cut from the paper layer to the front.


I added some little trinkets inside the hut and added a small step to the front finishing it all off with the cardstock sticker on the inside of the door. I hope you've enjoyed my little trip to the seaside. Next I'd like to introduce you to a very special man in my life ...


...My Dad! As it's fathers day this month we are celebrating the special fellas in our lives over at Glitz and the Love Games line fits perfectly with this rare photo of my dad not making a cheesy grin at the camera! Here's what I used;
Glitz Designs Love Games papers; polka, stripe, damask, floral
Glitz Designs Love Games cardstock stickers; titles and journalling
Glitz Designs Love Games paper layers
Glitz Designs Afternoon Muse glitzers
Glitz Designs Love Games whatnots
Glitz Designs teeny alphas; Burnt orange and cream
Glitz Designs Run on fancy frames


I started with a bit of distressing, well I would wouldn't I! and decided to go with the lovely black side of the Love Games floral paper as my base, adding in a little red insert with the polka paper to match the mount I created for the photo.


I built up layers of paper, paper pleats, rub ons and some hessian for texture.


My top tip when using the fabulous Glitz whatnots and stickers, if you only want to have a bit peaking out, cut them so you get the rest to use on another project.


Adding the teeny alphas (LOVE these!) for my title...


... I finished off the layout by circling the relevant words on the paper layer for my journalling. I think this layout will go on an easel on the side in my house, the Love games papes are so stylish and I want everyone to know how much I love my dad!

Thanks for letting me share my Glitzy projects with you and thanks for stopping by. I'll see you soon,until then Happy Crafting
Love
M x

Saturday, 4 June 2011

Glue stick embossing!

Hi all, today it's my turn to share a project over on the Banana Frog Lilypad.


It's a technique based project using a glue stick for that distressed embossing look. Step by step photos are on the frog blog, so why not hop on over and take a peak and get creating with your glue stick!!

I hope you're well and happy, life has been busy in Mogford towers as usual but hopefully one of these days I will keep my promise to come back and have a chat ... you never know stranger things have happened :)

Until soon Happy Crafting
Love
M x

Monday, 30 May 2011

{happy birthday} froggity blog hop

Hi all
Well that's another month gone and time for another Banana Frog blog hop, can you believe we're nearly half way through the year!! Anyway this months blog hop is a special one .... it's the little green guys birthday and what's a birthday without some cake?


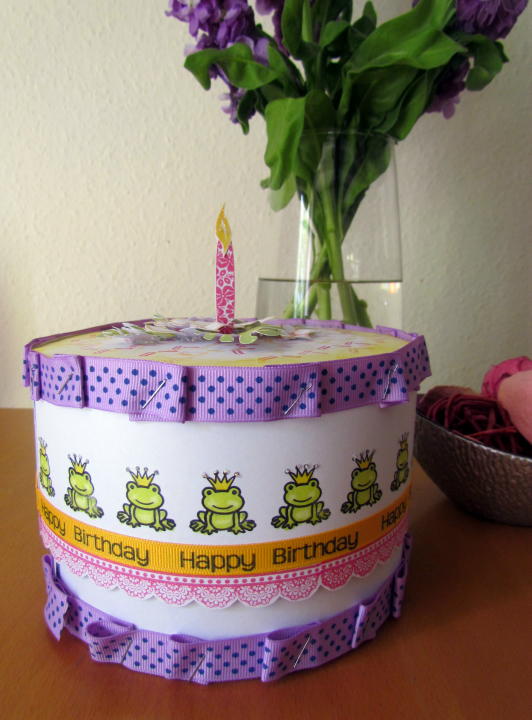
And better still this one is calorie free :) and doubles up as a great gift box! I have used a veritable feast of Frog stamps for this project Charming prince, Tropical garden, Build a daisy, Simple greetings, That takes the cake and It's all about elegance (psssst all these stamps are on sale, go on treat yourself ;))


1st up I cut a strip of white card for the lid and stamped along the bottom edge with the lace trim from It's all about elegance and trimmed to the pattern. Then added the greeting from simple greetings along some ribbon with permanent ink sticking it along the strip above the stamped lace trim.


Next thing was, what else but, the cute little frog from Charming prince, again stamped with permanent ink so I could colour them in with my pro markers.


I cut a wider strip of white card for the base of the box and added a purple trim to the bottom of it and along the top of the top strip of card using a stapler to pleat it as I went to give a look of piped icing.


I then added some bling to the crowns with glitter glue.


Cutting a circle with dragons teeth for the top and bottom of the box I added pretty sprinkles to the top from the stamp in that takes the cake and inked the edges.


Using the totally tropical stamp set I stamped some leaves and flowers mixing the ink on the stamps to create shaded colouring. I used one of the petals from build a daisy to create the candle and one of the leaves stamped in yellow for the flame.


To make the candle stand up on the cake I cut it with some tabs on the bottom of the petal that were stuck to the underside of the top when it was in position.


The flowers and leaves were added with silicon glue and curled before sticking in place to add dimension.


And that's it a unique froggy birthday gift box :)

Thanks for hopping by today, your next stop on the hop is the fabulous Francine (I love her style) and don't forget to comment as you go there may be birthday prizes!! Enjoy the rest of the hop and I'll see you soon. Until then Happy Crafting
Love
M x