Showing posts with label paper craft. Show all posts

Sunday, 1 December 2013

Oh Christmas tree, Oh Christmas tree .....

How lovely are your suprises!

Hi folks
Well it's been a busy few days with life and putting together one of my DIY projects so you can create this ....


A Christmas tree surprise ..... what's the surprise?


it opens up to reveal a decorated Christmas tree complete with fairy lights and space to add your own special Christmas memories.

The project is available on line in my website shop at www.mjm-thearttart.com

But what is a DIY project I hear you cry. I created the idea of DIY projects a few years ago as a way of sharing a kind of workshop with you, I provide all the templates you need and full step by step instructions with oodles of photographs on the way and you use your own stash, that way you make the project in the colours and patterns you want without me inflicting my choices on you, after all we all have different tastes and what a dull world it would be if we didn't! And this DIY project goes a step further as I have added a new digi craft set of instructions for those of you that would like to create the project digitally with Serif Craft Artist 2 professional like this one


and again this set of instructions has a full step by step tutorial with lots of screen shots of me working on the programme.


Then you complete the project with the relevant steps from the paper craft instructions.

So fancy having a go and creating a very unique Christmas decoration full of memories that will take pride of place and return year after year? It would make a great Christmas present especially for a first Christmas for a baby or even a newly married couple, the beauty is you can make it however you want for whoever you want and as you have the templates you can make it again and again (and for those of you wondering if you can sell what you make then yes you can ;))

The project will be emailed to you in a zipped file so no postage, it will contain 3 PDF's a set of templates, a set of paper craft instructions (21 pages of instruction and full colour photo step by steps) and a set of digi craft instructions (42 pages of instruction and full colour screen shot photo step by steps) and it costs just £5.00. Whether you're a new crafter or a seasoned crafter you will love this project, it's easy and it's unique! Find it in my shop www.mjm-thearttart.com

Right folks I have to dash, hubs is home for a couple of days from panto and is waiting for a Sunday roast!!! I will be back soon, I hope you're well and happy.
as ever Happy Crafting
Love
MJM x

Monday, 18 April 2011

Glitzy Springtime and Bunnies

Hi all,
Spring is here and with it arrived a box of new goodies from Glitz Designs on my doorstep. It's contents made me smile as much as the blue skies, the flowers in the garden and the lambs in the field, the new lines are yumsville and I know you're going to LOVE the new stamp sets. So what better thing to scrap first than some Spring photos!


This layout is inspired by the beautiful Spring day today and the 'song' I have journalled. It is from one of my all time favourite films Willy Wonka and the chocolate factory (the original Gene Wilder version, love you Mr Depp but Gene rules this one!) and I sing it a lot at this time of year, but originally it came from As you like it by Willam Shakespeare and even then he was quoting from a celtic ballad 'it was a lover and his lass' ... hmmm best stop waffling and let you know what I used!

Glitz Designs Afternoon Muse papers; Banner, Stripe, Block, Floral, Carte Postal, Polka
Glitz Designs Laced with Grace paper; Butterflies
Glitz Designs Afternoon Muse and Love Games Clear Stamps
Glitz Designs Afternoon Muse Glitzers
Glitz Designs Afternoon Muse Paper Layers
Glitz Designs Teent Alphas; Burnt Orange, Cream, Bubble gum pink, aqua block, yellow block, apple green block
Glitz Designs Maya cardstock stickers


I cut out all the shapes I needed for the fields, rainbow and clouds etc distressing edges as I went. When doing a collage like this I use a plain 12 x 12 piece of cardstock to build it on so I don't waste too much of my precious paper (this also means it's a great way to use up scraps!) The colours and patterns of the afternoon muse papers are great for my happy spring collage, love that polka paper!


The hot air balloon and sun rays are made using the new stamps. So useful and so much fun not to mention brilliant stamps that give a great image every time.


I took some photos of the lambs in the field next to our house and cut them out to fit into my collage and cut out the photo of my nieces (a great way to lose a dodgy background)


With scissors still in hand I cut out lots of flowers from the floral paper even ones that were missing petals (as they are tucked under flowers in the design) and those around the edges as they still work when I layer everything up.


Once I'd layered all the flowers around my photo and tucked some behind the 'hills' I cut out some of the butterflies from the laced with grace paper, curled the wings and added them all over the collage.


Finally I set to with the teeny alphas. My favourite all time alphas ever and I LOVE the new additions to the line with their mixed up style of letters, the colours make my heart sing! I added some doodled journalling inbetween and doodled in places on my collage


and that was it done, a happy spring time layout with one of my favourite photos of my nieces. My second layout stays with my beautiful nieces and something else that happens at spring time ... Easter.


This is a record of a really fun Easter weekend spent with them and my sister. Decorating eggs, eating roast dinner and driving the girls crazy with a fiendishly clever Aunty Michelle treasure hunt LOL. Here are my ingredients;

Glitz Designs Laced with Grace papers; Rose, Stripe, Polka
Glitz Designs Afternoon Muse paper; Floral
Glitz Designs Laced with Grace Peek-a-boo
Glitz Designs Laced with Grace Clear Stamps
Glitz Designs Afternoon Muse Peek-a-boo
Glitz Designs Afternoon Muse Cardstock Stickers-titles
Glitz Designs Afternoon Muse Paper Layers
Glitz Designs Clear stamps Distressing set 2
Glitz Designs Teeny Alphas; cream


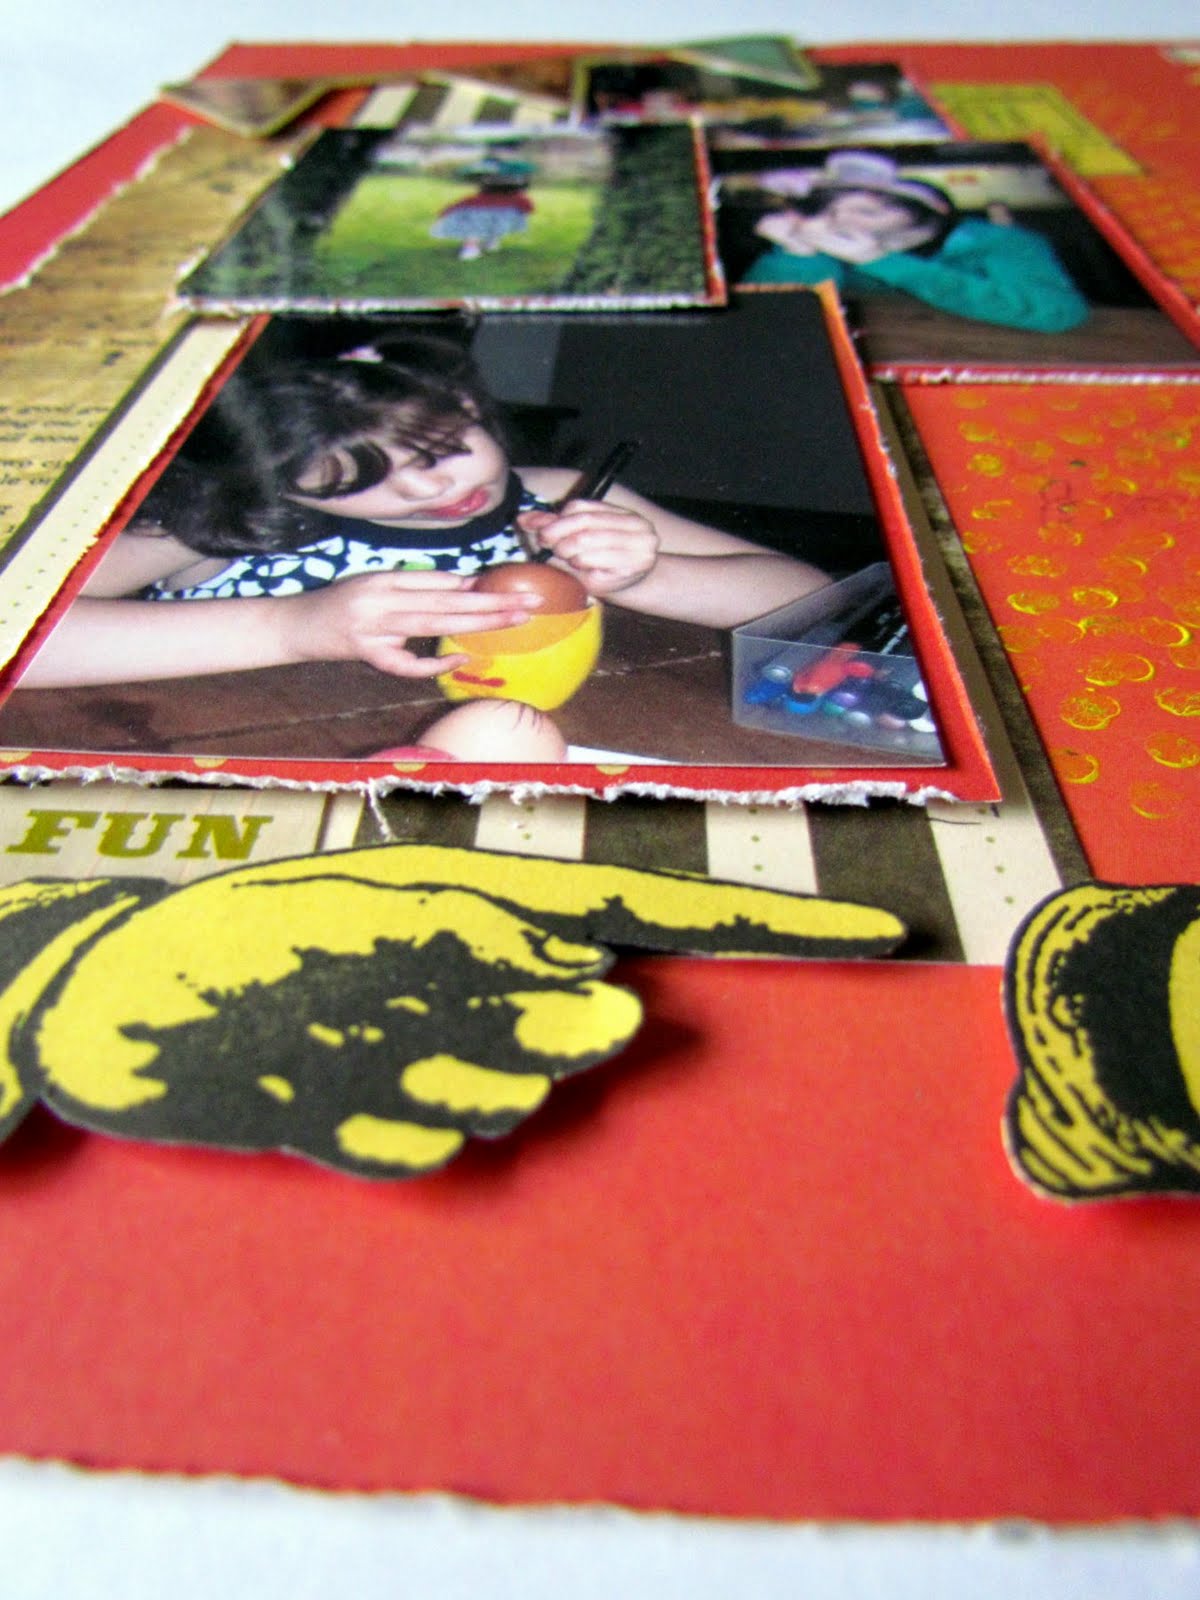
The orange tones with the playground imagery from Laced with Grace mixed with the Afternoon Muse yellow were perfect to tell my story. I broke up the orange 12 x 12 by stamping, using a distress stamp with yellow paint, around the area my photos would sit to tie everything all together.


I stamped images on to the yellow paper and also adhered one of the Afternoon Muse peek-a-boos onto it to pop it off the page.


I lifted my photos by matting them onto some of the polka paper and cut out the photo of my bunny eared niece to create a photo embellishment of my own.


I framed my cut out niece with a peek-a-boo from Laced with Grace and as it has a cut out centre I could pop her out of it on foam pads for dimension. I added an orange butterfly from the paper as an extra embellishment.


The cut out stamped images, cardstock stickers, a paper layer and those gorgeous teeny alphas finished off my layout. Another happy layout that makes me smile

So what new Glitzyness will you use to make you smile? .... warning! You will be spoilt for choice .... whatever it is please share it with us and now there is the perfect opportunity to show off your Glitz with the new Monthly challenge, see details here and get Glitzy and creative!

Thanks for stopping by and letting me share my projects with you. I hope you're all well and happy and enjoying Spring, until soon Happy Crafting
Love M x

Tuesday, 23 November 2010

Love abiding with Glitz Designs

Hi all,
Today I get to share some more Glitzy goodness with you ... I am so lucky to get to play with the amazing Glitz products and new lines and I am so lucky to be married to a wonderful man. 19 years ago I met my soul mate and 11 years ago this month I got to marry him. It has become a little tradition of mine over the years that I scrap a page of us then and now, this year my page was prompted by the Scarlett paper layer I’ve used.... a perfect sentiment and a perfect Glitz line!


Love Abiding

Glitz Designs Scarlett papers; Wallpaper, Polka, Bouquet
Glitz Designs Scarlett Paper Layers
Glitz Designs Scarlett Rub ons
Glitz Designs Scarlett Peek-a-boo
Glitz Designs Scarlett Glitzers

Now I have to confess I thought I would stick to the darker colours of the Scarlett line but I was drawn to the yellow side of the Bouquet paper so much I had to use it, which scared me a little as I think this is the first time ever that I have scrapped with these colours, but do you know what? I loved using a different colour palette, it was refreshing and so easy with everything co-ordinating within the line.


I cut the beautiful floral corner from the Bouquet paper, tore a strip from the green polka of the same paper and a large green rectangle from the wallpaper 12 x 12(love that green!) For my page base, distressing edges and inking.


Layering it up I tried to make things overlap in places to meld it altogether.


I printed some small ‘then’ pictures of us in sepia and distressed them with my trusty nail file.


And printed a large ‘now’ picture of us in colour, matting it onto some of the bouquet paper, distressing the edges and curling them up to add dimension.


After layering the 3 small photos down the page I added one of the new embellishments to the Glitz family, a peek-a-boo, a pack of fun designs printed onto transparent film to overlay and layer up. I used the lovely frame one to pick out a photo of us on our wedding day, attaching the top right corner with silicon glue as this would be hidden by the main photo.


To tack the opposite corner of the peek-a-boo down I used some of the pretty Scarlett Glitzers, they tie in beautifully with my floral corner and also add the perfect amount of bling (those crystals are encapsulated within the stickers, so easy to use!) while acting as a fastener.


I ripped the bottom and one side of the paper layer which started this layout and inked the edges before simply adhering it to the page to sit under my main photo which was added on foam pads to make it stand out.


Lastly, to tie in the floral bottom corner of my page and to add an interest to a bare, sharp corner of the main photo I applied a rub on to a piece of acetate and cut it out, the rub ons are so super strong and beautifully detailed they are great to create your own embellishments, adding them to acetate allows you to use them in other ways than just flat.


I added it to the top corner of my photo on foam pads, added a bit of handwritten journaling to the top left corner and voila there is this year’s then and now layout.


A complete departure on the colour front for me but I love it and I also love the fact that everything on this page is from Glitz and all from one line to boot!

I hope you’re having as much fun as me creating with the new Glitz products! Thanks for stopping by and I’d like to take this opportunity to wish all my Family and friends in America a very happy and peaceful thanksgiving. Until soon, Happy Crafting!
Love
M x

Friday, 19 November 2010

A Beautiful Glitzy Autumn

Hi all,
It’s that Glitzy time of the month again when I get to share a project with you AND some of the new goodies that the Oh so talented Glitz team have brought us. If it’s possible to be in love with paper products I am head over heels ... the biggest question is where to start! Which line, which exciting new embellishment to use?
To be honest I wanted to use it all but settled with a little ... for now!


Beautiful Autumn

We don’t have thanksgiving here in the UK but there are times in life that stop you in your tracks to give thanks for family, friends and moments like these. Driving home on bonfire night last year Mother Nature made me stop in my tracks, get out of the car and snap this pic on my mobile phone. Who needs a firework display to ‘oohhh’ and ‘ahhh’ at after you’ve seen this! I wanted to record it in a scrap page and the new Love Nest collection from Glitz Designs was the perfect choice.

Glitz Designs Love Nest papers; Polka, Sky, Damask and Floral
Glitz Designs Love Nest Rub ons
Glitz Designs Love Nest Cardstock stickers; Titles and Journalling
Glitz Designs Love Nest What Nots
Glitz Designs Tulle


I marked out an aperture, slightly smaller than the photo which I wanted to be central (unusual for me!) to take focus, and cut it out with a craft knife from the polka paper. I then ripped a square from the reverse of the sky paper (a fabulous scrunched up brown paper) to add a frame over the frame and ripped out the centre.


After ripping out the polka aperture, distressing paper edges and inking copiously I adhered the brown paper frame to the page and then ripped back into the polka aperture to roll and fold sections back.


To continue the optical illusion that the photo is popping out of the paper I then backed the aperture with the damask paper.


I added the photo into the frame on foam pads to add more dimension and used some words from the Love Nest titles, journaling and rub ons packs as well as adding the cute bird rub ons to fill the edge.


To pull some of the fabulous citrus green colour from the title stickers I tore a strip from the green side of the floral paper, I love how Glitz add contrasting colours that really pop in their collections so you can mix it up. I also tore another strip from the brown paper side of polka, inked them and attached them across my page with just enough green peeking out.


One of the new additions to the Glitz lines is the Tulle which comes in yummy colours, I used a strip of the brown attaching it across my page with brads and twisting it to add interest. I also twisted and tacked down the bit of tulle that would sit under my journaling block to add more shape (and also to make it easier to add the block!)


I sanded, distressed and inked the Love Nest What Not, I love that Glitz has brought out a set of What Nots to go with each new line, they’re so useful and so much fun!


I used the What Not for my journaling and added it to my page.


The finishing touches were some flowers and vines to reflect nature and to tie in all the elements of the page. And that’s it a record of a most amazing display from Mother Nature brought together beautifully with the new Love Nest line from Glitz.

That’s all from me for now, I’m off to delve back into my box of Glitzy goodness and create some more .... Now which line next? Scarlett or Hoopla? And Oh look at those peek-a-boos......

Thanks for stopping by, see you soon and until then Happy crafting!
Love
M x

Monday, 15 November 2010

It's a {thrifty} creative world

Hi all
Well here I am again .... so soon!! Today is my turn to share a project over at It's a Creative world, an inspirational blog full of wide and varied crafty inspiration and a great team of girls!

My project this month is a thrifty pretty


We all love those prima vines, but not so keen on the price! So pop on over to It's a creative world and follow my step by steps to have a go at making your own!


A great Christmas present for a crafty friend, unusual and bespoke, easy to make and as I said most importantly thrifty :) Enjoy!

Good to *see you* If I don't see you before I'll see you here on Friday with some delicious Glitzy goodness, and of course Wednesday on Create and Craft with Serif! Until then Happy Crafting
Love
M x

Thursday, 28 October 2010

A Glitzy Spooktacular

Hi all, well here I am again to share some more Glitzy goodness with you in the form of 2 spooktacular layouts with yummy Glitz Designs
As the Halloween season approaches I thought I would do a layout to record my Halloween celebration. The celebration stretches right back to pagan roots and is a time to celebrate the end of one year and the beginning of the next, in effect it is the new year celebration as well as a time to celebrate our ancestors and of course the rich harvest to see us through the dark winter months and it is known as


Samhain (pronounced sow-ein)

I love the mix of Purple and black for Halloween so what better line to use than Glitz Designs Plum Crazy, one of my all time favourites ... to date! Purple is such a hard colour to get right with papers and I think Glitz designs just hit the mark with this collection. Ok enough waffling this is my list of ingredients for my layout;
Glitz Designs Plum Crazy paper; Diamonds, chair, polka and stripe
Glitz Designs Plum Crazy journaling cardstock stickers
Glitz Designs Plum Crazy cardstock alphas
Glitz Designs Paisley flourish rub ons
Glitz Designs black damask rub on
Glitz Designs Distressing stamps; set two
Glitz Designs teeny alphas; round black.


I ripped the piece of chair paper in half roughly along the diagonal and distressed it all ... liberally! Using the text side of the paper it went across the base of the diamonds paper (also distressed of course!)


Before I adhered the lilac text paper to the base I worked on it. I used the alpha stickers to create my title but didn’t want them the strong plum colour that they are so I took some of the sticky off the back (by repeatedly sticking each letter to my jumper) and used the alphas as a stencil. As I had run out of some of the letters I cut around their outline on the sticker sheet so I could use the negative, I quite like the ethereal quality I got from mixing up the positive and negative alphas. I then used one of the distressing stamps and some black ink to stamp over my title and built up a ‘black mist’. Tip; to avoid getting a straight edge from the stamp I only applied ink to the centre, avoiding adding ink to the stamp edge. Once I was happy with the build up of black I removed the alpha stickers (remember Glitz Design stickers are really super sticky so really work at covering them in fluff before using this method!)


I then added a piece of the Damask rub on, this I ripped to avoid harsh edges, a little paisley flourish and then cut out the centre of two of the journaling card stock stickers to add later.


My photos are of my Halloween hearth, candles, crystals and offerings of food and wine, these I layered onto some distressed pieces of the polka paper


Lastly I added some ribbon, a strip of the stripe paper as a detail, some staples, the tiny alphas and my journaling which is a little bit of Samhain Lore.

And now I’d like to take you from the past to the present with all the colours of the autumn season.


Little Pumpkin

I love this photo of my cousins little boy over in the states last Halloween on his Pumpkin search. I’ve mixed it up a little with my supplies for this layout and here’s the list;
Glitz Designs Vintage Love papers; love letters and polka
Glitz Designs Kismet papers; brown and stripes
Glitz Designs Kismet journaling cardstock stickers
Glitz Designs Maya papers; damask and stripe
Glitz Designs Maya rub ons
Glitz Designs teeny alphas; brown round


I decided to use the 11’’ x 8.5’’ format for this layout for a change as I really wanted to focus the design around the photo. I layered up a strip of vintage love letters onto some kismet brown then these two onto the vintage love polka. All pieces were distressed and inked, that part of my design didn’t change!


I then added a torn strip of Kismet stripes paper, some ribbon for texture and then cut out the round journaling block from the Kismet stickers so I could keep the very fine line of the outer circle to use as well, so creating 3 circles from the one sticker.


Next I set to with my scissors and the coloured sides of the Maya damask and stripe paper and cut out some autumn leaves. I then inked the edges to define the shape and curled them with my fingers. (You could of course use punches or dies if you have them!)


I layered up the photos and the leaves, using silicon glue to give my leaves movement and added more ribbon for texture.


I added some leaves to the top corner of the photo for balance, added the teeny alphas and finally the Maya rub on birdie ....as it just seemed right :)

And that’s it my Spooktacular Glitzy offering for this month. Thanks for stopping by and whatever you get up to this Halloween may I wish you the warmest of Seasons greetings and Happy Crafting
Love
MJM x