Hi all
I've created another tutorial for you using digi kits from the Victoria Nelson collection using Craft Artist 2 professional. Remember you don't have to use the content I have or follow the design to the letter make it your own .... unleash your creativity.
This is the piece of home décor I am going to create
I created it on a 12 x 12 page set up and the finished piece is about 10 x 10. I have used the Victoria Nelson Bird Garden digi kit .... so pretty!
I added some material to my page and resized it almost to the edges, I then aligned it centrally with the vertical and horizontal buttons in the align tab bottom right, this meant that every layer would sit in exactly the right place as I aligned each one the same as I built up the design, even the circle punch that I dragged on a resized was aligned centrally every time. (If you hold the CTRL or control key down as you resize the punch it will stay perfectly circular for you!)
Before I punched the circle I added a decorative edge to the punch by going to the third tool bar while the punch was selected and from the scissor type drop down menu selected the bump edge and then increased the wavelength and amplitude values (play around with these to get the pattern you want, I always call it the smoothness and bumpiness :D) When I was happy I clicked punch on the bottom right corner and deleted the waste area.
I added two more layers of material in the same way, aligning them to the centre and adding shadows to bring the design to life.
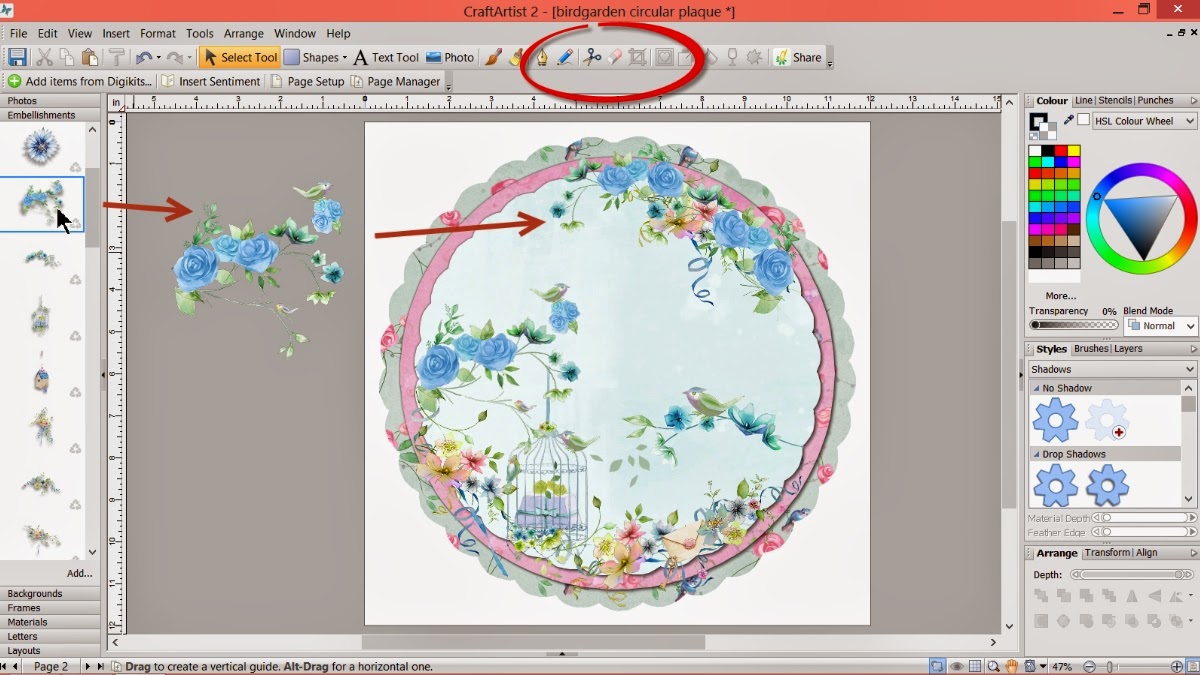
I then started adding the pretty embellishments to build my design ....
.... twisting things with the ball tool and flipping them if necessary with the tools in the arrange tab. I also erased away bits of the images if they didn't look right or over hung my design by selecting the embellishment and picking up the erase tool on the 2nd tool bar.
I added further detail with the envelope and keys embellishments after erasing away the bits I didn't want and re sizing them accordingly then adding them in place arranging them backwards via the arrange tab.
I continued to add detail to the top right of my design to balance it, again twisting etc as needed and erasing bits I didn't want ....
.... like the birds on the blue roses.
And lastly I added my quote using the text tool. Click on the A text tool button, click on your work space, choose a font and size and type then click edit points on the bottom right and push against the wrap text nodule to put the text in a line, clicking the centre button under the text tool button aligns the words accordingly. I also recoloured the lettering with the colour palette.
And that's it a pretty piece of home décor. You could just print it out and hang it on the wall, you could add it to a wooden plaque, you could print off the separate layers and hybrid it or add it into another design the choice is yours!
I hope you have enjoyed this tutorial and I thank you for popping by. I'll see you soon but maybe a little while longer than normal as I have some shows to prep for so bare with me ;) but until then, as always
Happy Crafting
Love
MJM x


Nice article and I like it, do not forget to visit back to my website pakar seo :)
ReplyDelete