Showing posts with label digital scrapbook. Show all posts

Tuesday, 14 October 2014

Craftscape inspiration part two

Hi all

As promised I am back with a few more of my sample pics from the recent Craftscape shows on Create and Craft using the new Craftscape digi kits from Daisy Trail and Craft Artist professional.

Following on from my last post when I shared pics from English Town, Autumn Country and Twilight Forest here are the other 3 kits in the collection starting with images from Country Garden

 
This cut out photo of my sis, my nieces my woofs and their sister was taken on the Yorkshire moors and this kit is brilliant for creating that expanse of rolling hills and beautiful blue skies

 
These scene kits are brilliant for creating posters and flyers and this one I mocked up to advertise some cream Teas yum! Great for small businesses and I can smell the scones wafting from the aga in that country cottage LOL. I used the transparency tool (the wine glass on the top tool bar) to blend the background scene so the text pops in the fore ground.

 
Another piece of home décor with a quote on it, perfect to create scenes to match your home décor and your mood!

 
A simple scene for the front of a card, there are a lot of elements in the scene but as the kits are so clever everything just merges together as one brilliantly!
 
 
as well as creating lovely inserts
 
Now we're going to the seaside ...

 
Another card which again shows you don't have to create a huge scene but a few elements used together can create a really striking design.
 
 
and you can go to town more on the insert

 
And then this card is creating a whole scene that leads your eye through and to the end of that pier into the lovely warm water ... sigh!
 
 
Using elements to then create the insert.

 
More work with the cut out studio allowed me to put hubs into a painting

 
and his niece and nephew into a scene. I really love this seaside kit, so many clever elements and a great one for home décor!
 
and finally to the other extreme we're off to the Winter Village kit, again so many clever elements with snow, snow banks, frosty tracks and pretty houses

 
I was able to cut out the scene behind my cousins and create a winter wonderland for them

 
This is the front of an aperture card ...
 
 
and this is the inside, like I said there is a project tutorial coming ;)


Not a scene in sight for this card but lovely elements from the kit on the pretty background create a stylish design

 
and then what about creating some Christmas place mats? I created the scene and once it was printed off and cut out I laminated it, you could even personalise each one from everyone coming to dinner as well as print smaller ones for drinks mats and don't stop there what about Christmas crackers made with the templates, place names etc, Christmas table sorted :D


And finally a very Christmassy and simple card that looked great with diamond Ice glitter once it was printed


with an insert to match :)
 
And that's all for now. I hope you feel inspired to have a go at some different projects and thanks for popping by.
 
I will be back soon with some projects and some other things to share, I hope you are well and happy. Until next time, as ever,
Happy Crafting
Love
MJM x

Sunday, 12 October 2014

Craftscape inspiration part one

Hi All

I am loving seeing all the work pop up in cyber space that you have all been creating with the new Craftscape kits from Daisy Trail to use with Craft Artist Professional, and from what I have seen it looks like you are really loving using them! They are fab aren't they and oh so clever! I had such a good time with the One Day wonder shows on Create & Craft when we launched them!

I thought I would share some of the samples I made and have split the pics into a couple of posts so they are not too big LOL I am also putting together a couple of project tutorials with the kits, although they are so easy to use you don't need to be told how to use them! But thought I'd share ideas on aperture cards and maybe one of the stepper cards I made .... bare with me they will be ready soon ;)

The first few images use the Autumn Country kit, such a lovely warm autumnal colour palette

 
I put the cut out studio to good use with these kits as I think the scenes lend themselves to having people put into them to create a story

 
They also really lend themselves to creating scenes for home decor

 
and of course they are great for card making! Also when you look at your kits don't always think you have to build a huge scene some of the individual elements put together make lovely simple images
 
 
and if your card making the kits are more than perfect to make your own stylish inserts with any of your digikits! (Don't forget your insert sentiment either when making inserts, there are lots pre installed and you can add your own .... I will cover this soon in a little project tutorial ;))
 
These next images are from the English Town kit, so many little details to play with from hanging baskets to pigeons, birds on a wire and a castle on a hill.

 
this is the front of a card but could be home décor too!

 
Another play in the cut out studio allowed me to add my sis to this one (she will kill me!) The photo isn't great as it is quite old from the Queens Silver Jubilee actually when she dressed as a Pearly Queen but photo quality doesn't bother me too much, its the story that matters and the smile it gives me when I remember the day!

This design I transferred to the front of a canvas shopping bag using t-shirt transfer material just remember if you have a go to flip the image before you print so the writing is the right way round :D

Another card, I found I really liked some of my designs without a background, the images are so vibrant they look really good against a plain white background I think.

 
One of my favourites was this mock poster I made, I want to go to that party! I created the scene for the background and then used the transparency tool on it (which looks like a wine glass on your top tool bar) to blend it into the background then built on top of that with more embellies and the text.
 
Next we're moving on to the Twilight Forest kit, I love it! When I start playing with it I am transported into a magical fairy realm and it's a lovely place to be!

Another card again using a few elements from the kit to create a tableau and using a white background so it pops off the page. I love the way the candles seem to light whatever is behind them, Oh and don't forget the glitter once these magical projects are printed off, they really are license to go to town with the bling :D
 
 
And once again don't forget to create your own designer inserts and something for the back of the card for that professional finish!

 
More fun in the cut out studio this time with my niece playing dress up, perfect for this kit!

 
This as a finished sample is an aperture card, I have just given you the flat front image for now and as I said I will be posting a project tutorial to show you how to make this into an aperture card, a simple but very effective project. I also think it works as this flat image too!

 
and finally a clock face I made ... I want to go into that house don't you?
 
 
So that's some of my ideas from 3 of the craft scape kits. I will continue to look out for all your fab projects in cyber space and hope I've maybe given you some more ideas to have a go at. Thanks for popping by and I'll post some of my pics from the other 3 Craftscape kits soon.
 
I hope you're well and happy and as ever
Happy Crafting
Love
MJM x


Monday, 6 October 2014

A catch up Mash up

Hi all

I thought I would drop by today with a bit of a catch up of bits and pieces since my last visit ... hence the title 'mash up' I have been doing so well being organised with my blog posts ... even shocked myself :D but life and work got the better of me the last couple of weeks and I missed my Cyber Monday date last week so here's a little of what I have been up to ;)

At the end of September I had a day in the studio at Create and Craft with ....


The Serif 2015 calendar collection, Cottage Arts (beautiful) Masks and Art backgrounds and the Daisy Trail 2014 collection (and of course Craft Artist 2 Professional) A perfect combination for creating Christmas pressies this year whether you use photos or not, and if you're doing Christmas craft fairs .... say no more :D (Calendars and DT collection unlimited angel policy as long as you create your designs yourself and cottage arts is 200 of one design ... fill your boots I say LOL)

I managed some Me time in my studio


and even if I say so myself I LOVE my flowerpots! One of those things that I look at and am really proud of! A bit of mixed media going on here with watercolour pencils and pastels (thanks to Cat Bennett for reminding me to mix it up in Greece!)

I then created a couple of projects that I really enjoyed doing for the Scrap365 blog


Hop on over (after you finish here :)) and check out the step by steps on the blog and let your imagination go and create some of your own Mexicana .... go on the sequins are calling!! And while you're there look at the right hand side at the top and grab yourself the FREE copy of our new digital magazine .... AMAZING!!!

Then it was more show prep time! Most of the time I work in my craft studio (yes I know I'm lucky to have my own room!) But sometimes I like to sit on the sofa and watch telly while I'm creating (the beauty of digi crafting!)


Sometimes though the woofs get bored :D step 1 ... the paws on the mat and the stare


Step 2 the half body on the mat and the stare under the eyebrows


Step 3 the 'you will pay attention to me' stare


Step 4 'ok I am going to sleep on your hand so you can't move it' LOL Ollie did get his own way eventually and I took them for a walk after getting Stan out of his bed where he had retired having abandoned all hope LOL

And what was I prepping for? The amazing craftscape collection which launched on Create and Craft on 2nd October


This is a page I made live on air with Dean Wilson as my guide :D (the text is using the font Galeforce as lots of you have asked!)


And this is one of my favourites from Twilight forest .... I will share more images and a project tutorial or two soon ;) I just love the kits ,I think they are genius and I can't wait to see what you all do with them!

And finally after the very busy launch I went to Seaton Carew with the boys for a walk on the beach the next day to clear the cobwebs


and beautiful it was too! Although rain was around it was a beautiful Autumn afternoon and the beach and sky just seemed to go on forever! These moments in time are so precious aren't they?

And that's it, all caught up so far, as I said I will be preparing some project tutorials soon and I have some frequently asked questions to answer! Thanks for popping by, I hope you are well and happy and as ever, until soon,
Happy Crafting
Love
MJM x

Thursday, 25 September 2014

Our Little Butterfly - A Craft Artist 2 project tutorial

Hi all

Here's another tutorial for you. I have used a digi kit from the Victoria Nelson collection I recently had on Create & Craft TV and it is created with Craft Artist 2 professional. As ever you don't have to use the content I have or indeed follow the design to the letter, I want you to be inspired to create with any of the digi kits you have and make it your own .... unleash your creativity. Maybe you will be inspired to do a real life page using my design for a scrap lift or combine the two and go hybrid.

This is the project I am creating today

Our Little Butterfly


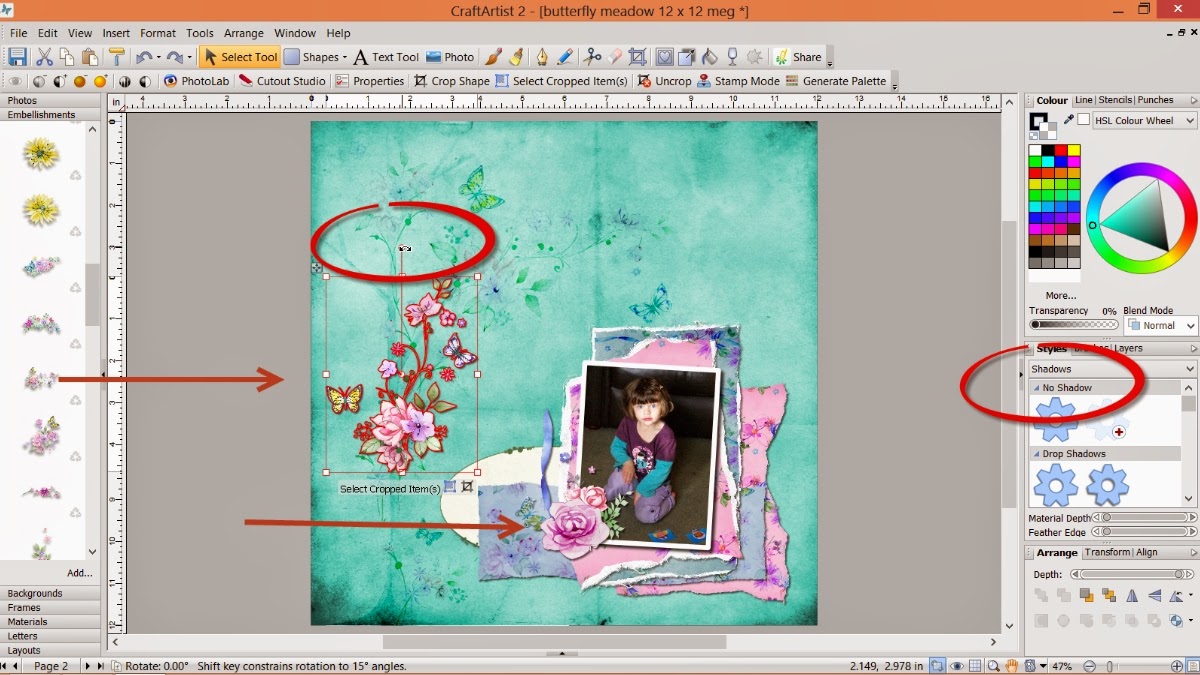
I used the Butterfly meadow digi kit and my page set up is a 12 x 12. I dragged and dropped the background in to place and then added the beautiful tree from the embellishments, dragging out the corners to resize it to the full height of the page.


While the tree was still selected I went to the blend mode tab found just under the colour box on the right and chose colour burn to blend the tree into the background so it added to my design but didn't dominate it. It also fills in the 'white space' that I intended to leave.


After clicking add at the bottom of the photo tab and adding my photograph I dragged it into position on my page, resized it to about 4'' x 3'' and then while it was still selected went to the styles tab on the right. From the drop down menu I selected lines and chose the heavy weight line which applied a line around my photo and then recoloured the line via the colour box. This is a way of framing a photo to make it pop without using an intelligent frame and without having to create a mat for it.


I wanted to maximise the use of the lovely materials in the kit and also add layers behind my photo to lift it. I dragged on some material and while it was selected I picked up the scissor tool on the top tool bar. I then proceeded to cut a random mat of the material (do this behind the photo so you can guage the size, I have it on the grey space in this picture so you can see what I did easier!) You need to cut of the material to off the material and click on the sections to discard. I used quite a raggy free form line to replicate a rip.


Once I had cut the mat and while it was still selected I went to the brushes tab on the right and chose edges from the drop down menu and then selected grunge to make the material look even more distressed. While it is all selected you can go to the line tab at the top on the right and increase or decrease the points value of the line to adjust the effect how you want it.


To further create the illusion of torn paper I then drew a rectangle with the shape tool and filled it with white, I sent it behind the pink material and roughly followed the cut lines again with the scissors. I then went back to the brushes > edges > grunge and increased the line (the shape you have drawn will increase in size when the effect is applied) I then pushed in the side nodes of the white shape so little bits could be seen around the edge of the pink material.


I drew an imaginary box around both layers with my cursor and then grouped the two layers together.


I positioned the pink mat behind the photo using the arrange tab and then repeated the above to create a purple mat behind it.


To create even more layers I roughly cut some more of the materials, adding the grunge edges as before but this time didn't add the white behind as this would have become too dominant in the design. I also at this point used the shadow section in the styles tab to add shadows to my layers to bring it all to life.


I then started to add some of the beautiful flower embellishments, turning them with the ball tool and flipping them with the horizontal and vertical buttons in the arrange tab, placing them around the photo to break up the hard lines.


I used one of the journal card ovals to lift the end of the material strip and recoloured the flourishes which I added behind the top edge of the mats, again to lift the colours.


I twisted and flipped some of the delicate long flower arrangements, putting the bulk of them behind the large rows to lead the eye across the design with the delicate twigs and flowers.


.... and then added ribbon from the Bird Garden kit, resizing it and following the horizontal line of the bottom of the photo, again leading the eye across the design.


I added some extra detail with a pearl and the metal heart and added the pretty tag from the kit to look like it is hanging from the top of the page, this pulls the eye up through the design and balances it out.


And lastly I added a bit of journaling using the text tool, writing it out, clicking edit points on the bottom and then wrapping the text into a line, using the centre button under the text tool to align it.


And that's it a pretty page with lots of layers. I have mentioned a few times about scrap lifting my designs if you want to and even I do that with my designs sometimes ;) These are a couple of alternative layouts I created following the same design.


 While you were sleeping is created using the Daisy Trail Butterfly Creations kit 
 
 
Be you is created using the Kreative by Karen Ruth digi kit.
 
 
Thanks for popping by and I hope you feel inspired to get creative. I will be back soon and hope you are all well and happy, until then, as ever
 
Happy Crafting

Love
MJM x